Introduction
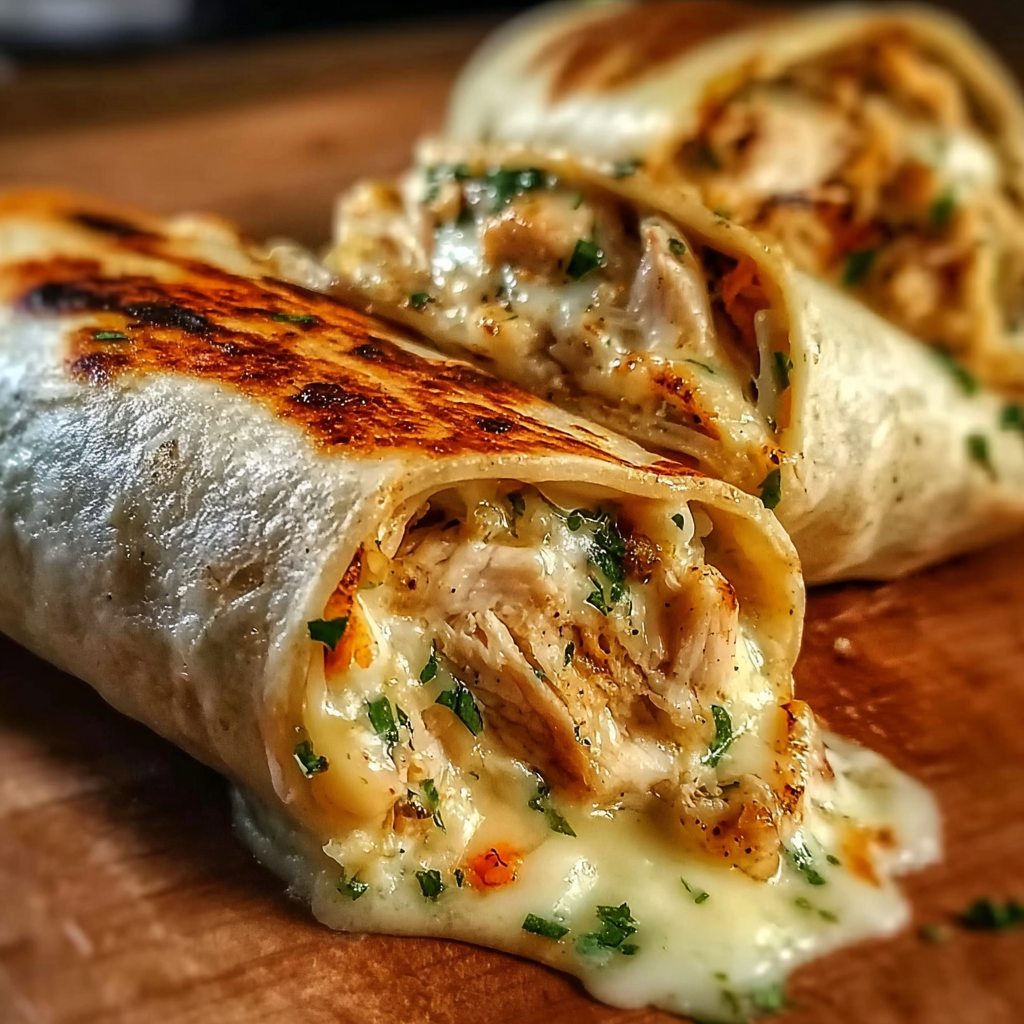
Cheesy Garlic Chicken Wraps are the kind of meal that makes weeknight cooking feel special. Packed with flavor, these wraps are perfect for anyone seeking a satisfying and quick dinner option. The creamy, cheesy chicken filling combined with the aromatic garlic will leave your taste buds wanting more.
What's more, they are incredibly versatile, allowing for personal tweaks that can suit your family’s preferences. Whether you're preparing a meal for the whole family or just for yourself, these wraps are sure to impress. Let’s explore how to create this mouthwatering dish that’s bound to become a favorite in your household.
Ingredients
- 2 cups cooked chicken, shredded
Using leftover rotisserie chicken or cooked chicken breast makes this recipe quick and easy. Shredded chicken adds a tender texture and is a great source of protein. - 1 cup shredded cheddar cheese
Cheddar cheese provides a rich, sharp flavor that melds beautifully with the garlic and chicken. It also contributes creaminess and helps bind the filling together. - 3 tablespoons cream cheese, softened
Cream cheese adds a velvety richness to the filling, making it creamy and easy to spread. It enhances the overall flavor profile by balancing the sharpness of the cheddar. - 3 cloves garlic, minced
Garlic is the star of this recipe, filling the wrap with a robust, aromatic flavor. Its fragrance complements the chicken and cheese, making every bite irresistible. - 1 teaspoon smoked paprika
Smoked paprika brings depth and a subtle smokiness to the wraps. This spice enhances the flavor while adding a beautiful color to the dish. - 1 tablespoon chopped fresh parsley
Fresh parsley serves as a garnish and adds a burst of color as well as a fresh, herbaceous note that brightens the rich flavors. - 4 large flour tortillas
Flour tortillas provide a soft yet sturdy base for the wraps, holding all the delicious filling together without breaking. - Salt and pepper, to taste
These basic seasonings allow you to customize the flavor of your filling, enhancing all the ingredients.
Directions & Preparation
Step 1: Prepare the filling mixture.
Start by combining the cooked chicken, cream cheese, cheddar cheese, minced garlic, smoked paprika, salt, and pepper in a mixing bowl. This step is crucial as it ensures that all the flavors meld together. The softened cream cheese allows for easy mixing, ensuring every piece of chicken is coated with the cheesy garlic goodness.
Step 2: Spoon filling onto tortillas.
Take a generous portion of the chicken filling and place it in the center of a tortilla. Be careful not to overfill, as this can make wrapping difficult. Ensure that the mixture is distributed evenly to allow for a consistent taste throughout your wrap. This is where the assembly begins!
Step 3: Wrap the tortillas.
Fold the sides of the tortilla inward, then roll it up tightly from the bottom. The goal is to create a snug wrap that will hold together when cooked. Wrapping properly ensures that the filling doesn't spill out during cooking, allowing for easier handling and a cleaner presentation.
Step 4: Heat a skillet.
Preheat a non-stick skillet over medium heat. This step is important as it prepares the cooking surface for the wraps, ensuring they get that delicious golden-brown crust while warming the filling. A well-heated skillet prevents the wraps from sticking and allows for even cooking.
Step 5: Cook the wraps until golden.
Place the wraps seam side down in the skillet and cook for about 3-4 minutes on each side until they turn golden brown and are heated through. This browning creates a delightful texture and flavor while ensuring the cheese inside melts and binds the filling together. Watch carefully to avoid burning.
Step 6: Slice and serve.
Once both sides are cooked to perfection, remove the wraps from the skillet and let them cool slightly before slicing them in half. Serving them warm allows for the gooey cheese to stretch invitingly from the center. These wraps are perfect for sharing, but you might not want to!

The Versatility of Cheesy Garlic Chicken Wraps
One of the best things about Cheesy Garlic Chicken Wraps is their versatility. You can easily adapt the filling to include vegetables like spinach, bell peppers, or even mushrooms for added nutrition and flavor. Additionally, substituting different types of cheese can offer a unique twist, making them an exciting option each time you prepare them.
Perfect Pairings with Wraps
These wraps are deliciously satisfying on their own, but pairing them with sides elevates the meal. Consider serving with a fresh salad, crispy fries, or a light soup to balance the richness of the creamy filling. Choosing complementary sides can enhance the overall dining experience, making your meal feel complete and well-rounded.
Making the Wraps Your Own
Customization is key when it comes to making these Cheesy Garlic Chicken Wraps your own. Feel free to experiment with different spices or add-ins like jalapeños, onions, or shredded carrots for added crunch and flavor. Such tweaks not only personalize the recipe but also provide an opportunity for you to cater to various taste preferences.
FAQs
What if my filling is too thick to spread?
If your filling is too thick, you can add a small amount of milk or broth to loosen it up. This will make it easier to spread and help achieve the desired creaminess.
Can I use pre-cooked frozen chicken for this recipe?
Absolutely! Just ensure that you thaw it thoroughly before mixing it with the other ingredients. This is a great way to save time.
What if the wraps fall apart while cooking?
To prevent this, ensure you're wrapping them tightly. If there's too much filling or they're overcooked, they may tear easily. Adjust how you fill and handle them to avoid this.
Can I make these wraps in a skillet instead of a griddle?
Yes, a skillet works wonderfully! Just make sure to monitor the heat to prevent any burning while ensuring they cook through.
What can I substitute for flour tortillas?
For a lower-carb option, try using lettuce leaves or whole grain wraps. Each alternative will give a different texture and flavor but can work nicely.
How do I know when my wraps are done cooking?
Look for a golden brown color on the outside and listen for a sizzling sound, indicating that they are crispy and the cheese is melty inside.
Can I add other proteins instead of chicken?
Certainly! Turkey, ham, or even a plant-based protein can be used as a substitute, making these wraps versatile for any dietary preference.
What should I do if my garlic flavor is too strong?
If the garlic flavor is overpowering, balance it by adding a bit more cream cheese or cheese to mellow it out. You can also add a pinch of sugar to offset the bitterness.
Conclusion
In summary, Cheesy Garlic Chicken Wraps are a delightfully easy meal option that doesn't compromise on flavor. With just a few ingredients, you can create a dish that feels indulgent yet simple to prepare.
Next time you're in a hurry or looking for something comforting, remember this recipe. Feel free to experiment with its many variations, making it a staple in your cooking repertoire.
Recipe Card
Deliciously Cheesy Garlic Chicken Wraps to Enjoy
Ingredients
Method
- Prepare the filling mixture.
- Spoon filling onto tortillas.
- Wrap the tortillas.
- Heat a skillet.
- Cook the wraps until golden.
- Slice and serve.
Notes
Additional serving suggestions: pair with a crisp salad, garlic bread, or roasted seasonal vegetables for balance.
For make-ahead, prep components separately and assemble just before heating to preserve texture.
Taste and adjust with acid (lemon/vinegar) and salt right at the end to wake up flavors.