Introduction
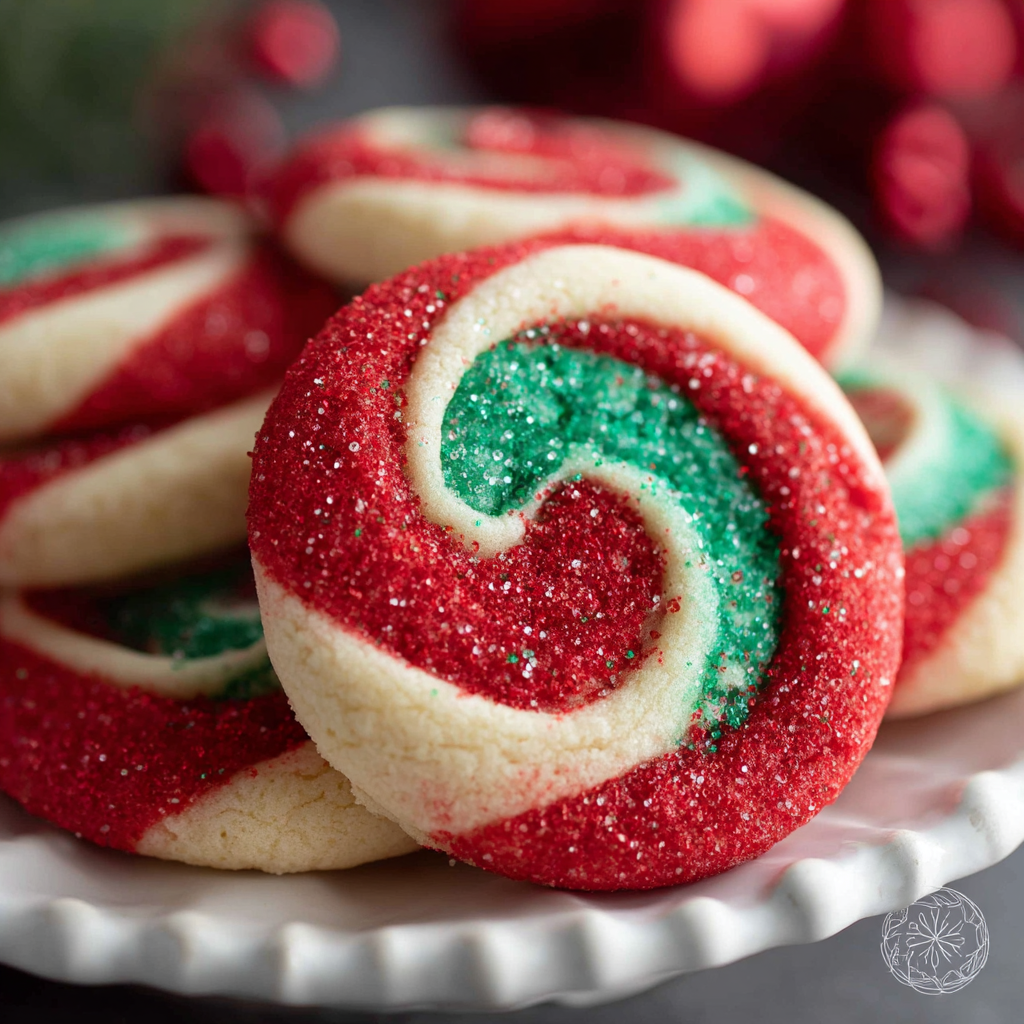
As the holiday season approaches, the aroma of baked goods fills the air, signaling the start of festive celebrations. Christmas Pinwheel Cookies are a delightful addition to any holiday cookie platter, offering a visual feast with their vibrant swirls of color and flavor. These cookies not only look stunning but also delight the palate with their buttery richness.
These charming cookies are versatile, allowing for an array of flavor combinations, from peppermint to chocolate. With a little creativity, you can personalize the filling to match your family's preferences. Pull out your rolling pin and get ready to spread some holiday cheer with these colorful treats!
Ingredients
- 2 1/2 cups all-purpose flour
This forms the base of the cookie dough, providing the necessary structure and stability. All-purpose flour allows the cookies to maintain a soft and tender texture while providing enough gluten for them to hold their shape. - 1 cup unsalted butter, softened
Butter contributes to the rich flavor and creamy texture of the cookies. Using unsalted butter gives you control over the overall saltiness, allowing the sweetness to shine through in the final product. - 1 cup granulated sugar
This ingredient sweetens the cookies and helps to create a delicate, crisp edge while keeping the inside chewy. Sugar also aids in browning, giving the cookies an appealing golden color. - 1 large egg
Eggs act as a binding agent, helping to hold the dough together. The protein in the egg also contributes to the cookie's height and texture, making them less dense. - 1 tsp vanilla extract
Vanilla extract adds warmth and depth to the flavor of the cookies. It balances the sweetness, enhancing the overall taste without overpowering the other flavors. - 1/4 tsp salt
Salt accentuates the sweetness while balancing the flavors in baked goods. It helps to bring out the natural flavors of the butter and sugar. - 1/2 cup cocoa powder
This ingredient brings a rich chocolate flavor and a beautiful contrast to the other swirls. Cocoa powder also adds depth and visual appeal, highlighting the pinwheel effect. - 1/2 cup powdered sugar
Powdered sugar is often added to the filling to achieve a sweet, smooth consistency. It helps to bind additional flavors, such as peppermint extract, without creating a grainy texture. - 1/2 tsp peppermint extract (optional)
Adding peppermint extract brings a refreshing holiday flavor to the pinwheel filling. This ingredient can enhance the festive nature of the cookies and pairs beautifully with chocolate.
Directions & Preparation
Step 1: Preheat your oven to 350°F (175°C).
Preheating the oven ensures that the cookies begin baking at the correct temperature. A properly heated oven helps to achieve an even bake, leading to perfectly cooked cookies with the right texture.
Step 2: In a bowl, beat the softened butter and granulated sugar together until fluffy.
Creaming the butter and sugar introduces air into the mixture, resulting in a light and airy cookie. This step is crucial for achieving the right texture and ensuring that the sugars dissolve properly, preventing graininess.
Step 3: Add the egg and vanilla extract to the creamed mixture and mix well.
Incorporating the egg and vanilla here enhances the moisture content and flavor of the dough. It's essential to mix this well so that the egg is fully integrated, which aids in the overall structure of the cookies.
Step 4: In a separate bowl, whisk together the flour, cocoa powder, and salt.
Sifting or whisking these dry ingredients together helps to distribute the cocoa and salt evenly throughout the flour, preventing clumps. This step ensures that each cookie gets a balanced flavor and texture.
Step 5: Gradually add the dry ingredients to the butter mixture, mixing until just combined.
Overmixing at this stage can lead to tougher cookies due to gluten development. Aim for a gentle mix, stopping as soon as the flour is incorporated to maintain a tender cookie.
Step 6: Divide the dough in half. To one half, add the cocoa powder and mix thoroughly.
This step creates the two flavors necessary for the pinwheel effect. By separating the dough, you ensure that the colors and flavors remain distinct, making the pinwheel visually appealing.
Step 7: Roll out both dough halves between sheets of parchment paper into rectangles.
Rolling out the dough between parchment helps prevent sticking and makes transferring easier. Aim for even layers to ensure consistent thickness, which will lead to even baking.
Step 8: Layer one rectangle on top of the other, then gently roll them into a log.
This step is crucial for achieving the pinwheel effect—by layering the contrasting doughs, you create the desired swirls. Be gentle when rolling to maintain the integrity of the layers.
Step 9: Wrap the log in plastic wrap and refrigerate for at least 30 minutes.
Chilling the dough firms it up, making it easier to slice into clean rounds. This step also helps enhance the flavors as the dough rests, ensuring a delicious result when baked.
Step 10: Slice the log into 1/4-inch rounds and place them on a baking sheet lined with parchment paper.
Uniform slicing ensures even baking; this is important because uneven cookies can result in some being overcooked while others remain raw. Keep the cookie shapes consistent for a polished look.
Step 11: Bake in the preheated oven for 10-12 minutes or until the edges are set.
Baking time is critical—too long will lead to dry cookies. The edges should be firm, while the centers may appear slightly soft; they will continue to firm up as they cool on the baking sheet.
Step 12: Allow the cookies to cool on the baking sheet for 5 minutes before transferring them to a wire rack.
Cooling the cookies on the baking sheet allows them to set fully and prevents them from breaking during transfer. Once moved to a wire rack, they can cool completely, ensuring the best texture.

Creative Filling Variations for Pinwheel Cookies
Pointing beyond the classic chocolate and vanilla swirls, you can experiment with different flavor combinations for your Christmas Pinwheel Cookies. Consider using fruit preserves, flavored extracts, or even colored frosting to create a unique filling that reflects your personal taste. Enjoy mixing different colors of dough for a vibrant presentation or try spices like cinnamon for an extra festive flair.
Perfecting the Swirl: Tips for a Stunning Presentation
Achieving the perfect pinwheel appearance comes down to patience and technique. When rolling the dough, ensure you maintain a tight but not overly forceful roll to retain the swirls' integrity. The more skilled you become at this technique, the more spectacular your pinwheels will look! Don't hesitate to embrace imperfections as part of the charm; each cookie is unique.
Enhancing Texture: Why Chilling is Crucial
Chilling the dough profoundly influences the final texture of your pinwheel cookies. It not only makes the dough easier to handle but also allows the flavors to meld beautifully. This resting period helps to counteract the effects of heat during baking, which can alter the texture and overall quality of your cookies. So, don't skip this essential step for the best results!
FAQs
What should I do if my dough is too crumbly?
If your dough appears too crumbly and fails to hold together, try adding a tablespoon of cold water or milk and mixing gently until the texture improves. This can help hydrate the flour, allowing for better cohesion.
How can I add more flavor to my cookies without changing the dough?
You can enhance flavor without altering your dough by adding spices or extracts to the filling. Ingredients like cinnamon, almond extract, or even citrus zest can provide a flavor boost without compromising the texture.
What if my cookies spread too much while baking?
Excessive spreading can result from overly soft dough or insufficient chilling time. Ensure your dough is adequately chilled before baking to maintain cookie shape and structure.
Can I substitute the cocoa powder with another ingredient?
You can use carob powder or chocolate powder as a substitute for cocoa powder, but keep in mind that the flavors will differ. Alternatively, you can also create a solid batch of vanilla pinwheel cookies without cocoa.
What's the best way to decorate these cookies after baking?
Decorating the cookies can add uniqueness and seasonal charm; consider using colored icing, edible glitter, or sprinkles for a festive touch. Drizzling chocolate or adding a light dusting of powdered sugar can also enhance their appearance.
How do I prevent the cookies from becoming too dry?
To prevent dryness, ensure you measure your ingredients accurately and avoid overbaking. Cookies should be slightly soft in the center when initially removed from the oven.
Conclusion
Creating Christmas Pinwheel Cookies is not just about baking; it's about bringing joy and festivity to your kitchen. These colorful delights not only offer a treat for the taste buds but also create lasting memories with family and friends as everyone gathers around to enjoy them.
As you experiment with flavors and styles, remember that each batch can be a reflection of your creativity and holiday spirit. Happy baking, and may your holiday season be filled with joy and warmth, one delicious cookie at a time!
Recipe Card
Delightful Christmas Pinwheel Cookies for Festive Cheer
Ingredients
Method
- Preheat your oven to 350°F (175°C).
- In a bowl, beat the softened butter and granulated sugar together until fluffy.
- Add the egg and vanilla extract to the creamed mixture and mix well.
- In a separate bowl, whisk together the flour, cocoa powder, and salt.
- Gradually add the dry ingredients to the butter mixture, mixing until just combined.
- Divide the dough in half. To one half, add the cocoa powder and mix thoroughly.
- Roll out both dough halves between sheets of parchment paper into rectangles.
- Layer one rectangle on top of the other, then gently roll them into a log.
- Wrap the log in plastic wrap and refrigerate for at least 30 minutes.
- Slice the log into 1/4-inch rounds and place them on a baking sheet lined with parchment paper.
- Bake in the preheated oven for 10-12 minutes or until the edges are set.
- Allow the cookies to cool on the baking sheet for 5 minutes before transferring them to a wire rack.
Notes
Additional serving suggestions: pair with a crisp salad, garlic bread, or roasted seasonal vegetables for balance.
For make-ahead, prep components separately and assemble just before heating to preserve texture.
Taste and adjust with acid (lemon/vinegar) and salt right at the end to wake up flavors.