Introduction
For those seeking a healthier indulgence, Protein Peanut Butter Cups stand out as the perfect blend of taste and nutrition. They combine the rich, creamy flavor of peanut butter with a protein boost, making them an ideal treat for fitness enthusiasts and snack lovers alike. You'll savor every bite while knowing you're fueling your body.
These delightful treats are not just indulgent; they’re versatile too. Whether enjoyed post-workout, as a midday snack, or even for dessert, they fit seamlessly into any lifestyle. With just a few simple ingredients, you can whip up a batch that’s sure to impress family and friends.
Ingredients
- 1 cup natural peanut butter
Natural peanut butter is packed with protein, healthy fats, and flavor, serving as the base of these peanut butter cups. It adds creaminess and a rich taste while ensuring you get essential nutrients. - 1/2 cup protein powder
Protein powder boosts the protein content significantly, turning a regular treat into a muscle-repairing snack. Use your favorite flavor, whether chocolate or vanilla, to complement the peanut butter. - 1/4 cup honey or maple syrup
This natural sweetener balances the flavors and adds a hint of sweetness. Honey or maple syrup not only enhances taste but also provides a natural source of energy. - 1/2 cup dark chocolate chips
Dark chocolate chips lend a satisfying chocolatey flavor while being lower in sugar compared to milk chocolate. They also contain antioxidants, elevating the nutritional value of your dessert. - 1/4 teaspoon sea salt
A pinch of sea salt amplifies sweetness and adds depth to the overall flavor. It balances the richness of the peanut butter and chocolate, making each bite more enjoyable. - 1 teaspoon vanilla extract
Vanilla extract enhances the flavors of the peanut butter and chocolate, bringing all the ingredients together. It adds a subtle aromatic quality that makes these cups even more delightful.
Directions & Preparation
Step 1: Prepare the pan
Start by lining a muffin tin with cupcake liners or greasing it lightly. This step is essential to ensure the peanut butter cups release easily after they harden. A well-prepared pan prevents sticking, allowing you to enjoy the treats without any hassle.
Step 2: Mix the peanut butter and sweetener
In a mixing bowl, combine the natural peanut butter and honey or maple syrup until smooth. This step is crucial as it creates the base mixture that will provide both fluffiness and sweetness to your cups. Ensure it's well-blended to avoid any clumps that might alter the texture.
Step 3: Add protein powder and vanilla
Fold in the protein powder and vanilla extract into the peanut butter mixture. This incorporation brings in the protein boost and aromatic flavor that distinguishes these cups. Stir carefully until fully combined, as an even mixture is vital for consistent texture in every cup.
Step 4: Pour into muffin tin
Spoon the peanut butter mixture into the prepared muffin tin, filling each cup about halfway. This step ensures that you have enough room to add the chocolate topping later. A consistent amount in each liner will help ensure uniform cooking and easy portioning.
Step 5: Melt the chocolate
In a microwave or double boiler, melt the dark chocolate chips until smooth. Be cautious to avoid overheating, as burnt chocolate can become lumpy and unappetizing. This molten chocolate will create the delicious topping that seals in the peanut butter goodness.
Step 6: Top with chocolate
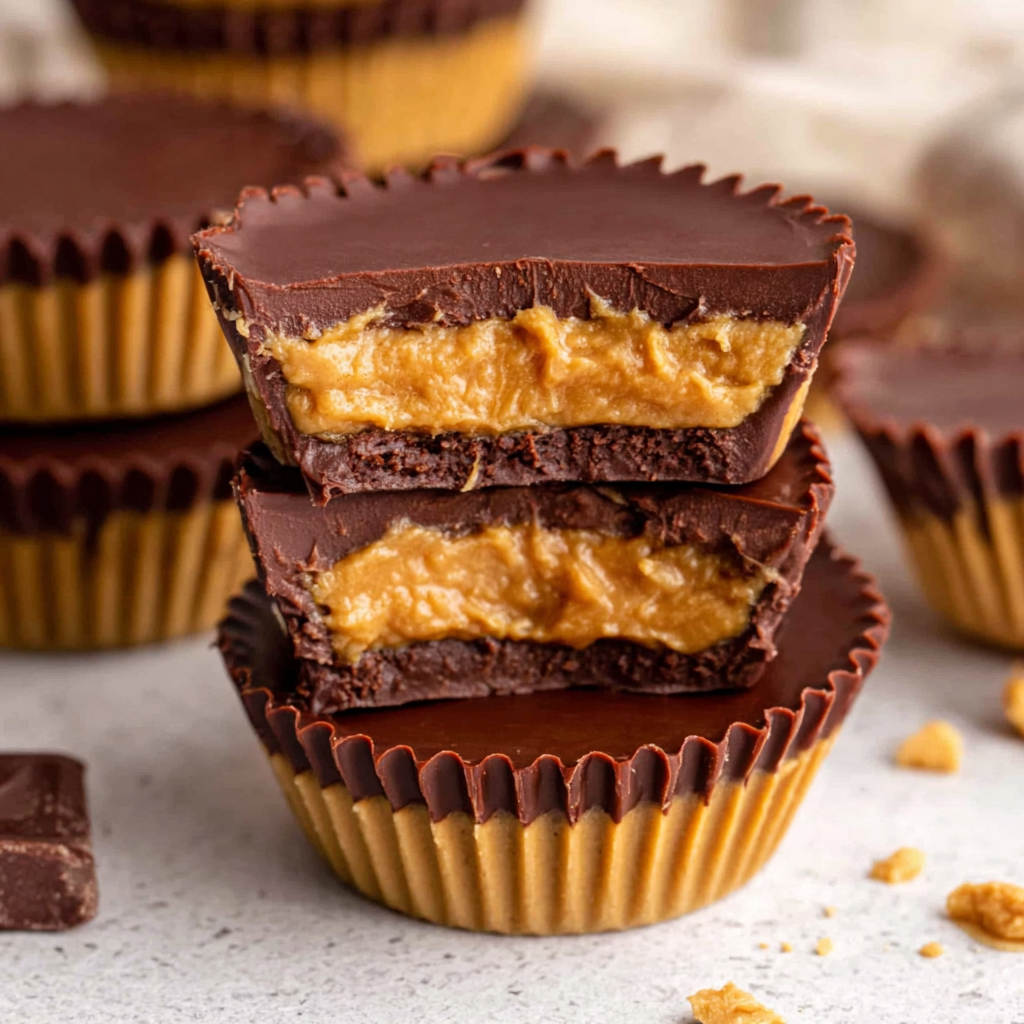
Once melted, pour the chocolate over each peanut butter cup, spreading evenly with a spatula. This topping not only adds a decadent layer but also creates a shiny finish when cooled. Make sure to cover the peanut butter completely for a balanced bite of flavors.
Step 7: Chill and set
Place your muffin tin in the refrigerator for at least one hour to allow the cups to set. Chilling solidifies the chocolate and the peanut butter mixture, ensuring they hold their shape. This step is essential for achieving the perfect texture that melts in your mouth.
Step 8: Serve and enjoy
Once set, remove the Peanut Butter Cups from the muffin tin and peel away the liners. These treats are now ready to be enjoyed. Whether as a post-workout snack or after dinner, each bite will be a satisfying combination of flavor and nutrition.

Customize Your Cup
One of the best aspects of Protein Peanut Butter Cups is their versatility. Feel free to experiment with different nut butters, such as almond or cashew, for unique flavors. You can also incorporate add-ins like crushed nuts, seeds, or even dried fruits to create your own twist. The possibilities are endless, making it easy to tailor these cups to your personal tastes.
The Chocolate Factor
The chocolate layer doesn’t just make these cups aesthetically pleasing; it elevates the entire experience. Choosing high-quality dark chocolate can make a significant difference in taste. Look for chocolate with a cocoa percentage of 70% or higher for a rich flavor that complements the sweetness of the peanut butter without overwhelming it.
A Perfect Post-Workout Snack
With their high protein content, these Peanut Butter Cups serve as an excellent post-workout recovery snack. The combination of protein from the peanut butter and powder helps in muscle repair, while the natural sugars from honey or maple syrup replenish energy stores. Enjoying these treats shortly after exercising can be a delightful way to refuel.
FAQs
What can I substitute for protein powder?
If you don't have protein powder, you can use powdered peanut butter as a lower-calorie alternative, though it will slightly change the texture and flavor.
Why are my peanut butter cups too soft?
If your cups are soft, they may need more chilling time in the refrigerator. Ensure they are fully set before attempting to remove them from the muffin tin.
Can I use milk chocolate instead of dark?
Absolutely! Milk chocolate will provide a sweeter taste, so adjust the amount of sweetener you use in the peanut butter mix to avoid overpowering sweetness.
How can I add more flavor to my peanut butter mixture?
Consider adding spices like cinnamon or cocoa powder to your peanut butter mixture. This can enhance the flavor profile and give your cups a unique twist.
What if the chocolate is too thick for topping?
If your melted chocolate is too thick, add a small amount of coconut oil or butter to thin it out. This will help achieve a smoother consistency for drizzling.
Can these cups be made vegan?
Yes, to make these cups vegan, use a plant-based protein powder, maple syrup as a sweetener, and dairy-free chocolate. This keeps them delicious and suitable for a vegan diet.
Conclusion
Protein Peanut Butter Cups are not just a delicious treat but also a nourishing option for anyone looking to satisfy their sweet tooth without compromising on health. With easy-to-follow steps and a handful of ingredients, you can create these delightful snacks in your own kitchen.
Whether you're enjoying them right after a workout or as a mid-afternoon pick-me-up, these peanut butter cups will leave you feeling satisfied and energized. Dive into this healthy indulgence and unleash your inner chef!
Recipe Card

Deliciously Creamy Protein Peanut Butter Cups
Ingredients
Method
- Prepare the pan
- Mix the peanut butter and sweetener
- Add protein powder and vanilla
- Pour into muffin tin
- Melt the chocolate
- Top with chocolate
- Chill and set
- Serve and enjoy
Notes
Additional serving suggestions: pair with a crisp salad, garlic bread, or roasted seasonal vegetables for balance.
For make-ahead, prep components separately and assemble just before heating to preserve texture.
Taste and adjust with acid (lemon/vinegar) and salt right at the end to wake up flavors.