Introduction
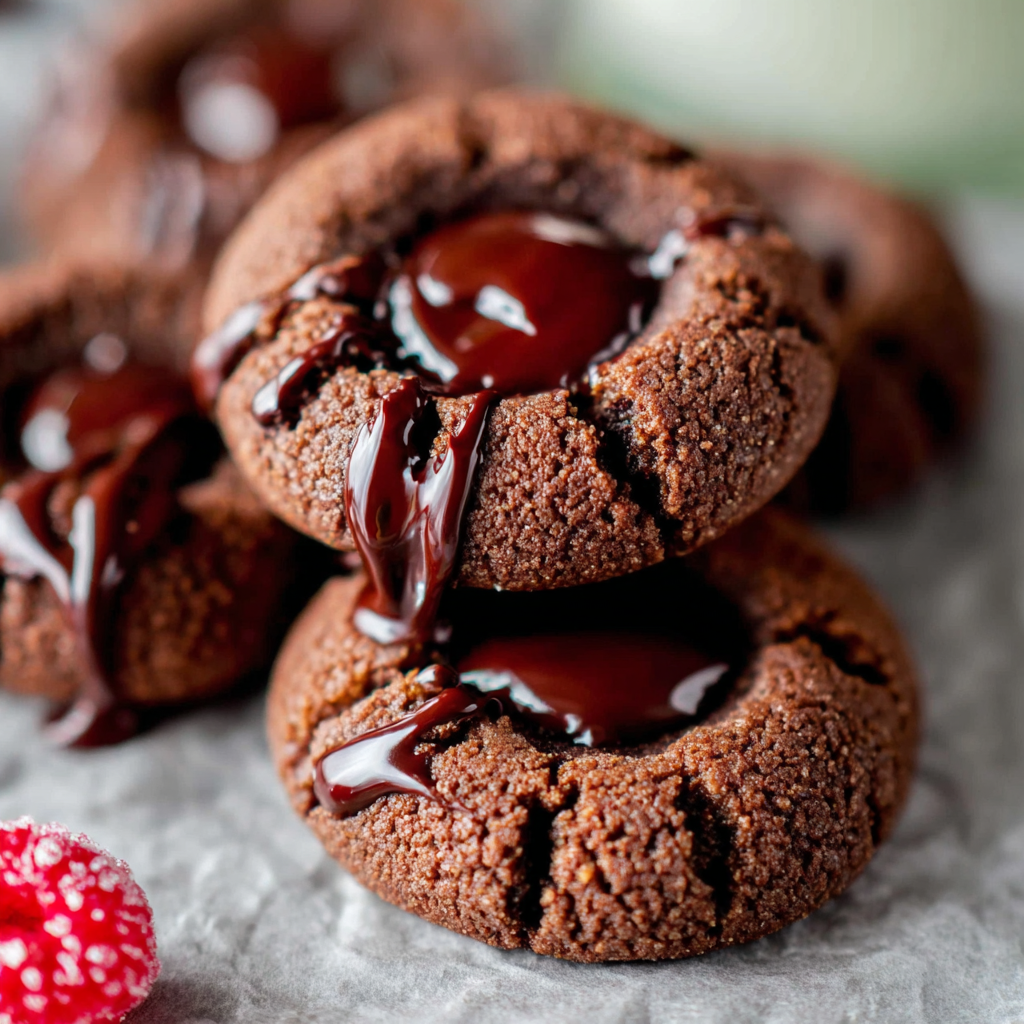
Chocolate thumbprint cookies are a delightful treat that bring together the rich, velvety taste of chocolate and the sweetness of your favorite fillings. They make for an irresistible combination that beckons both casual bakers and seasoned chefs alike.
These cookies are not only beautiful to behold, with their distinctive thumbprint dimple holding a generous scoop of chocolate ganache or jam, but they also invite creativity in their preparation. Whether you enjoy crafting them for a special occasion or simply to indulge yourself, their charm will never fade.
In this article, we’ll explore how to make chocolate thumbprint cookies from scratch, delving deep into each ingredient's purpose and providing you with tips to ensure your cookies turn out perfectly every time.
Ingredients
- 1 cup unsalted butter, softened
Butter provides moisture and richness, contributing to the tender texture of the cookies. It also enhances the flavor, creating a delicious buttery base for our chocolate. - 2/3 cup granulated sugar
Sugar sweetens the cookies and helps in achieving a crisp outer texture. It promotes browning, which is essential for a cookie’s overall flavor. - 1 large egg
Eggs serve multiple functions: they provide structure and stability to the cookie dough. The egg also helps with leavening, adding lightness to the cookies. - 1 teaspoon vanilla extract
Vanilla extract adds a warm, aromatic flavor, enhancing the taste of chocolate and creating a more complex flavor profile. - 2 cups all-purpose flour
Flour is the backbone of the cookie dough, giving it structure. The right amount of flour leads to a perfectly balanced cookie texture. - 1/2 cup cocoa powder
Cocoa powder imparts the rich chocolate flavor, making these cookies truly decadent. It also contributes to the overall color and texture. - 1/2 teaspoon baking powder
Baking powder helps the cookies rise slightly during baking, contributing to a soft interior while still retaining their shape. - 1/4 teaspoon salt
Salt enhances the overall flavor of the cookies, balancing the sweetness and bringing out the chocolate taste. - 1 cup chocolate chips or your preferred filling
These are the stars of the show! Chocolate chips can be melted and used as filling, or you can opt for jams or fruit preserves, adding diversity and extra sweetness.
Directions & Preparation
Step 1: Preheat your oven to 350°F (175°C).
Preheating the oven ensures that your cookies bake evenly and properly. An oven that is too cool can result in cookies that spread too much, while a properly heated oven helps to set them quickly.
Step 2: Cream the softened butter and granulated sugar together.
Creaming the butter and sugar incorporates air into the mixture, leading to a light, fluffy texture. Ensure that the butter is at room temperature so it blends well with the sugar, creating a homogenous mixture.
Step 3: Add in the egg and vanilla extract; beat well.
Incorporating the egg and vanilla at this stage enriches the dough, adding moisture and depth of flavor. This step is crucial for achieving the right consistency, so mix until fully combined but do not overbeat.
Step 4: In a separate bowl, whisk together the flour, cocoa powder, baking powder, and salt.
Whisking the dry ingredients together before adding them to the wet mixture ensures an even distribution of leavening agents and prevents clumping. This step is fundamental for consistent cookie texture.
Step 5: Gradually add the dry ingredients into the wet mixture, mixing until just combined.
Mixing the dry ingredients in gradually helps control gluten development, avoiding a tough cookie. Stop mixing when you no longer see flour, as overmixing can lead to a dense result.
Step 6: Fold in the chocolate chips gently.
Folding in the chocolate chips allows them to be evenly distributed without breaking apart. This adds pockets of melted chocolate throughout the cookies, enhancing your experience with each bite.
Step 7: Scoop the dough into equal-sized balls and place them on a lined baking sheet.
Making sure the dough balls are equal in size allows for uniform baking. Use a cookie scoop or your hands, but try to maintain a consistent size to ensure they bake evenly.
Step 8: With your thumb, create an indentation in the center of each ball of dough.
Making an indentation provides space for the filling to sit, ensuring it doesn’t overflow during baking. This gives them their signature thumbprint look and is essential for holding your favorite filling.
Step 9: Bake for 12-15 minutes until the edges are set but the centers remain moist.
This baking time allows the cookies to achieve a slight crispiness while keeping the center soft. Taking them out at the right moment ensures you avoid overbaking, which can lead to dryness.
Step 10: Remove from the oven and let cool for a few minutes before transferring to a wire rack.
Cooling the cookies first on the baking sheet allows them to firm up before being moved to a wire rack. This prevents them from breaking apart and helps maintain their shape.
Step 11: Fill each thumbprint with chocolate filling or jam of your choice.
Adding the filling while the cookies are still slightly warm helps it to spread into the indentation properly. You can have fun with different flavors; experiments are encouraged!

The Importance of Quality Chocolate
Using high-quality chocolate is paramount when making chocolate thumbprint cookies. The flavor of the chocolate can greatly influence the overall taste of the cookies, transforming them from ordinary to extraordinary. Opt for chocolate with at least 60% cocoa content for a rich, bold flavor that complements the sweetness of the cookie.
Exploring Different Fillings
While classic chocolate ganache is a favorite, feel free to get creative with fillings. Jams, caramel, or even peanut butter can add a unique twist to your thumbprint cookies. Experimenting with different flavors not only keeps things exciting but also allows you to tailor the cookies to suit the preferences of your friends and family.
Perfecting Texture and Shape
Achieving the right texture in chocolate thumbprint cookies involves a balance between moisture and structure. The creaming process, the right blending of dry and wet ingredients, and meticulous baking all come together. Cookies should be slightly crisp at the edges and chewy in the center, creating an enjoyable contrast that keeps you coming back for more.
FAQs
Why are my cookies too dry?
Overbaking or using too much flour can lead to dry cookies. Make sure to measure your flour accurately and watch the baking time closely.
What should I do if the dough is too thick?
If your dough seems thicker than expected, you can add a tablespoon of milk or water to adjust the consistency without compromising texture.
Can I use a different sweetener instead of sugar?
You can substitute granulated sugar with coconut sugar or a sugar alternative, but keep in mind it may slightly change the taste and texture.
Why do my thumbprints lose shape during baking?
If the dough is too warm when placed in the oven, it can spread and lose its thumbprint shape. Ensure your dough is chilled if necessary before baking.
Can I make these cookies smaller?
Yes, you can reduce the size of the dough balls, but adjust the baking time to ensure they do not underbake.
What if I want more chocolate flavor?
You can increase the cocoa powder slightly but keep in mind to maintain the balance with the flour to avoid changing the dough's integrity.
Conclusion
Chocolate thumbprint cookies are a delightful treat that can easily become a staple in your baking repertoire. With their perfect balance of texture and flavor, they're sure to impress anyone who takes a bite.
Whether you stick to the classic chocolate filling or venture out with fruity jams or nutty spreads, these cookies invite customization and creativity, allowing each batch to tell a unique story.
Recipe Card

Deliciously Rich Chocolate Thumbprint Cookies
Ingredients
Method
- Preheat your oven to 350°F (175°C).
- Cream the softened butter and granulated sugar together.
- Add in the egg and vanilla extract; beat well.
- In a separate bowl, whisk together the flour, cocoa powder, baking powder, and salt.
- Gradually add the dry ingredients into the wet mixture, mixing until just combined.
- Fold in the chocolate chips gently.
- Scoop the dough into equal-sized balls and place them on a lined baking sheet.
- With your thumb, create an indentation in the center of each ball of dough.
- Bake for 12-15 minutes until the edges are set but the centers remain moist.
- Remove from the oven and let cool for a few minutes before transferring to a wire rack.
- Fill each thumbprint with chocolate filling or jam of your choice.
Notes
Additional serving suggestions: pair with a crisp salad, garlic bread, or roasted seasonal vegetables for balance.
For make-ahead, prep components separately and assemble just before heating to preserve texture.
Taste and adjust with acid (lemon/vinegar) and salt right at the end to wake up flavors.