Introduction
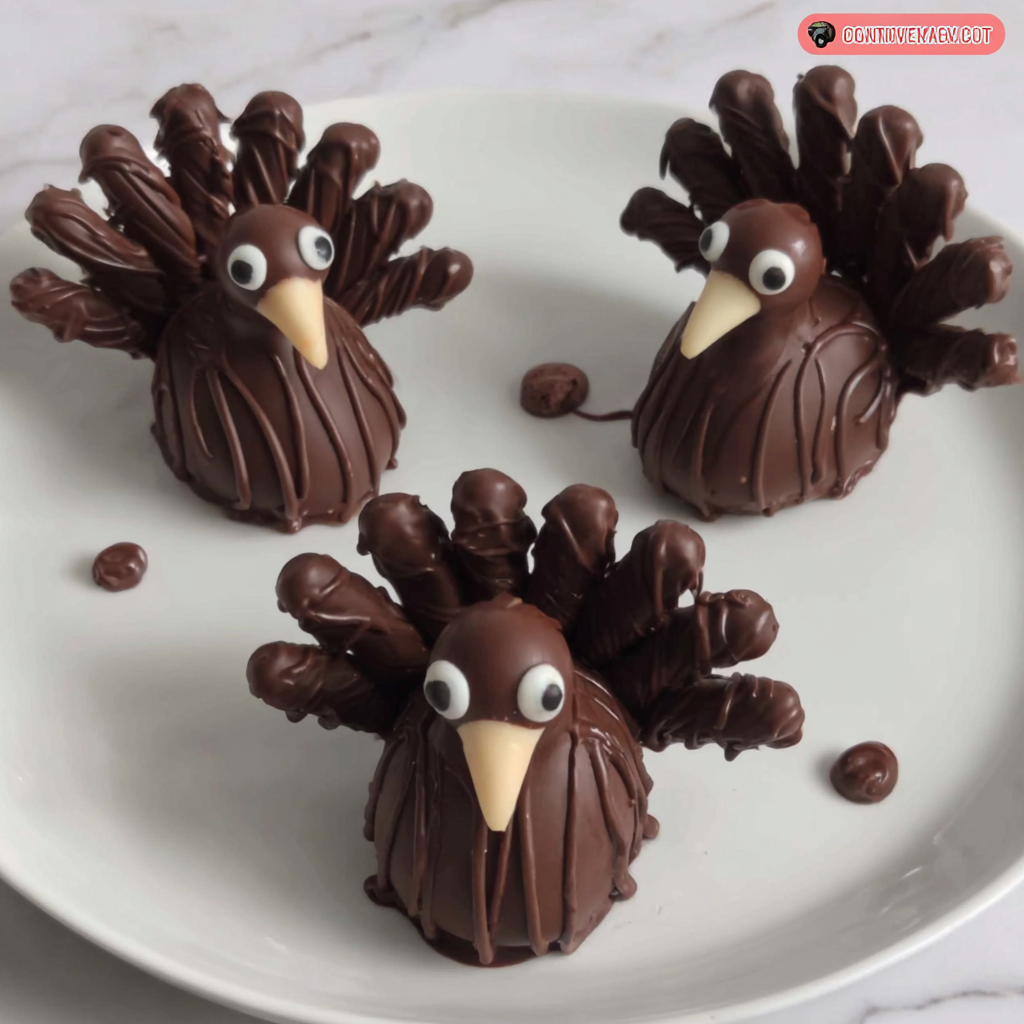
As the holiday season approaches, the idea of festive treats often brings joy and excitement. Chocolate turkeys are a perfect blend of creativity and culinary charm that can delight both children and adults. These edible art pieces not only taste delicious but also serve as an attractive centerpiece for any gathering.
Crafting chocolate turkeys allows home cooks to unleash their creativity and engage in a delightful hands-on experience. Whether you're celebrating Thanksgiving or hosting a playful event, these charming treats will surely impress your guests. Let's dive into the art of making chocolate turkeys that are as delectable as they are visually appealing.
Ingredients
- 1 cup semi-sweet chocolate chips
These chocolate chips are the primary building block of your chocolate turkeys. Their rich flavor and smooth melting properties provide the perfect base for crafting your turkey molds. - 1/2 cup milk chocolate chips
Milk chocolate adds a creamy sweetness that balances the richness of the semi-sweet chocolate. This layer will contribute to the aesthetic as well as the flavor profile of your chocolate turkeys. - 1/4 cup white chocolate chips
White chocolate can be used for detailing, such as eyes, feathers, or highlights. It melts smoothly and hardens nicely, making it ideal for decoration. - Assorted candies (like M&M's, candy corn, or sprinkles)
These candies will be used for embellishing your chocolate turkeys, adding texture, color, and fun. Each piece can provide a unique flair that makes your turkeys distinct. - Peanut butter (or any nut butter)
Peanut butter acts as an adhesive, helping hold components together. Plus, it imparts a delicious flavor that pairs well with chocolate. - Piping bags or plastic sandwich bags
These will be essential for applying melted chocolate decoratively. Using piping bags allows you to achieve detailed designs and control the flow of chocolate. - Wax paper or parchment paper
This non-stick surface will prevent the chocolate from adhering too firmly, making it easier to remove your finished turkeys without damaging them.
Directions & Preparation
Step 1: Melt the semi-sweet chocolate chips.
Begin by placing the semi-sweet chocolate chips in a microwave-safe bowl. Heat them in short bursts of 20-30 seconds, stirring in between until completely melted. This step is crucial as properly melted chocolate ensures a smooth texture and better molding when forming the turkeys. Be cautious not to overheat, as chocolate can seize if burned.
Step 2: Make the turkey mold.
Once the chocolate is melted, pour a small amount into a turkey mold, ensuring the bottom and sides are coated evenly. This step is vital as it creates the turkey's outer shell. Use a spatula to help distribute the chocolate evenly by tilting and rotating the mold. Allow it to set slightly in the refrigerator until firm but not completely hardened.
Step 3: Prepare the inner filling.
While the outer layer sets, mix together your choice of fillings, such as candies or crushed treats, with a few spoonfuls of peanut butter. This mixture provides texture and flavor contrast. Scoop this filling into the partially set chocolate mold, ensuring not to overfill. This step not only adds delightful surprises inside your turkey but contributes to stability.
Step 4: Seal the turkey.
Melt the milk chocolate chips and pour a layer over the filled mold to enclose the turkey completely. This sealing layer keeps the filling intact and enhances the chocolate flavor. Ensure the layer is even by smoothing it out. Set aside the mold in the fridge once more to let the chocolate harden completely.
Step 5: Remove the turkeys from the molds.
After the chocolate has fully set, carefully remove the turkeys from the molds. Gently twist the mold or tap it on the counter to release the turkeys without damaging them. This step highlights the craftsmanship involved in your creations, so be gentle to preserve their shape.
Step 6: Decorate the turkeys.
Melt the white chocolate and pour it into a piping bag. Use it to draw eyes or add details like feathers on the turkeys. Add your assorted candies as embellishments while the chocolate is still warm to ensure they adhere well. This final touch is what brings your turkeys to life, showcasing your creativity and personal style.
Step 7: Let them set and serve.
Once decorated, allow the chocolate turkeys to set at room temperature or in the fridge for a few minutes. Ensure the decorations are solidified before serving. This step is key to presenting polished, professional-looking treats that will wow your guests, making every bite delightful.

Creative Decoration Ideas for Chocolate Turkeys
Decorating your chocolate turkeys is an opportunity to showcase your creativity. Beyond traditional candies, consider adding edible gold dust for a touch of elegance or using colored icing to create intricate feather designs. Utilizing different textures can enhance the visual appeal, making each turkey unique. Personalize them further by incorporating initials or fun patterns to reflect the personalities of your guests.
Alternatives to Traditional Fillings
While candy and peanut butter work wonderfully as filling options, don't hesitate to explore alternatives. Dried fruit, like cranberries or apricots, can provide a chewy contrast, while crushed cookies or granola can add crunchiness. This not only diversifies the flavor profile but allows you to cater to dietary preferences, making your chocolate turkeys even more enjoyable.
Pairing Chocolate Turkeys with Beverages
Chocolate turkeys make an excellent accompaniment to a range of beverages. To balance the richness, consider serving them with a light herbal tea or a refreshing fruit-infused beverage. Alternatively, deepening the experience with hot cocoa or coffee can elevate the indulgence. Pairing enhances the overall enjoyment, turning a simple treat into a memorable dessert experience.
FAQs
What can I do if my chocolate is too thick?
If your melted chocolate seems too thick, stir in a small amount of coconut oil or vegetable shortening to thin it out. This will help achieve a smoother consistency ideal for molding and decorating.
How can I substitute the fillings for dietary restrictions?
For nut allergies, consider using sunbutter or sunflower seed paste instead of peanut butter. For a vegan version, use dairy-free chocolate and alternative fillings like fruit or vegan candies.
What if my turkeys do not come out of the mold easily?
If you encounter trouble removing the turkeys from the mold, try placing them in the refrigerator for a few minutes. The cold may shrink the chocolate slightly, easing removal. Be gentle during the process to avoid breaking them.
Can I use flavored chocolate instead of regular chocolate?
Absolutely! Flavored chocolates like mint or raspberry can add an intriguing twist. Just ensure they complement the other ingredients and that you adjust any sweetness according to taste.
How can I enhance the flavor of my chocolate turkeys?
Adding a pinch of salt or a dash of vanilla extract to your melted chocolate can intensify the flavors. Alternatively, incorporating flavor extracts like almond or orange can elevate the taste further.
What should I do if my decorations are melting?
If your decorations are melting, ensure that your chocolate base is not too warm when applying them. Allow it to set slightly before adding any additional toppings to prevent this from happening.
Conclusion
Creating chocolate turkeys is not only a delightful way to embrace the holiday spirit, but it also allows for memorable moments in the kitchen. This creative culinary project can be a fun activity for families, encouraging collaboration and creativity.
As you experiment with decorations and fillings, remember that your personal touch is what makes each turkey special. Celebrate your successes and share these charming treats with loved ones to spread happiness and joy.
Recipe Card
Delightful Chocolate Turkeys for Festive Celebrations
Ingredients
Method
- Melt the semi-sweet chocolate chips.
- Make the turkey mold.
- Prepare the inner filling.
- Seal the turkey.
- Remove the turkeys from the molds.
- Decorate the turkeys.
- Let them set and serve.
Notes
Additional serving suggestions: pair with a crisp salad, garlic bread, or roasted seasonal vegetables for balance.
For make-ahead, prep components separately and assemble just before heating to preserve texture.
Taste and adjust with acid (lemon/vinegar) and salt right at the end to wake up flavors.