Introduction
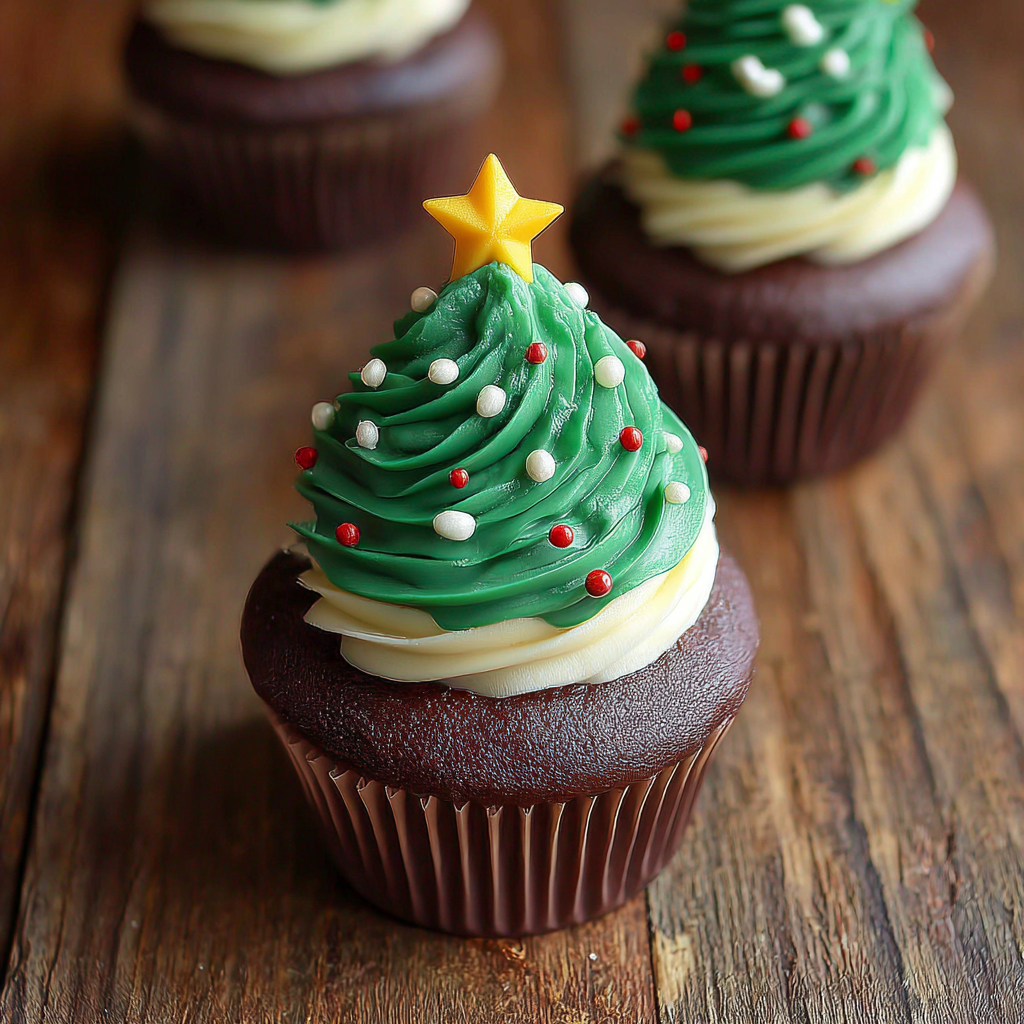
The festive season is synonymous with creativity in the kitchen, and what better way to embrace that spirit than with Christmas Tree Cupcakes? These charming treats not only bring a pop of color to your holiday gatherings but also serve as a fun activity for both adults and kids.
With their light, fluffy bases adorned with vibrant green frosting and playful decorations, they capture the essence of Christmas cheer. Perfect for family gatherings, office parties, or simply as a sweet surprise for friends, these cupcakes will surely spread joy.
Let’s bring the holiday magic into your home baking with simple ingredients and an easy-to-follow process that results in delightful, festive confections.
Ingredients
- 1 ½ cups all-purpose flour
The foundation of any cupcake, all-purpose flour provides the structure. It helps achieve a light and fluffy texture when mixed properly with other ingredients. - 1 cup granulated sugar
Sugar not only sweetens the cupcakes but also aids in moisture retention, ensuring that your cupcakes remain soft and delectable. It contributes to a lovely golden color when baking. - ½ cup unsalted butter
Butter adds richness and flavor. It also helps in creating a tender crumb when creamed with sugar, making your cupcakes softer and more enjoyable. - 1 cup milk
Milk works to hydrate the dry ingredients and adds moisture to the batter, making the cupcakes rich and fluffy. It also helps in creating a smooth batter for even baking. - 3 large eggs
Eggs act as binding agents in the batter, helping to hold everything together. They contribute to the structure while adding a subtle richness to the flavor. - 1 tsp vanilla extract
Vanilla extract enhances the overall flavor profile, adding warmth and depth to the cake. It balances the sweetness and makes the cupcakes taste more complex. - 2 cups green buttercream frosting
Buttercream is essential for decorating and giving that 'tree' appearance. The green color adds a festive look, and its creamy texture provides a delicious contrast to the cupcake. - Decorative toppings (edible glitter, candies)
These toppings add a whimsical touch and create visual appeal, making your cupcakes not just tasty but also festive and fun. They inspire creativity in decorating.
Directions & Preparation
Step 1: Preheat the oven to 350°F (175°C) and line a cupcake tray with liners.
Preheating the oven ensures even baking, which is crucial for achieving the perfect cupcake texture. Lining the tray with cupcake liners makes for easy removal and adds to the presentation, preventing messes.
Step 2: In a large bowl, cream together the sugar and butter until light and fluffy.
Creaming the sugar and butter aerates the mixture, creating tiny air pockets that will expand during baking. This is a key step to achieving a light, fluffy cupcake, so take your time with it.
Step 3: Add eggs one at a time, mixing well after each addition, then stir in the vanilla extract.
Adding eggs gradually helps maintain the mixture's texture and allows for even incorporation. The introduction of vanilla at this stage adds flavor, deepening the profile of your cupcakes.
Step 4: In a separate bowl, whisk together the flour and baking powder, then gradually add it into the wet mixture, alternating with the milk.
Mixing dry ingredients separately prevents clumping and ensures even distribution of the leavening agents. The alternation with milk helps create a smooth batter without overmixing, which can toughen the cupcakes.
Step 5: Spoon the batter into prepared cupcake liners, filling each about two-thirds full.
Filling the liners only two-thirds full allows room for the cupcakes to rise without overflowing. This tip is essential for achieving well-shaped cupcakes that maintain their structure.
Step 6: Bake for 18 to 20 minutes or until a toothpick inserted into the center comes out clean.
Baking times can vary, so checking with a toothpick ensures that you remove them at the right moment. Overbaking can lead to dryness, so watch closely towards the end.
Step 7: Let the cupcakes cool in the tray for 5 minutes before transferring to a wire rack to cool completely.
Cooling in the tray helps them set but removing them too soon may cause them to break. Once on the rack, ensuring they are completely cool is crucial for the frosting to adhere properly.
Step 8: Once cooled, frost with green buttercream and decorate as desired to create a Christmas tree look.
Proper frosting techniques elevate your cupcakes. Use a piping bag for a more professional finish, and decorate with edible glitter or candy to evoke the festive spirit, making each cupcake a unique creation.

The Art of Frosting
Frosting is not just about taste; it's about presentation as well. For Christmas Tree Cupcakes, a piping bag can help create tree-like swirls resembling pine branches. Use a star tip for a perfect design. Don’t hesitate to layer different colors of frosting for effects that mimic Christmas lights.
Festive Decoration Ideas
Make your Christmas Tree Cupcakes not just delicious but stunningly festive with various decorations. Consider using mini candy canes, gumdrops, or edible glitter to emulate ornaments or snow. These touches not only enhance flavor but make every cupcake a festive centerpiece.
Customizing Your Flavors
While the classic vanilla flavor is delightful, consider playing with different flavors in your base cupcakes. Chocolate, mint, or even spice blends can add exciting twists to your traditional holiday treats. Experimenting with spices or extracts opens the door to unique takes on this festive favorite.
FAQs
What can I do if my frosting is too thick?
If your frosting is too thick, try adding a small amount of milk, one teaspoon at a time, until you reach a smooth, spreadable consistency.
How can I adjust the recipe for more cupcakes?
To scale this recipe, simply multiply each ingredient by the number of batches you want, keeping in mind that baking times may vary depending on batch size.
What if my cupcakes are too dry?
If your cupcakes come out dry, it could be due to overbaking or improper measuring of flour. Ensure accurate ingredient measurements and set timers to monitor baking times closely.
Can I use a different type of frosting for variation?
Absolutely! Cream cheese frosting, chocolate ganache, or whipped cream can all create deliciously unique versions of these Christmas Tree Cupcakes.
How can I ensure my cupcakes stay moist?
To maintain moisture in your cupcakes, avoid overbaking and consider adding a bit of sour cream or yogurt to your batter.
What decorations work best for a snowy effect?
For a snowy effect, sprinkle your cupcakes with edible glitter or powdered sugar to create a winter wonderland vibe that beautifully complements the tree design.
Conclusion
Making Christmas Tree Cupcakes is a delightful way to engage with the holiday spirit. From the fluffy cake base to the vibrant green frosting, these cupcakes sweeten your festive celebrations.
Whether shared at a holiday gathering or enjoyed with family at home, they bring joy and creativity into your baking. Try out this recipe, and let your imagination blossom as you celebrate the season!
Recipe Card

Delightful Christmas Tree Cupcakes for the Holidays
Ingredients
Method
- Preheat the oven to 350°F (175°C) and line a cupcake tray with liners.
- In a large bowl, cream together the sugar and butter until light and fluffy.
- Add eggs one at a time, mixing well after each addition, then stir in the vanilla extract.
- In a separate bowl, whisk together the flour and baking powder, then gradually add it into the wet mixture, alternating with the milk.
- Spoon the batter into prepared cupcake liners, filling each about two-thirds full.
- Bake for 18 to 20 minutes or until a toothpick inserted into the center comes out clean.
- Let the cupcakes cool in the tray for 5 minutes before transferring to a wire rack to cool completely.
- Once cooled, frost with green buttercream and decorate as desired to create a Christmas tree look.
Notes
Additional serving suggestions: pair with a crisp salad, garlic bread, or roasted seasonal vegetables for balance.
For make-ahead, prep components separately and assemble just before heating to preserve texture.
Taste and adjust with acid (lemon/vinegar) and salt right at the end to wake up flavors.