Introduction
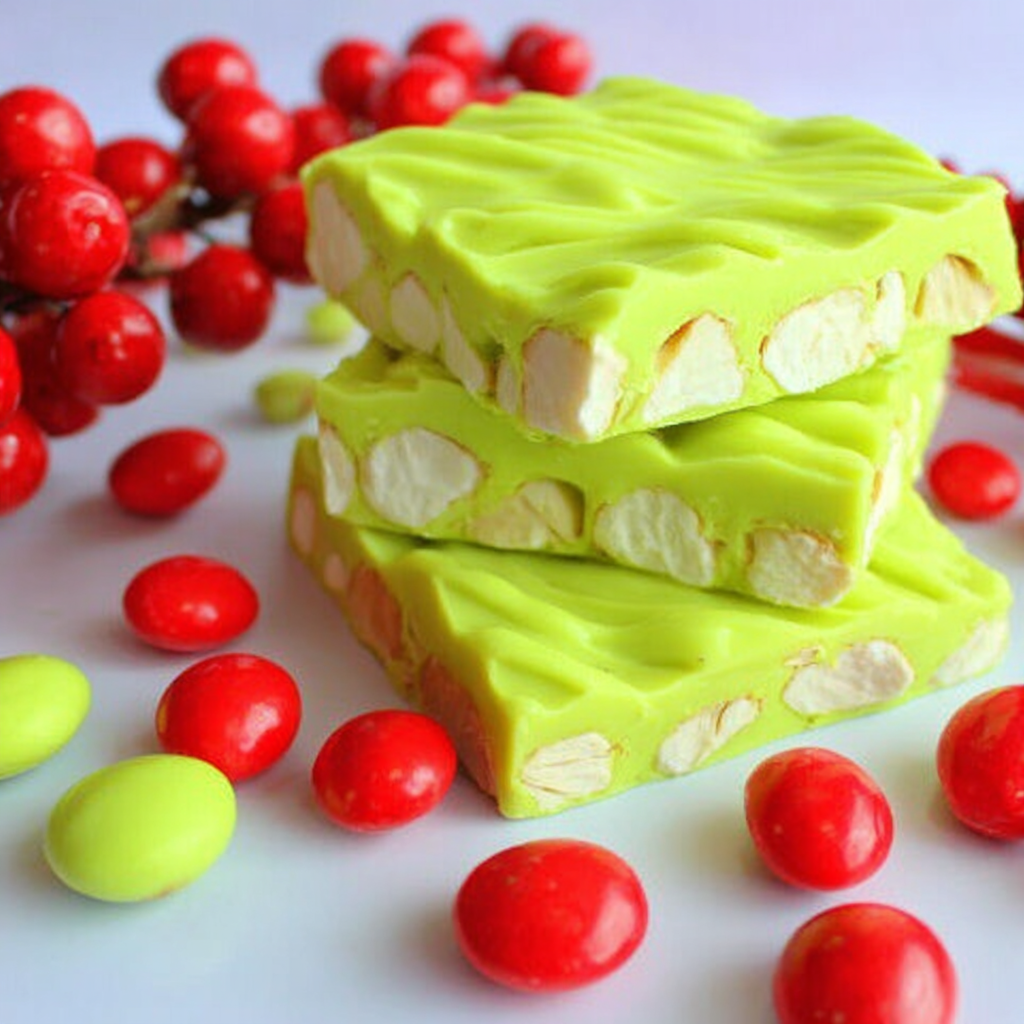
As the holiday season approaches, the spirit of cheer often finds its way into our kitchens, inspiring us to create festive treats. One such delightful creation is Grinch Rocky Road Candy, an imaginative twist on the classic rocky road dessert. Vibrant green and packed with textures and flavors, this candy captures the essence of holiday joy while being incredibly fun to prepare.
The perfect embodiment of festive whimsy, Grinch Rocky Road Candy combines the traditional elements of marshmallows and nuts with a splash of green-and-red cheer. It’s easy to make and is a wonderful addition to any holiday gathering. Plus, it’s a treat that invites creativity, allowing you to customize ingredients as per your liking. Grab your mixing bowls, and let’s dive into this deliciously cheeky recipe.
Ingredients
- 3 cups mini marshmallows
The stars of this candy, mini marshmallows add a fluffy and chewy texture. They create that signature rocky road feel, marrying beautifully with the chocolate and nuts. - 2 cups semi-sweet chocolate chips
Chocolate forms the base of this confection. Semi-sweet chocolate balances richness and sweetness, melting down smoothly to envelop the marshmallows and nuts. - 1 cup unsalted butter
Butter not only enhances the flavor but also helps create a creamy texture when combined with chocolate. It acts as a binder that keeps the ingredients together. - 1 cup chopped walnuts or pecans
Nuts add a satisfying crunch and a layer of earthiness to the mix. They contrast with the soft marshmallows and act as a source of healthy fats. - 1 cup green candy melts
Adding a whimsical touch to the recipe, green candy melts give the candy its signature 'Grinch' color. They also heighten the flavor and provide a fun, festive appeal. - 1/2 cup red candy melts
Red candy melts not only enhance the visual aspect but also provide a sweet contrast to the green. They can be drizzled on top for decoration, adding holiday flair. - 1 teaspoon vanilla extract
Vanilla extract infuses an aromatic element that rounds out the flavors. It boosts the overall sweetness and enhances the rich chocolatey notes.
Directions & Preparation
Step 1: Prepare the baking pan and ingredients.
Line a 9×13 inch baking pan with parchment paper, leaving enough overhang for easy removal later. This step is vital to prevent sticking and ensure a clean cut into your candy squares. Set your ingredients out and pre-measure them for an efficient cooking process.
Step 2: Melt the chocolate and butter.
In a microwave-safe bowl, combine the chocolate chips and butter. Heat in short bursts, stirring in between, until fully melted and smooth. This melting process is crucial as it forms the base of your candy. Ensuring even melting prevents burning and gives you a silky texture.
Step 3: Combine marshmallows and chopped nuts.
Once the chocolate mixture is smooth, remove it from the microwave and let it cool slightly. Stir in marshmallows and nuts until well coated. This step is where the magic happens as the fluffy marshmallows absorb the rich chocolate flavor while providing a delightful contrast in texture.
Step 4: Add flavorings and candy melts.
Incorporate the vanilla extract and half of the green candy melts into the mixture, stirring until combined. This adds complexity to the flavor and contributes to the candy's distinctive coloration. Remember, reserving some candy melts will help with the final decoration.
Step 5: Spread mixture into prepared pan.
Pour the candy mixture into the lined baking pan, spreading evenly with a spatula. Pat it down gently to create an even layer. This helps to achieve uniform thickness throughout, ensuring consistent bite sizes once cut.
Step 6: Melt remaining green candy melts and drizzle.
Melt the reserved green candy melts in a small microwave-safe bowl. Using a fork or piping bag, drizzle it generously over the chocolate layer. This adds both flavor and a visual pop that aligns with the Grinch theme.
Step 7: Melt and add red candy melts for decoration.
Following the same melting method, melt the red candy melts to drizzle over the top as well. This step enhances the festive look and introduces a pleasing contrast to the greenery. Allow the drizzled candy melts to set.
Step 8: Chill and set the candy.
Place the entire pan in the refrigerator to chill for at least 2 hours. This step is essential for the candy to harden properly. Skipping this can lead to a gooey mess when cutting, so allow time for the components to fuse together.
Step 9: Cut and serve.
Once set, use the overhanging parchment paper to lift the candy out of the pan. Cut into squares or triangles, making sure to use a sharp knife for clean edges. Serve immediately or store in an airtight container for a delightful holiday treat anytime.

A Twist on Tradition: Grinch Rocky Road
Grinch Rocky Road Candy takes the classic rocky road recipe and adds a festive flair that’s perfect for the holidays. Infusing vibrant colors and flavors typical of the season, this candy not only pleases the palate but also dazzles the eyes. The playful presentation will delight both children and adults, making it an excellent conversation starter at any gathering.
Experiment with Add-ins for Personalization
While the standard ingredients create a delightful texture and flavor, feel free to experiment with mix-ins that suit your taste. Consider adding dried fruits like cranberries or cherries for a tangy burst, or substitute the nuts with your favorite seeds for a unique twist. The versatility of Grinch Rocky Road Candy allows for personal touches, making each batch distinctly yours.
Perfect for Gift Giving and Sharing
Wrapped up nicely in holiday-themed boxes or bags, Grinch Rocky Road Candy makes an excellent gift for friends and family. It’s a delightful way to spread festive cheer with something homemade. Share a slice of joy during the holidays, and your loved ones will appreciate both the thought and the treat!
FAQs
What if my mixture is too thick when combining ingredients?
If the mixture seems too thick, try adding a tablespoon of melted butter or coconut oil to loosen it up. This will help ensure the marshmallows and nuts are evenly coated and provide a delightful texture.
Can I substitute a different type of nut in the recipe?
Absolutely! You can substitute any nuts of your choice, such as almonds or cashews, or even omit nuts entirely for a nut-free version. The key is to maintain the crunch factor in your candy.
What can I do if the chocolate isn't melting smoothly?
If your chocolate isn’t melting uniformly, try lowering the microwave power or using a double boiler. Overheating can cause chocolate to seize, so slow and steady is crucial for a smooth consistency.
Is there a way to enhance the flavor further?
Yes, you could add a sprinkle of sea salt or a pinch of espresso powder to the melted chocolate to amplify its flavor profile. These additions can bring a delightful contrast to the sweetness.
How important is the chilling step for texture?
Chilling is crucial as it allows the ingredients to set properly, resulting in a firmer texture. Skipping this step can lead to overly gooey candy, which may be challenging to cut into neat pieces.
Can I use white chocolate instead of semi-sweet?
Yes, white chocolate can be used, but it will result in a sweeter candy. Consider reducing the amount of candy melts to maintain balance, and ensure the textures complement each other.
Conclusion
Grinch Rocky Road Candy is more than just a treat; it’s a joyful celebration of the season's spirit, perfect for sharing with loved ones or enjoying during cozy nights at home. With its playful colors and festive flavors, it encapsulates the fun of holiday cooking effortlessly.
As you prepare this delightful candy, remember that creativity is encouraged. Whether you tweak the ingredients or embrace new flavors, the essence remains the same: spreading joy and deliciousness. Enjoy the process, and happy holiday baking!
Recipe Card

Discover the Joy of Grinch Rocky Road Candy
Ingredients
Method
- Prepare the baking pan and ingredients.
- Melt the chocolate and butter.
- Combine marshmallows and chopped nuts.
- Add flavorings and candy melts.
- Spread mixture into prepared pan.
- Melt remaining green candy melts and drizzle.
- Melt and add red candy melts for decoration.
- Chill and set the candy.
- Cut and serve.
Notes
Additional serving suggestions: pair with a crisp salad, garlic bread, or roasted seasonal vegetables for balance.
For make-ahead, prep components separately and assemble just before heating to preserve texture.
Taste and adjust with acid (lemon/vinegar) and salt right at the end to wake up flavors.