Introduction
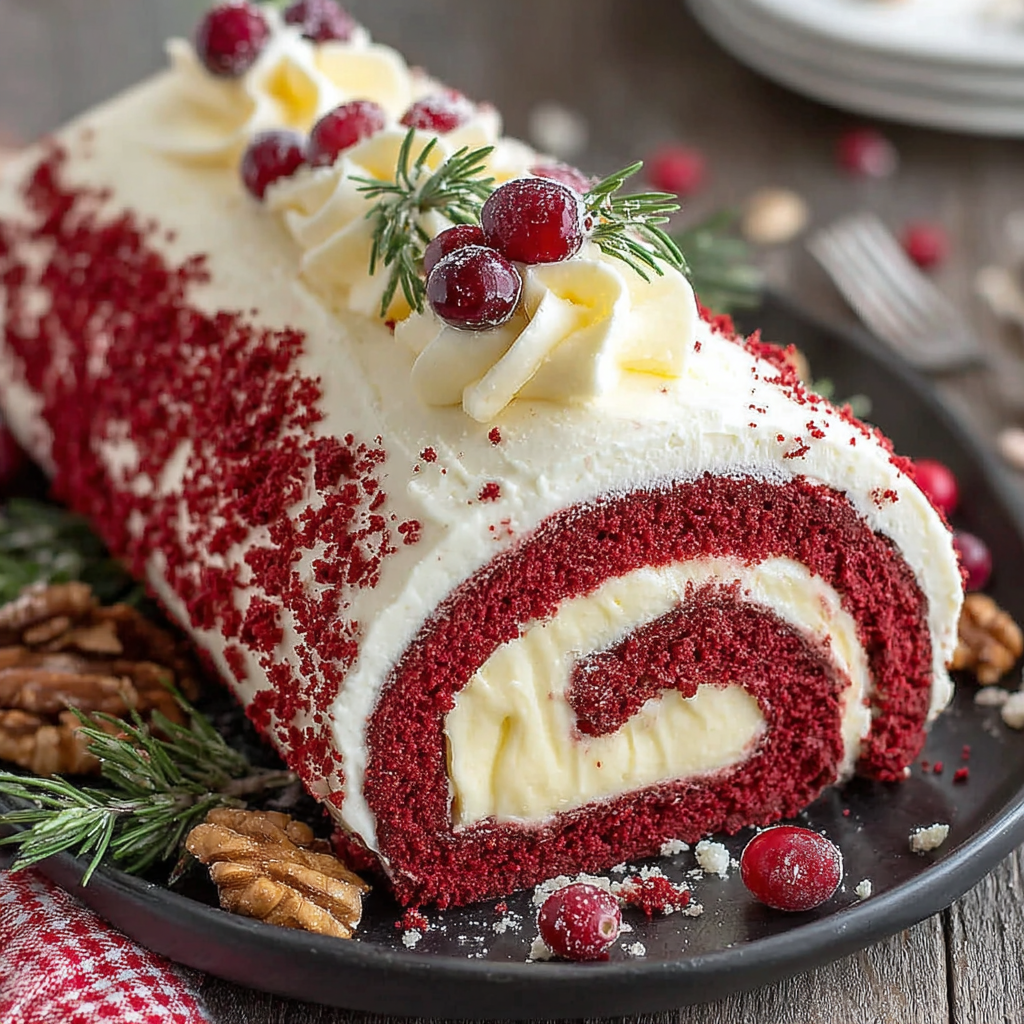
The Red Velvet Yule Log is a delightful twist on the classic chocolate version, merging festive spirit with a burst of unique flavor. This cake roll not only captures the essence of the holidays through its vibrant color but also delivers a rich, velvety texture that will impress family and friends alike.
Bringing together the lightness of a sponge cake with the tang of cream cheese filling, this dessert is as pleasing to the palate as it is to the eyes. Perfect for holiday gatherings or just to treat yourself, preparing a Red Velvet Yule Log is a rewarding experience.
With a little patience and love, your efforts will yield a stunning centerpiece that celebrates the joy of the season. Let’s embark on the journey of creating this culinary masterpiece.
Ingredients
- 1 ½ cups all-purpose flour
The foundation of the yule log, all-purpose flour provides structure and stability to the cake. It balances the moisture and richness created by other ingredients. - 1 cup granulated sugar
Sugar not only sweetens the cake but also contributes to its moistness and helps achieve a beautiful golden color during baking. - 1 tsp baking powder
Baking powder is a leavening agent that helps the cake rise, giving it the light and airy texture characteristic of a sponge. - ½ tsp baking soda
It enhances the leavening alongside baking powder, ensuring a tender crumb. It also reacts with the vinegar for a subtle flavor. - 1 tsp cocoa powder
Cocoa powder adds a depth of flavor and enhances the characteristic red hue of the cake, contributing to that delightful red velvet color. - ½ tsp salt
Salt amplifies the flavors, balancing the sweetness and enhancing the overall taste of the cake. - 3 large eggs
Eggs enrich the batter, providing moisture and stability while acting as a natural binder, which is essential for the cake’s structure. - 1 cup vegetable oil
Oil keeps the cake moist and tender, allowing it to remain soft and luscious even after cooling. - 1 tsp vanilla extract
This extract enhances the flavor profile, adding a lovely warmth and depth that complements the red velvet. - 1 tbsp red food coloring
Food coloring is key in achieving that vibrant red color, distinguishing red velvet from traditional sponge cakes. - 1 tbsp white vinegar
Vinegar reacts with baking soda to create lift in the cake, and it also contributes to the overall flavor profile. - 8 oz cream cheese, softened
The star of the filling, cream cheese provides a tangy flavor that contrasts beautifully with the sweetness of the cake. - ½ cup unsalted butter, softened
Butter adds richness to the cream cheese filling, making it velvety smooth while complementing the cake. - 2 cups powdered sugar
Powdered sugar sweetens the cream cheese filling without making it overly dense, allowing for a light and enjoyable texture. - 1 tsp vanilla extract (for filling)
This enhances the creamy filling, ensuring the flavors are harmonious and rich.
Directions & Preparation
Step 1: Preheat your oven to 350°F (175°C).
Preheating the oven ensures even baking from the moment the batter hits the pan. A consistent temperature is crucial for a cake with a delicate structure like this, allowing the sponge to rise properly without any unwanted kernels.
Step 2: Prepare a 15×10 inch jelly roll pan by lining it with parchment paper and greasing it lightly.
The parchment paper allows for easy release of the cake once baked, preventing any sticking that could ruin the sponge’s appearance. Greasing adds an extra layer of protection, ensuring a seamless removal.
Step 3: In a large bowl, whisk together the flour, sugar, baking powder, baking soda, cocoa powder, and salt.
Combining the dry ingredients beforehand ensures they are evenly distributed throughout the batter. This step prevents an uneven rise and guarantees that your cake will have a consistent, delightful flavor.
Step 4: In another bowl, mix the eggs, oil, vanilla extract, food coloring, and vinegar until well combined.
Whisking the wet ingredients together fully integrates the oil and eggs, ensuring uniformity in your batter. The food coloring should be carefully mixed to achieve an even hue throughout the cake.
Step 5: Pour the wet mixture into the dry ingredients and mix until just combined, being careful not to overmix.
Overmixing can activate gluten, making the cake dense instead of light and airy. Aim for a smooth batter while being cautious of keeping it fluffy.
Step 6: Spread the batter evenly into the prepared pan, smoothing it out to the corners.
Even spreading ensures uniform thickness, so the cake cooks evenly. This step is crucial for achieving a consistent texture across the entire log.
Step 7: Bake in the preheated oven for about 15-20 minutes or until a toothpick inserted in the center comes out clean.
The baking time is crucial; too long can lead to dryness, while too short could leave the center undercooked. The toothpick test is a reliable cue for doneness.
Step 8: Once baked, let the cake cool in the pan for 5 minutes before transferring it to a cooling rack.
Allowing it to cool slightly in the pan helps it set and prevents cracking. The transition to a cooling rack allows it to cool evenly without steaming, preserving its texture.
Step 9: While cooling, prepare the cream cheese filling by beating the cream cheese, butter, powdered sugar, and vanilla until smooth and fluffy.
This step is vital for creating a rich and airy filling. Beating it well ensures that all ingredients are incorporated, resulting in a satisfying, smooth mixture.
Step 10: Once the cake is completely cool, spread the filling evenly over the top of the cake.
Evenly spreading the filling prevents any part of the roll from being overly stuffed or lacking, ensuring a delectable bite every time.
Step 11: Starting from one end, carefully roll the cake into a log, using the parchment paper to assist.
Rolling neatly while the cake is still slightly warm provides flexibility, preventing cracking. This technique is essential to shape the cake properly.
Step 12: Wrap the log in plastic wrap and chill in the refrigerator for at least an hour to set.
Chilling allows the filling to firm up and the cake to hold its shape, making it easier to slice and serve later.
Step 13: Once chilled, remove the log from the plastic wrap and place it seam-side down on a serving platter.
Displaying it seam-side down not only provides a polished appearance but also hides the imperfection of the roll, allowing for a professional look.
Step 14: Decorate with additional cream cheese frosting on top and dust with powdered sugar if desired.
Adding frosting enhances the presentation and flavor, while powdered sugar gives a festive touch. These finishing touches elevate the visual appeal of the Yule Log.

The Tradition of Yule Logs
Historically, Yule Logs symbolize warmth during winter festivities, inspired by the custom of burning a log to celebrate the season. This cake captures that essence by merging tradition with delightful flavor. By incorporating classic elements with modern techniques, the Red Velvet Yule Log becomes a perfect centerpiece for your holiday gatherings.
Choosing the Right Ingredients
Selecting high-quality ingredients can significantly impact the flavor and texture of your Red Velvet Yule Log. Use fresh eggs, real vanilla extract, and good-quality cocoa powder to ensure a rich and nuanced taste. The choice of cream cheese for the filling should also be carefully considered; opting for full-fat cream cheese gives you the best results in terms of flavor and creaminess.
Adapting for Various Occasions
Though often reserved for holidays, the Red Velvet Yule Log is a versatile dessert. You can adjust the flavor profile by adding elements such as orange zest or spices for enhanced warmth. This cake adapts well for various celebrations, making it a favorite not just for winter holidays, but also for birthdays or romantic occasions, bringing joy year-round.
FAQs
What if my cake is too thick after baking?
Ensure to follow the recipe closely. If it's too thick, it may need more liquid. Consider adding a splash of milk to the batter before pouring it into the baking pan.
Why does my cake taste bland?
Blandness can often be corrected by ensuring salt and vanilla are used in sufficient quantities. A pinch more salt can enhance the overall flavor.
Can I use buttermilk instead of oil?
Yes, buttermilk can replace oil for added tang. Note that it will change the cake’s texture slightly, so adjust your baking powder due to the acidity.
How can I prevent my roll from cracking during assembly?
To minimize cracking, roll the cake while it’s still warm. This technique allows the cake to adapt to the rolled shape without breaking down.
What can I do if my filling is too runny?
If the filling is too runny, add more powdered sugar gradually until it reaches your desired consistency. Be sure to mix thoroughly to avoid lumps.
How do I make my Yule Log more festive?
You can enhance the look by adding edible decorations, like holly or festive sprinkles. Dark chocolate shavings can also elevate the presentation.
Conclusion
Creating a Red Velvet Yule Log is not just about baking; it's an opportunity to spread joy and celebrate the spirit of the season. The combination of a rich cake and creamy filling makes it a memorable dessert that leaves a lasting impression.
Whether you’re gathering with family or hosting a holiday party, this cake is sure to be a standout. Enjoy the process, and don’t forget to share this delightful treat with those you love.
Recipe Card
Indulge in a Festive Red Velvet Yule Log
Ingredients
Method
- Preheat the oven and prepare the pan.
- Mix dry ingredients.
- Combine sugar, oil, and egg.
- Add food coloring and buttermilk.
- Incorporate dry ingredients.
- Bake the cake.
- Cool and roll the cake.
- Prepare the frosting.
- Unroll, fill, and re-roll the cake.
- Frost the cake.
- Chill and serve.
Notes
Additional serving suggestions: pair with a crisp salad, garlic bread, or roasted seasonal vegetables for balance.
For make-ahead, prep components separately and assemble just before heating to preserve texture.
Taste and adjust with acid (lemon/vinegar) and salt right at the end to wake up flavors.