Introduction
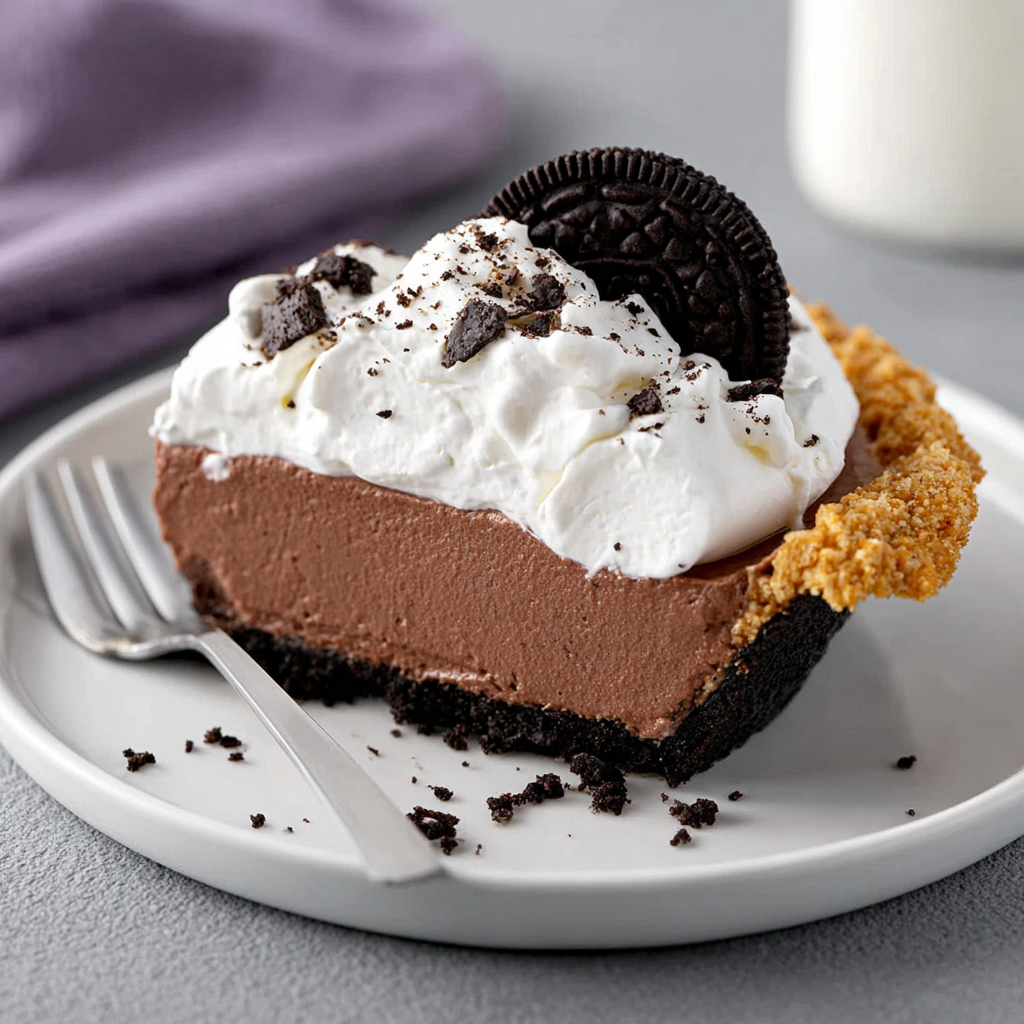
There’s something irresistibly luxurious about a chocolate mousse pie, especially when nestled within a crunchy Oreo crust. This combination delivers a perfect balance of rich, creamy texture and a delightful cookie crunch.
Crafting this dessert not only brings joy to the palate but also creates an impressive centerpiece for any occasion. Whether celebrating a birthday or simply indulging your chocolate cravings, this pie is sure to impress.
Ingredients
- 2 cups Oreo cookie crumbs
Oreo crumbs create a rich, chocolatey base for the pie, providing a crunchy texture that contrasts beautifully with the creamy filling. - 1/2 cup unsalted butter, melted
Butter binds the cookie crumbs together and adds moisture, helping the crust to hold its shape while contributing to a more decadent flavor. - 1 cup heavy whipping cream
Heavy cream is essential for the mousse’s airy texture, helping it whip up into soft peaks that create lightness against the denser chocolate. - 8 ounces bittersweet or semisweet chocolate, chopped
Quality chocolate is the star of the mousse, giving it a deep, rich flavor that elevates the pie and offers a satisfying taste experience. - 3 large eggs, separated
Eggs provide structure and richness; the yolks add creaminess to the mousse, while whipped egg whites contribute airiness for that light, fluffy texture. - 1/4 cup granulated sugar
Sugar sweetness balances the rich bitterness of the chocolate, enhancing the overall flavor profile without overwhelming it. - 1 teaspoon vanilla extract
Vanilla extract adds depth of flavor, rounding out the chocolate and bringing all elements of the pie together harmoniously.
Directions & Preparation
Step 1: Prepare the Oreo crust.
Begin by preheating the oven to 350°F (175°C). In a medium bowl, combine the Oreo cookie crumbs with melted butter until well blended. This mixture should resemble wet sand. Press it evenly into the bottom and up the sides of a 9-inch pie pan, ensuring it’s compact to hold together during baking. Bake the crust for 8-10 minutes until set. This step is crucial as it allows the crust to firm up, producing a sturdy base for the mousse.
Step 2: Melt the chocolate.
In a heatproof bowl over simmering water or in the microwave in short bursts, melt the chopped chocolate, stirring until smooth. Ensure not to overheat the chocolate, as it can seize. This melted chocolate will be the heart of your mousse, providing richness and a luscious mouthfeel, so take care to melt it gently.
Step 3: Whip the cream.
In a large mixing bowl, whip the heavy cream to soft peaks using an electric mixer. Be careful not to overwhip, as it can turn grainy. Soft peaks will lend a light and fluffy texture to your mousse while balancing the richness of the chocolate.
Step 4: Beat the egg yolks and sugar.
In another bowl, whisk the egg yolks with granulated sugar until pale and creamy. This process is essential as it dissolves the sugar and incorporates air, which will contribute to the volume of your mousse. The sugar also helps to stabilize the mixture.
Step 5: Combine the melted chocolate and egg yolk mixture.
Carefully fold the melted chocolate into the beaten yolk mixture until fully combined. This does not require too much mixing; the goal is to maintain the airy texture created earlier. This step integrates the flavors and ensures the richness of the chocolate is evenly distributed.
Step 6: Fold in the whipped cream and egg whites.
Gently fold the whipped cream into the chocolate mixture using a rubber spatula. In a separate bowl, whip the egg whites to stiff peaks, then gently fold them into the mousse until there are no streaks. This is a delicate process; folding helps retain the airiness needed for a light mousse.
Step 7: Assemble the pie and refrigerate.
Pour the mousse filling into the prepared Oreo crust, smoothing the top with a spatula. Chill in the refrigerator for at least 4 hours or until set. This chilling period is vital as it allows the mousse to firm up, making it easier to slice and enhancing the overall texture.
Step 8: Serve and enjoy.
Once set, slice the mousse pie into wedges to serve. Consider garnishing with whipped cream and chocolate shavings for an extra touch of elegance. Each slice should showcase distinct layers of the crunchy crust and the creamy filling, inviting your guests to indulge.

Perfecting the Oreo Crust
The Oreo crust serves as the foundation of your creamy chocolate mousse pie, and achieving the right texture is key. Make sure to thoroughly combine the cookie crumbs with melted butter to create a mixture that holds together when pressed into the pie pan. Baking the crust briefly solidifies it, ensuring it won’t crumble under the weight of the mousse filling, making a seamless transition from crust to dessert.
Choosing the Right Chocolate
Selecting the right type of chocolate is critical for an intense chocolate flavor in your mousse. Bittersweet chocolate adds depth and richness, while semisweet chocolate provides a sweeter profile. Whatever type you choose, ensuring it’s high quality will yield the richest taste, significantly influencing the final outcome of your dessert. Your chocolate is not just an ingredient; it’s the star of the show.
Elevating Your Mousse with Flavor
While the recipe focuses on classic chocolate mousse, adding flavors can personalize this dessert. A hint of espresso powder enhances the chocolatey notes, or a splash of orange extract can introduce brightness. However, remember to keep your additions subtle to maintain the dish’s original character. Exploring these variations invites creativity and makes every pie uniquely yours.
FAQs
What if the mousse is too thick?
If your mousse turns out too thick, it may be due to overwhipped cream or egg whites. To fix this, you can gently fold in a bit more whipped cream to lighten the texture.
Can I use a different type of cookie for the crust?
Yes, you can substitute the Oreos with similar cookies like chocolate wafers or even graham crackers for a different flavor profile.
How can I ensure my chocolate doesn’t seize?
To prevent chocolate from seizing, melt it slowly and avoid adding moisture. If using a microwave, heat in 20-second intervals, stirring in between.
Why did my mousse turn out grainy?
If your mousse is grainy, it likely resulted from not properly melting the chocolate or mixing the ingredients too vigorously, causing the mixture to separate.
What can I do to make my mousse sweeter?
If the mousse is too bitter, consider increasing the sugar during the egg yolk and sugar mixing step. Taste and adjust as necessary.
How can I make sure my egg whites whip up properly?
Ensure your mixing bowl and beaters are completely clean and free of grease. Also, make sure no yolks are mixed in, as this can hinder the whipping process.
Conclusion
Crafting a creamy chocolate mousse pie with an Oreo crust is a delightful experience that rewards you with a stunning dessert. The combination of rich chocolate and crunchy crust elevates any gathering, making it perfect for special occasions or a sweet treat at home.
With a few techniques and quality ingredients, you can create a dessert that not only looks impressive but tastes amazing. Enjoy the compliments that come your way with each bite!
Recipe Card

Indulgent Creamy Chocolate Mousse Pie with Oreo Crust
Ingredients
Method
- Prepare the Oreo crust.
- Melt the chocolate.
- Whip the cream.
- Beat the egg yolks and sugar.
- Combine the melted chocolate and egg yolk mixture.
- Fold in the whipped cream and egg whites.
- Assemble the pie and refrigerate.
- Serve and enjoy.
Notes
Additional serving suggestions: pair with a crisp salad, garlic bread, or roasted seasonal vegetables for balance.
For make-ahead, prep components separately and assemble just before heating to preserve texture.
Taste and adjust with acid (lemon/vinegar) and salt right at the end to wake up flavors.