Introduction
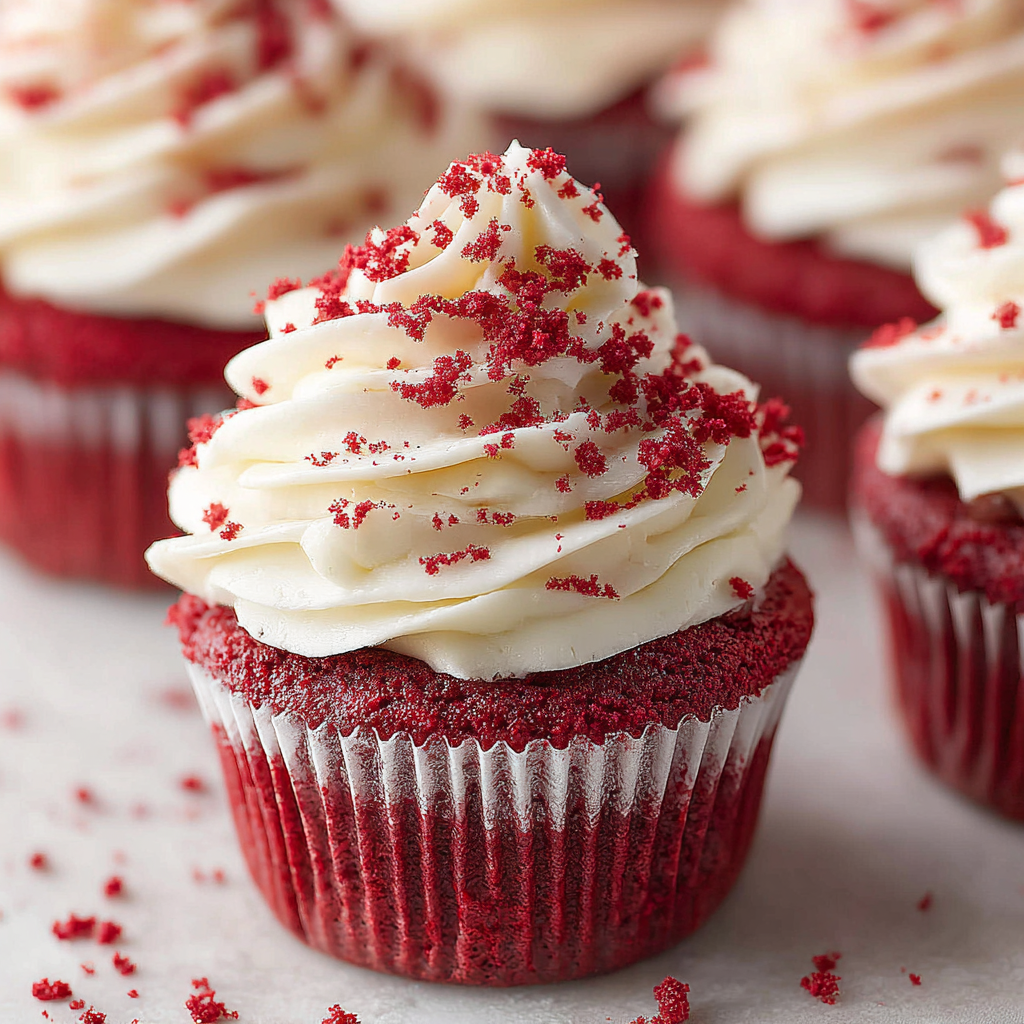
Few desserts can quite match the allure of a red velvet cupcake. With its striking red hue and deliciously rich flavor, this treat has become a beloved staple at celebrations and gatherings. Whether served at a birthday party, wedding, or holiday event, red velvet cupcakes capture attention and tantalize taste buds.
But these are not just about looks; they are a symphony of flavors, blended beautifully with a hint of cocoa and a luscious cream cheese frosting. Perfectly moist and delightfully soft, these cupcakes make for a wonderful baking project, inviting both novice and seasoned bakers into the kitchen.
Ingredients
- 2 cups all-purpose flour
The base of our cupcakes, all-purpose flour provides the structure and helps the cupcakes rise. It ensures the right balance between fluffiness and density, giving the cupcakes their signature tender crumb. - 1 ½ cups granulated sugar
Sugar not only sweetens the cupcakes but also contributes to their moist texture. It enhances the overall flavor profile, ensuring that each bite is just the right amount of sweet. - 1 cup vegetable oil
Vegetable oil adds moisture without weighing down the batter. Its neutral flavor also allows the distinct cocoa and vanilla notes to shine through, creating a balanced taste. - 1 cup buttermilk, room temperature
Buttermilk is essential for creating a tender cupcake. The acidity reacts with baking soda, helping the cupcakes rise and imparting a slight tanginess that complements the sweetness. - 2 large eggs, room temperature
Eggs act as binders, helping to hold the ingredients together while also providing structure. They also add richness and enhance the overall flavor of the cupcakes. - 1 tablespoon red food coloring
This is what gives red velvet its signature color. The food coloring enhances the visual appeal of the cupcakes, making them a stunning addition to any dessert table. - 1 teaspoon vanilla extract
Vanilla extract adds a warm, sweet flavor that complements the cocoa and buttermilk perfectly. It rounds out the taste of the cupcakes, making them truly delicious. - 1 teaspoon baking soda
Baking soda is a leavening agent that helps the cupcakes rise. It reacts with the acidity of the buttermilk to create fluffier textures. - 1 teaspoon vinegar
Vinegar enhances the red color of the cupcakes and also adds to the leavening process. It reacts with the baking soda to create carbon dioxide, contributing to a light, airy crumb. - 1 teaspoon cocoa powder
Cocoa powder gives red velvet cupcakes their unique flavor profile—just a hint of chocolatey goodness. It also deepens the rich color, ensuring the cupcakes are visually appealing.
Directions & Preparation
Step 1: Preheat your oven to 350°F (175°C) and line a cupcake tin with paper liners.
Preheating the oven is crucial for achieving even cooking. If the oven isn’t hot enough, your cupcakes may not rise properly, resulting in a dense texture. Lining the cupcake tin with parchment cups helps with easy removal, ensuring your cupcakes retain their beautiful shape.
Step 2: In a large bowl, whisk together the flour, cocoa powder, baking soda, and salt until well combined.
Whisking the dry ingredients together ensures that the leavening agents are evenly distributed. This helps each cupcake rise uniformly at the same rate during baking, which is key for achieving that perfect fluffy texture.
Step 3: In another bowl, mix the oil and sugar until well combined and slightly fluffy.
Creaming the oil and sugar together introduces air into the mixture, leading to lighter cupcakes. It’s essential that this mixture is combined thoroughly, as it forms the base for your batter.
Step 4: Add the room temperature eggs and vanilla extract to the oil-sugar mixture, beating until smooth.
Incorporating eggs at room temperature helps them emulsify with the oil and sugar, resulting in a cohesive batter. Mixing well ensures that the eggs contribute their binding properties effectively.
Step 5: Pour in the buttermilk and red food coloring, mixing until fully incorporated.
Adding buttermilk and food coloring while mixing helps to enhance moister while maintaining the vibrant color. Ensure it’s well blended, as this plays a pivotal role in developing the cupcakes' overall flavor.
Step 6: Gradually add the dry ingredients to the wet mixture, stirring until just combined. Do not overmix!
Overmixing can lead to tough cupcakes. Stir just until no dry flour remains visible; a few lumps are fine. This cautious approach maintains a delicate texture.
Step 7: Gently fold in the vinegar, ensuring it's evenly distributed throughout the batter.
Vinegar reacts with baking soda, so it's important to fold it in gently to maximize the leavening effect. This step is crucial for achieving the desired fluffiness.
Step 8: Divide the batter evenly among the lined cupcake cups, filling them about 2/3 full.
Filling the liners too much can cause the batter to overflow, leading to uneven shapes. Leaving room for expansion is vital for achieving that perfect dome top.
Step 9: Bake in the preheated oven for 18-20 minutes, or until a toothpick inserted in the center comes out clean.
Baking at the correct temperature ensures that the cupcakes rise evenly. Always test with a toothpick; it’s beneficial to check for doneness as soon as the time is up to avoid overbaking.
Step 10: Remove the cupcakes from the oven and allow them to cool in the pan for 5 minutes before transferring to a wire rack.
Cooling in the pan allows the cupcakes to set slightly, helping maintain their shape. Transferring to a wire rack allows them to cool completely, preventing moisture buildup.
Step 11: Once cooled, frost with cream cheese frosting and enjoy!
Frosting at room temperature ensures that it spreads smoothly and evenly. This final touch not only enhances flavor but also adds visual appeal to your lovely red velvet cupcakes.

Choosing the Right Food Coloring
When it comes to coloring your red velvet cupcakes, the type of food coloring used matters. Gel food coloring is highly recommended as it delivers vibrant color without adding excess liquid. Liquid food coloring can dilute the batter, altering the cupcake's consistency. Ensure that you use enough coloring to achieve that classic rich red hue that makes these cupcakes so iconic.
Elevating Your Cream Cheese Frosting
For that perfect complement to your cupcakes, your cream cheese frosting should be luxuriously smooth and full of flavor. Consider adding a splash of vanilla or a hint of lemon juice to brighten the taste. Make sure that your cream cheese is at room temperature before mixing to avoid lumps. A slight chilling after spinning helps the frosting firm up for easier spreading.
Variations to Try With Red Velvet Cupcakes
While traditional red velvet cupcakes have their charm, you can experiment with variations to keep things exciting. Consider adding a dash of espresso powder to the batter for a deeper flavor profile, or sprinkle some chocolate chips for added texture. For a twist on the frosting, try infusing crushed berries for a fruity contrast that pairs wonderfully with the rich cake.
FAQs
What can I do if my red velvet cupcakes are too dry?
If your cupcakes turned out dry, you may have overbaked them or used too much flour. Always measure flour accurately by scooping and leveling off, and check for doneness a minute or two earlier.
How can I adjust the recipe for mini red velvet cupcakes?
To make mini cupcakes, reduce the baking time to about 10-12 minutes. Keep an eye on them to avoid overbaking. This allows for a perfectly timed treat that’s great for bite-sized enjoyment.
What should I do if my batter is too thick?
If your red velvet cupcake batter seems too thick, it may be due to excess flour. You can add a tablespoon of buttermilk at a time until the desired consistency is reached, ensuring a light texture.
How do I prevent my cupcakes from sinking in the middle?
Cupcakes may sink if they are underbaked or if the batter was overmixed. Ensure that you are mixing just until combined and always perform the toothpick test to check doneness.
Is it possible to make red velvet cupcakes without sugar?
Yes, you can use sugar substitutes like erythritol or a stevia blend. Just note that this may alter the texture slightly, so it’s good to follow a recipe designed specifically for sugar replacements.
What type of cocoa should I use for red velvet?
Use unsweetened Dutch-processed cocoa for a deeper flavor and enhanced richness, as it interplay beautifully with the acidity of buttermilk and leads to the desired flavor profile.
Conclusion
Red velvet cupcakes are more than just a dessert; they bring joy and a splash of color to any gathering. By following this simple recipe, you can create an indulgent treat that’s sure to impress your family and friends.
As you bake, remember to enjoy the process—each whisk, fold, and scoop contributes to the delightful end result. Whether you stick to the classic flavors or venture into creative territory, your red velvet cupcakes will undoubtedly be a hit.
Recipe Card
Irresistible Red Velvet Cupcakes for Every Occasion
Ingredients
Method
- Preheat your oven to 350°F (175°C) and line a cupcake tin with paper liners.
- In a large bowl, whisk together the flour, cocoa powder, baking soda, and salt until well combined.
- In another bowl, mix the oil and sugar until well combined and slightly fluffy.
- Add the room temperature eggs and vanilla extract to the oil-sugar mixture, beating until smooth.
- Pour in the buttermilk and red food coloring, mixing until fully incorporated.
- Gradually add the dry ingredients to the wet mixture, stirring until just combined. Do not overmix!
- Gently fold in the vinegar, ensuring it's evenly distributed throughout the batter.
- Divide the batter evenly among the lined cupcake cups, filling them about 2/3 full.
- Bake in the preheated oven for 18-20 minutes, or until a toothpick inserted in the center comes out clean.
- Remove the cupcakes from the oven and allow them to cool in the pan for 5 minutes before transferring to a wire rack.
- Once cooled, frost with cream cheese frosting and enjoy!
Notes
Additional serving suggestions: pair with a crisp salad, garlic bread, or roasted seasonal vegetables for balance.
For make-ahead, prep components separately and assemble just before heating to preserve texture.
Taste and adjust with acid (lemon/vinegar) and salt right at the end to wake up flavors.