Introduction
Pork chops are a versatile and satisfying protein that many home cooks cherish. When seasoned and seared to perfection, they can be a standout dish at any dinner table. The union of garlic and butter adds a depth of flavor that transforms a simple pork chop into a Gourmet delight.
This recipe for garlic butter pan-seared pork chops is not only simple but provides a rich, savory taste that will impress your family and guests alike. As the chops cook, the garlic butter basts the meat, infusing it with moisture and flavor, ensuring each bite is juicy and delicious.
Ingredients
- 4 bone-in pork chops (about 1 inch thick)
Bone-in pork chops have more flavor and moisture than their boneless counterparts. The bone helps to insulate the meat during cooking, resulting in a juicier, more tender chop. - 4 tablespoons unsalted butter
Butter adds richness and a creamy texture to the dish. It also serves as a base for the garlic, which when sautéed, infuses the meat with a savory aroma. - 4 cloves garlic, minced
Garlic provides a punch of flavor, enhancing the overall taste of the dish. When cooked in butter, it turns golden and aromatic, making the pork chops truly irresistible. - 2 teaspoons fresh thyme leaves
Thyme adds an earthy, herby note that complements the richness of the pork and the buttery garlic. Fresh herbs elevate the dish, making it feel more upscale. - Salt, to taste
Salt is essential to enhance the flavors of the pork chops. It draws out the natural juices, ensuring the meat remains moist and flavorful. - Pepper, to taste
Pepper adds a hint of heat and complexity to the dish. Freshly cracked pepper offers a more vibrant flavor than pre-ground pepper.
Directions & Preparation
Step 1: Pat the pork chops dry with paper towels and season generously with salt and pepper on both sides.
Drying the chops ensures a better sear, allowing them to develop a beautiful crust when cooked. Generous seasoning with salt and pepper not only enhances the pork's flavor but also helps to form a savory crust.
Step 2: Heat a large skillet over medium-high heat and add 2 tablespoons of butter.
Heating the skillet adequately before adding the butter is key to achieving a good sear. The right temperature ensures that the chops caramelize rather than steam, creating a flavorful crust.
Step 3: Once the butter is melted and bubbling, carefully add the pork chops to the skillet, without overcrowding.
Adding the chops should create a satisfying sizzle; if it doesn’t, the pan isn't hot enough. Overcrowding the pan can lead to uneven cooking and steaming, so it’s essential to give each chop adequate space.
Step 4: Cook the pork chops for 5-7 minutes on the first side, until a golden-brown crust forms.
Proper cooking time is crucial; undercooked chops can be chewy, while overcooked ones become dry. Look for a delicious crust that signals it's time to flip—resisting the urge to move them around will help with this.
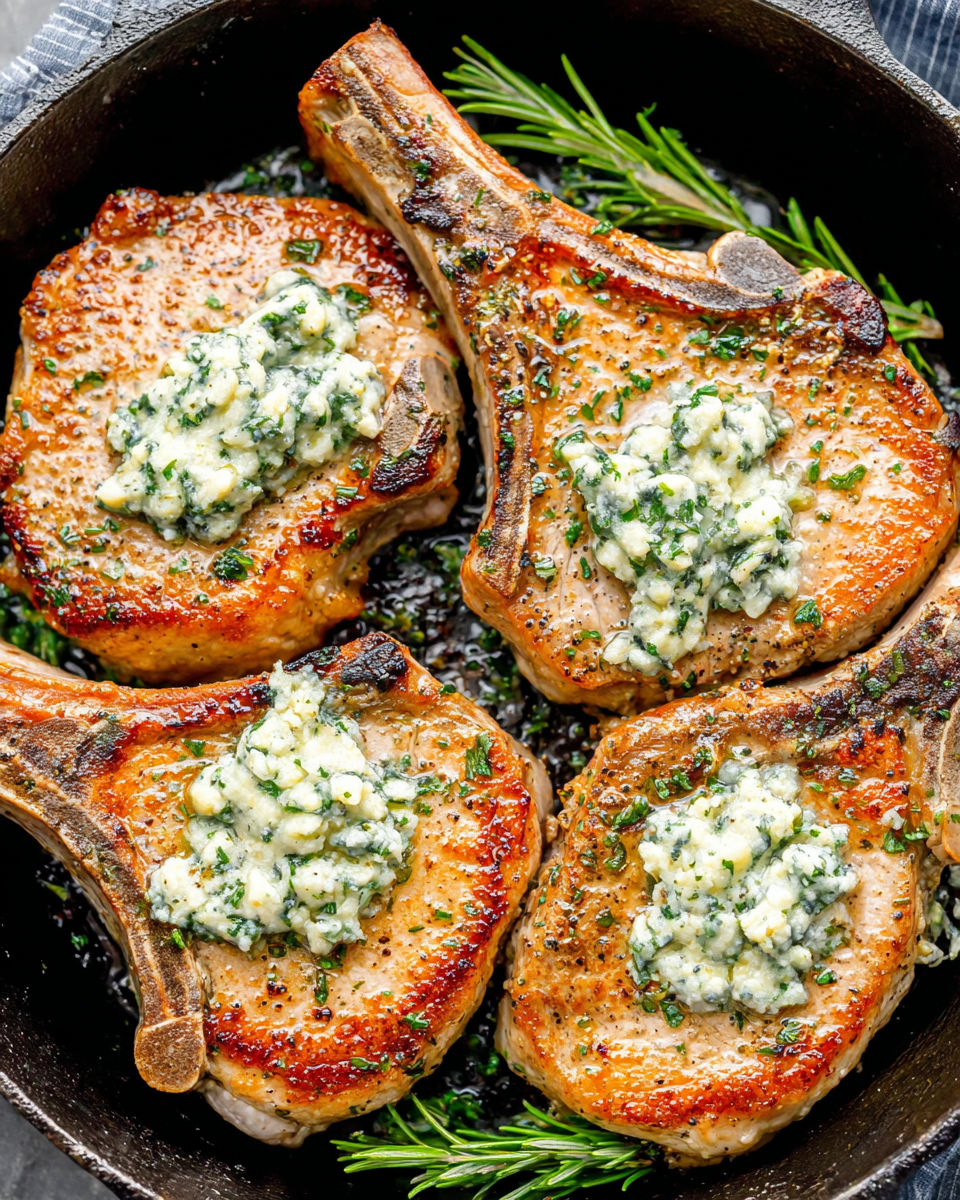
Step 5: Flip the chops and add the minced garlic, thyme, and remaining 2 tablespoons of butter to the pan.
Flipping the chops allows the other side to sear while the garlic and thyme release their aromas. The butter will start to brown; use it to baste the chops frequently for added moisture and flavor.
Step 6: Continue cooking for another 5-7 minutes, basting with the garlic butter until the pork reaches an internal temperature of 145°F (63°C).
Basting not only transfers flavor but ensures even cooking across the meat. Using a meat thermometer is advisable to avoid overcooking; the pork should remain juicy and tender.
Step 7: Remove the chops from the skillet and let them rest for 5 minutes before serving.
Resting allows the juices to redistribute throughout the meat, preventing them from running out when you cut into the chops. This step is essential for a juicy final dish.
Step 8: Serve the pork chops drizzled with the garlic thyme butter from the skillet.
Drizzling the remaining garlic butter over the chops adds another layer of flavor. It also enhances presentation, making the dish even more appealing and delicious.

The Importance of Quality Pork
Choosing high-quality pork chops is crucial for this dish. Look for chops that are well-marbled with fat, as this contributes to both flavor and tenderness. Fresh, high-quality meat communicates care in your cooking and can elevate a simple recipe significantly.
Enhancing Flavor with Fresh Herbs
Using fresh herbs, like thyme in this recipe, allows for a vibrant and aromatic finish. Freshly chopped herbs impart a lively taste that dried herbs lack, making the dish feel more complete. Don’t hesitate to experiment with your favorite herbs or what you have on hand to personalize the flavors.
Mastering the Sear: A Culinary Technique
Achieving a perfect sear on your pork chops is a fundamental cooking skill that enhances the texture and taste of your dish. The Maillard reaction, responsible for that beautiful crust, requires patience and the right heat. By mastering this technique, you're on your way to restaurant-quality home cooking.
FAQs
Why did my pork chop turn out dry?
Dry pork chops are typically overcooked. Using a meat thermometer can help ensure they are cooked to just the right temperature, maintaining their juiciness.
What can I do if the sauce is too thin?
If your garlic butter sauce is too thin, you can reduce it further by simmering it on low heat until it thickens slightly. Alternatively, adding a bit of cornstarch mixed with water can create a thicker consistency.
Can I use boneless pork chops for this recipe?
Yes, boneless pork chops can be used; however, they may cook faster. Keep an eye on the cooking time to avoid overcooking.
What can I do if the garlic starts to burn?
If the garlic heats too quickly and begins to burn, reduce the heat immediately and add a bit of butter to cool things down. Burnt garlic can impart a bitter flavor.
Should I adjust the cooking time for thicker pork chops?
Yes, if your pork chops are thicker than 1 inch, increase the cooking time slightly and check the internal temperature to ensure they are cooked through.
What side dishes complement garlic butter pork chops?
Simple sides like garlic mashed potatoes or sautéed green beans pair well, as they can absorb the flavors from the pork and garlic butter.
Conclusion
Garlic butter pan-seared pork chops are a testament to how a few quality ingredients can create a memorable meal. This dish shines with its simplicity and flavors, making it suitable for both weeknight dinners and special occasions.
Embrace the techniques you've learned here, and don’t be afraid to experiment with additional seasonings or side dishes. Cooking is about creativity, and each meal is an opportunity to express your culinary personality.
Recipe Card

Savory Garlic Butter Pan Seared Pork Chops
Ingredients
Method
- Pat the pork chops dry with paper towels and season generously with salt and pepper on both sides.
- Heat a large skillet over medium-high heat and add 2 tablespoons of butter.
- Once the butter is melted and bubbling, carefully add the pork chops to the skillet, without overcrowding.
- Cook the pork chops for 5-7 minutes on the first side, until a golden-brown crust forms.
- Flip the chops and add the minced garlic, thyme, and remaining 2 tablespoons of butter to the pan.
- Continue cooking for another 5-7 minutes, basting with the garlic butter until the pork reaches an internal temperature of 145°F (63°C).
- Remove the chops from the skillet and let them rest for 5 minutes before serving.
- Serve the pork chops drizzled with the garlic thyme butter from the skillet.
Notes
Additional serving suggestions: pair with a crisp salad, garlic bread, or roasted seasonal vegetables for balance.
For make-ahead, prep components separately and assemble just before heating to preserve texture.
Taste and adjust with acid (lemon/vinegar) and salt right at the end to wake up flavors.