Introduction
Brightly colored and whimsical, Dr. Seuss Cookies are an invitation to the wonderful world of children's literature. Inspired by the playful stories of Dr. Seuss, these cookies are not just treats; they are tiny works of art that engage the imagination.
Baking these cookies allows for a burst of creativity, as you can play with colors, shapes, and flavors. Whether you’re making them for a party, a school event, or just a fun afternoon at home, each cookie can tell a story. The dough is soft and easy to shape, making it perfect for kids to join in on the fun.
Ingredients
- 2 ½ cups all-purpose flour
All-purpose flour provides the structure for the cookies. It’s essential for balancing out the moisture from other ingredients and helps create a chewy texture. - 1 teaspoon baking powder
This ingredient acts as a leavening agent, giving the cookies a light and airy quality. It helps them rise slightly while baking. - ½ teaspoon baking soda
Baking soda helps with browning and assists in the spread of the cookies during baking, contributing to a nice texture. - ½ teaspoon salt
Salt enhances the flavor of the cookies, balancing out the sweetness and ensuring a more complex taste. - 1 cup unsalted butter, softened
Butter adds richness and flavor to the cookies while also helping to keep them tender. Softened butter is essential for easy creaming with sugars. - 1 cup granulated sugar
Granulated sugar sweetens the cookies and helps achieve a lovely, crisp texture on the edges. - 1 cup packed brown sugar
Brown sugar adds moisture and a slight chewiness, along with a deeper flavor due to the molasses content. - 2 large eggs
Eggs bind all the ingredients together and provide moisture, while also contributing to the cookies’ structure. - 2 teaspoons vanilla extract
Vanilla extract adds a warm, inviting flavor that complements and enhances the overall taste of the cookies. - Food coloring (various colors)
Food coloring is what brings these cookies to life, allowing you to create vibrant shades that reflect the whimsy of Dr. Seuss’s illustrations. - Sprinkles (optional)
Sprinkles add a fun crunch and additional color, making the cookies even more playful and visually appealing.
Directions & Preparation
Step 1: Preheat the oven to 350°F (175°C).
Preheating your oven ensures that the cookies start baking at the right temperature, which helps them rise and bake evenly. Skipping this step can lead to uneven texture and spread.
Step 2: In a medium bowl, whisk together flour, baking powder, baking soda, and salt.
Whisking these dry ingredients first helps to evenly distribute the leavening agents and salt throughout the flour, ensuring consistent texture and taste in every cookie.
Step 3: In a large bowl, cream together the softened butter, granulated sugar, and brown sugar until light and fluffy.
Creaming incorporates air into the butter and sugars, which is crucial for lightness in cookies. Be sure to beat until the mixture is pale and fluffy; this can take a few minutes.
Step 4: Add the eggs, one at a time, beating well after each addition, then stir in the vanilla extract.
Adding eggs one at a time allows for better incorporation into the butter-sugar mixture. This helps bind the dough together and contributes to a soft texture.
Step 5: Gradually mix the dry ingredients into the wet ingredients until just combined, being careful not to overmix.
Mixing just until combined helps avoid developing the gluten in the flour, which can make the cookies tough. A few flour streaks are okay.
Step 6: Divide the dough into portions and mix in food coloring to achieve desired colors.
Dividing the dough allows for vibrant colors without muddling the hues. Mix until the color is evenly distributed; adding too much can affect the texture.
Step 7: Scoop the dough onto parchment-lined baking sheets, leaving space between each cookie for spreading.
Proper spacing is key; cookies will spread while baking, so ensuring enough room prevents them from merging into one another.
Step 8: Optional: top each cookie with sprinkles for extra fun before baking.
Adding sprinkles enhances the presentation and adds a delightful crunch. This step is all about creativity, so let your imagination run wild.
Step 9: Bake for 8-12 minutes, or until the edges are golden brown but the centers remain soft.
Keeping the centers slightly underbaked will lead to a chewy texture in the cookies. Monitor closely, as baking times can vary with oven types.
Step 10: Remove the cookies from the oven and let them cool on the baking sheet for a few minutes before transferring to a wire rack.
Cooling on the baking sheet allows the cookies to continue to set without becoming overly firm. Transferring them too soon may cause them to break.

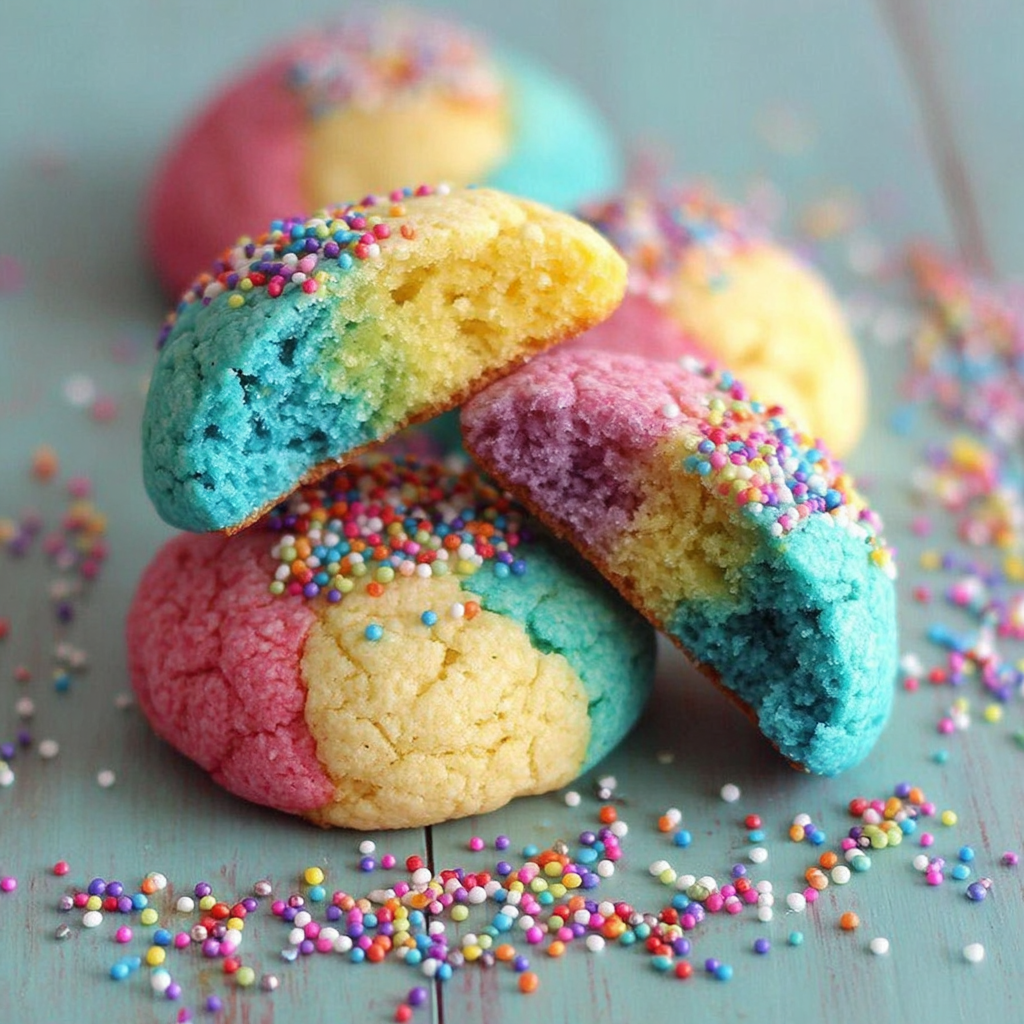
A Splash of Color: Creative Coloring Techniques
Using food coloring can transform ordinary cookie dough into a vibrant canvas. Consider separating the dough into different bowls to create swirled or marbled effects. This playful mixing can mimic the fantastical colors found in Dr. Seuss books, giving each cookie a unique charm that excited imaginations.
Making the Most of Your Cookie Cutter Shapes
Shape does matter in Dr. Seuss Cookies, where creativity knows no bounds. Using fun cookie cutters, you can craft playful animals, hats, or even trees inspired by classic books. Don’t forget to chill the dough slightly if it becomes soft during handling, as this helps maintain the shape during baking.
Decoration as a Final Touch: Go Wild with Toppings
After baking, unleash your inner artist by decorating your Seuss cookies with icing, edible glitter, or more sprinkles. These embellishments can reflect the whimsical nature of Dr. Seuss’s universe and make your cookies unforgettable. Let the kids get involved in the decorating phase for a truly fun baking experience.
FAQs
Why are my cookies flat?
If your cookies spread too much, they may have too much butter or not enough flour. Ensure accurate measurements and consider refrigerating the dough for at least 30 minutes before baking.
Can I change the food coloring after mixing?
If you decide to adjust the colors after mixing, simply knead in additional food coloring until you reach the desired shade. However, too much can alter the dough's consistency.
What if the dough is too sticky to handle?
If the dough feels overly sticky, add a little more flour, about a tablespoon at a time, until it reaches a workable consistency. Be careful not to add too much or it could affect texture.
How can I make cookies in different flavors?
You can experiment by adding extracts such as almond or lemon, or incorporating cocoa powder for chocolate cookies. Adjust the flour to compensate for additional dry ingredients.
What should I do if the cookies taste bland?
If the cookies seem bland, try increasing the vanilla extract or adding a pinch of additional salt. A missed measurement can easily dull the flavor.
Can I use flavored extracts instead of vanilla?
Absolutely! Flavored extracts like peppermint or almond can add unique twists to your cookies. Start with half of what you would typically use for vanilla.
Conclusion
Baking Dr. Seuss Cookies is more than just making a sweet treat; it’s an opportunity to foster creativity and enjoyment in the kitchen. Whether you’re a seasoned baker or a beginner, these cookies allow for endless customization and fun.
So gather your ingredients, let your imagination run wild, and enjoy the delicious results that are sure to bring smiles and a touch of whimsy to anyone lucky enough to taste them.
Recipe Card
Whimsical Dr. Seuss Cookies for Creative Baking
Ingredients
Method
- Preheat the oven to 350°F (175°C).
- In a medium bowl, whisk together flour, baking powder, baking soda, and salt.
- In a large bowl, cream together the softened butter, granulated sugar, and brown sugar until light and fluffy.
- Add the eggs, one at a time, beating well after each addition, then stir in the vanilla extract.
- Gradually mix the dry ingredients into the wet ingredients until just combined, being careful not to overmix.
- Divide the dough into portions and mix in food coloring to achieve desired colors.
- Scoop the dough onto parchment-lined baking sheets, leaving space between each cookie for spreading.
- Optional: top each cookie with sprinkles for extra fun before baking.
- Bake for 8-12 minutes, or until the edges are golden brown but the centers remain soft.
- Remove the cookies from the oven and let them cool on the baking sheet for a few minutes before transferring to a wire rack.
Notes
Additional serving suggestions: pair with a crisp salad, garlic bread, or roasted seasonal vegetables for balance.
For make-ahead, prep components separately and assemble just before heating to preserve texture.
Taste and adjust with acid (lemon/vinegar) and salt right at the end to wake up flavors.