Introduction
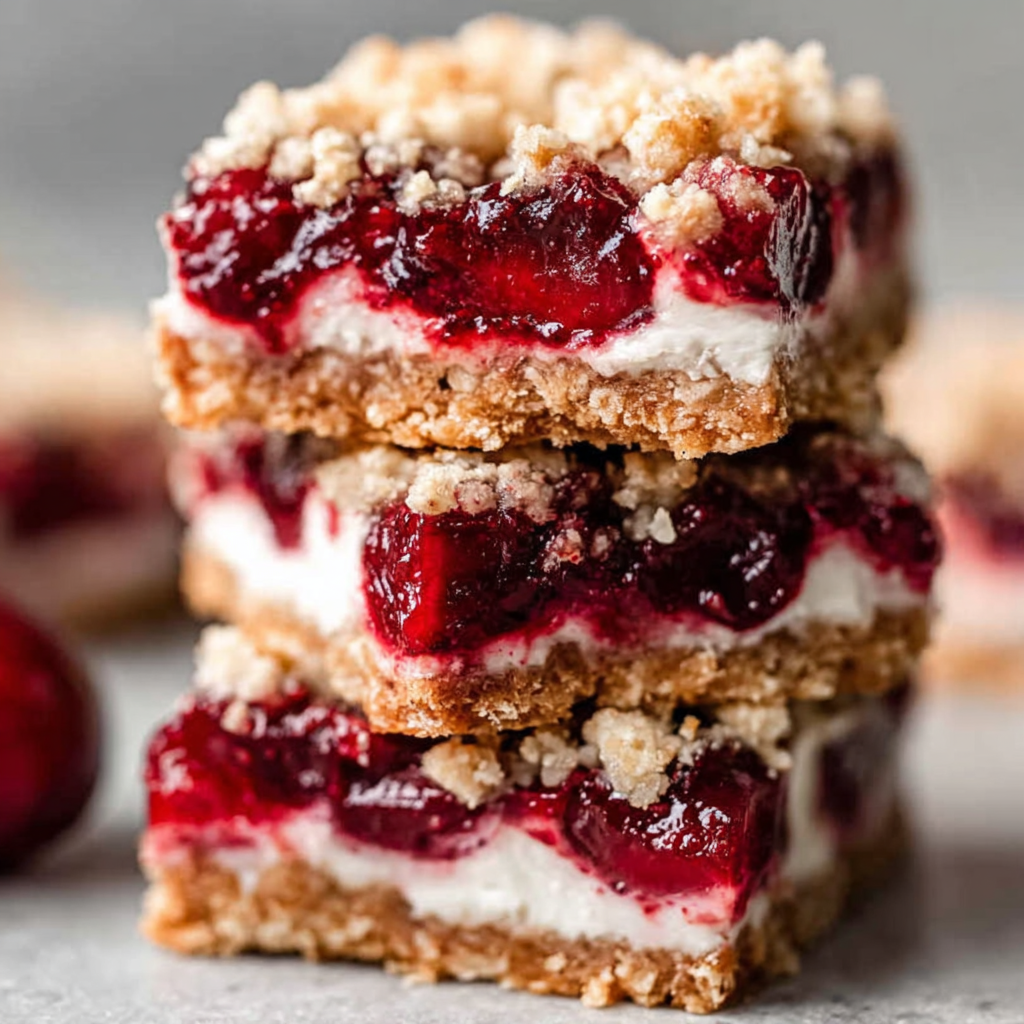
Cherry pie bars are a delightful twist on a classic dessert, offering the perfect balance of sweet and tart flavors. They’re easy to make and perfect for sharing, whether at a picnic, potluck, or simply enjoyed at home. These bars combine a buttery crust with a rich cherry filling, creating a treat that’s sure to impress without requiring intricate techniques.
With fresh or frozen cherries, you can whip up these cherry pie bars whenever the craving strikes. The combination of almond extract and lemon juice brightens the filling, making each bite a burst of flavor. These bars also allow for customizable toppings, whether you prefer a sprinkle of powdered sugar or a dollop of whipped cream.
Ingredients
- 1 ½ cups all-purpose flour
Flour is the backbone of the crust, providing structure and stability. It creates a sturdy base that holds all the delicious filling together. - ½ cup granulated sugar
Sugar sweetens both the crust and the filling, helping to balance the tartness of the cherries and contributing to a golden, caramelized appearance. - ½ cup unsalted butter, melted
Butter adds richness and flavor to the crust, creating a tender texture as it bakes. Melting it ensures even incorporation into the flour. - 1 large egg
The egg acts as a binding agent, helping to hold the crust together and giving it a slight lift during baking. - 1 teaspoon almond extract
Almond extract enhances the cherry flavor, adding a wonderful depth and a hint of nuttiness that complements the sweetness. - 2 cups fresh or frozen cherries, pitted and halved
Cherries are the star of the show, providing that classic tart and sweet profile that makes cherry pie so beloved. Fresh cherries yield a fresher flavor, while frozen are convenient and still delicious. - 2 tablespoons lemon juice
Lemon juice brightens the cherry filling, balancing its sweetness while enhancing the overall flavor. It also helps to prevent the cherries from browning. - 1 tablespoon cornstarch
Cornstarch thickens the cherry filling, ensuring it sets properly and doesn’t make the crust soggy. It’s essential for achieving the right consistency. - ¼ teaspoon salt
Salt enhances the flavors in each ingredient, balancing the sweetness and adding depth to the overall flavor of the bars. - Powdered sugar for dusting (optional)
Powdered sugar adds a beautiful finishing touch, giving the bars a delightful sweetness and an appealing visual contrast against the vibrant cherry filling.
Directions & Preparation
Step 1: Preheat the oven to 350°F (175°C).
Preheating the oven ensures that your cherry pie bars bake evenly and rise properly. Starting with a hot oven helps to create a lovely golden crust.
Step 2: In a medium bowl, combine the flour, sugar, and salt.
Mixing the dry ingredients first ensures an even distribution of sugar and salt throughout the crust, which is crucial for a balanced flavor. It also helps in incorporating air into the mix.
Step 3: Stir in the melted butter and egg, mixing until combined.
Incorporating the butter and egg into the dry ingredients creates a cohesive mixture that will form the base of your crust. It’s vital to mix until just combined to avoid overworking the dough.
Step 4: Press the mixture into the bottom of a greased 8×8-inch baking pan to form the crust.
Pressing the dough evenly into the pan ensures that the crust will cook uniformly. Make sure to reach the corners for a complete base that supports the filling.
Step 5: Bake the crust for 15 minutes, until lightly golden.
This step sets the foundation for the bars, giving them a head start on cooking before adding the filling. A golden color indicates that the crust is becoming flavorful and crispy.
Step 6: While the crust bakes, prepare the cherry filling.
Getting the filling ready while the crust bakes optimizes your time and guarantees a hot filling that melds beautifully with the crust. It’s all about efficient multitasking in the kitchen.
Step 7: In a medium bowl, combine the cherries, lemon juice, almond extract, cornstarch, and sugar.
Mixing these ingredients helps to evenly coat the cherries in flavor and thicken the filling. The cornstarch activates with the juices from the cherries and lemon, creating a luscious filling.
Step 8: Pour the cherry filling over the pre-baked crust, spreading it evenly.
Distributing the filling evenly ensures each bite contains a delightful amount of cherries. It's crucial for a balanced texture and flavor throughout the bars.
Step 9: Bake for an additional 25-30 minutes, until the filling is bubbly and the bars are slightly firm.
Baking until the filling is bubbly indicates that the cornstarch has activated and thickened. The firmness of the bars shows they are set and ready to cool.
Step 10: Allow the bars to cool completely in the pan before slicing and serving.
Cooling is essential for the filling to firm up, making it easier to cut clean pieces. This step ensures that your cherry pie bars maintain their shape when served.

Choosing the Right Cherries
Selecting the right cherries can elevate your cherry pie bars. Fresh, ripe cherries provide a vibrant flavor and juicy texture that makes the filling irresistible. If using frozen, opt for high-quality brands without added sugar, allowing you to control the sweetness and prevent excess liquid in your bars.
Customizing Your Cherry Pie Bars
These cherry pie bars are versatile, allowing home cooks to experiment with different flavors and toppings. Consider adding a touch of cinnamon or nutmeg to the filling for a warm spice note. You can also switch up the crust by incorporating ground nuts or oats for a heartier texture.
Perfect Pairings for Serving
Cherry pie bars are delightful on their own, but they’re even better when paired with complementary flavors. Serve them with a scoop of vanilla ice cream or a dollop of freshly whipped cream for a decadent dessert. You can also offer a side of chocolate sauce or caramel for those who enjoy a richer treat.
FAQs
What should I do if the filling is too runny?
If the filling is too runny, it might need additional cornstarch to thicken. You can mix a little more cornstarch with water and gently stir it into the filling while it's cooking.
Can I double the recipe for a larger pan?
Yes, you can double the recipe and use a 9×13-inch pan. Just make sure to adjust the baking time as needed, checking for doneness.
How can I enhance the flavor if the filling is bland?
If the filling tastes bland, consider adding a bit more sugar or lemon juice to brighten the flavors. A pinch of salt can also enhance overall sweetness.
What if my crust is too thick or crumbly?
If your crust is too thick, ensure even pressing into the pan. If it's crumbly, add a splash of water or more melted butter to help with binding.
Can I replace the cherries with another fruit?
Absolutely! You can substitute cherries with blueberries, raspberries, or peaches, adjusting the sugar based on the fruit's natural sweetness.
Is it necessary to let the bars cool completely before serving?
Yes, letting the bars cool completely helps them firm up, making it easier to cut neat squares without the filling spilling out.
Conclusion
Cherry pie bars are not only a splendid dessert but also a nostalgic treat that resonates with many. Their simplicity and adaptability make them a favorite among home cooks, inviting creativity in flavor and presentation.
Whether you enjoy them warm or chilled, these bars bring the charm of classic cherry pie in a more portable form, perfect for any occasion. So gather your ingredients and start baking—these cherry pie bars are a guaranteed crowd-pleaser.
Recipe Card

Delicious Cherry Pie Bars for Everyone to Enjoy
Ingredients
Method
- Preheat the oven to 350°F (175°C).
- In a medium bowl, combine the flour, sugar, and salt.
- Stir in the melted butter and egg, mixing until combined.
- Press the mixture into the bottom of a greased 8x8-inch baking pan to form the crust.
- Bake the crust for 15 minutes, until lightly golden.
- While the crust bakes, prepare the cherry filling.
- In a medium bowl, combine the cherries, lemon juice, almond extract, cornstarch, and sugar.
- Pour the cherry filling over the pre-baked crust, spreading it evenly.
- Bake for an additional 25-30 minutes, until the filling is bubbly and the bars are slightly firm.
- Allow the bars to cool completely in the pan before slicing and serving.
Notes
Additional serving suggestions: pair with a crisp salad, garlic bread, or roasted seasonal vegetables for balance.
For make-ahead, prep components separately and assemble just before heating to preserve texture.
Taste and adjust with acid (lemon/vinegar) and salt right at the end to wake up flavors.