Introduction
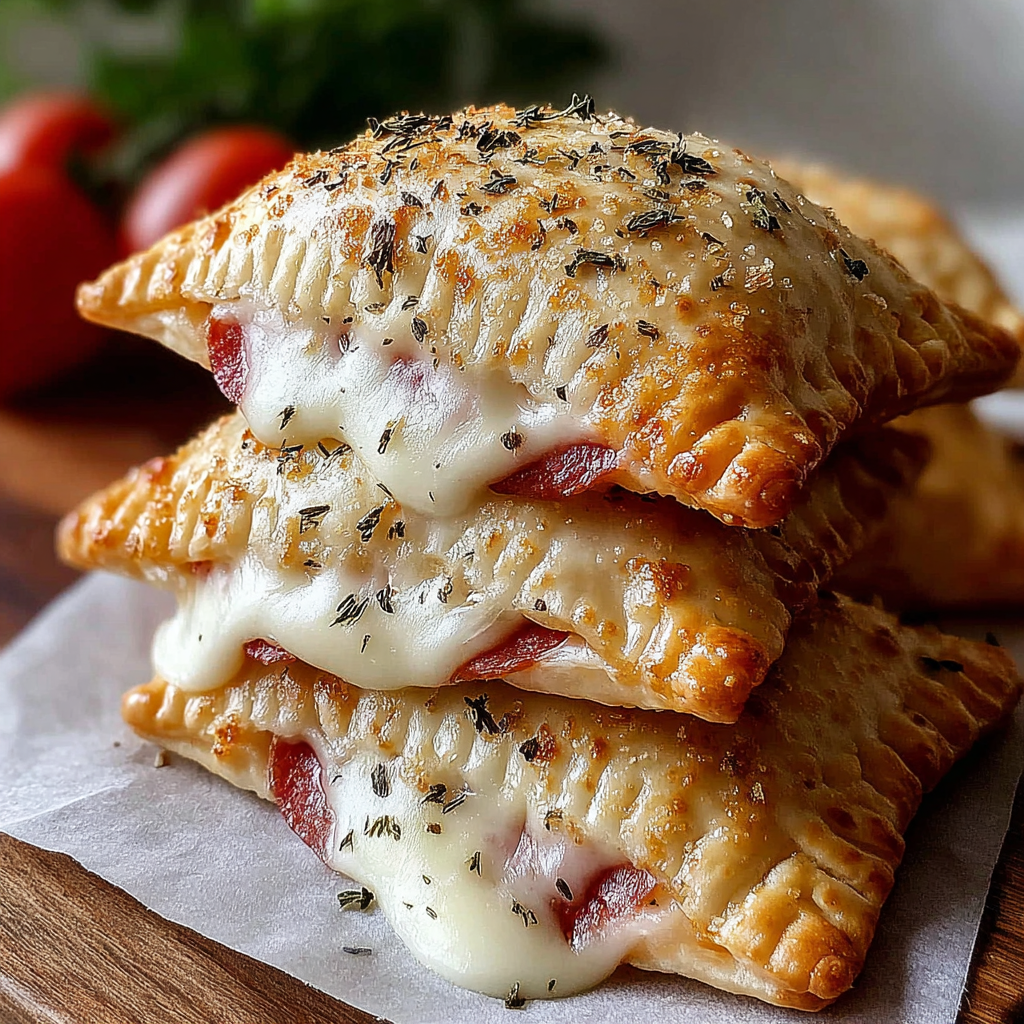
Cheesy pizza pockets are the perfect party snack or quick dinner option that combine the joy of pizza with the convenience of hand-held portions. Whether you're feeding a crowd or looking for an easy meal, these little pockets are both satisfying and customizable.
The beauty of pizza pockets lies in their versatility. You can fill them with your favorite toppings, making them as simple or gourmet as you desire. Imagine biting into a warm, gooey pocket filled with melted cheese and savory ingredients, all encased in a crispy crust – pure bliss!
Not only are these pizza pockets delightful to eat, but they're also a fun cooking project for the whole family. Get the kids involved in the assembly process for a perfect way to spend quality time together.
Ingredients
- 2 cups all-purpose flour
All-purpose flour provides the structure for the dough, creating a base that is neither too thick nor too thin. Its gluten content helps the dough rise and develop a chewy texture. - 1 teaspoon baking powder
Baking powder helps the dough to rise, giving the pizza pockets a light and airy texture. This leavening agent is crucial for achieving the right balance of softness and crispness. - 1/2 teaspoon salt
Salt enhances the flavor of the dough. It also strengthens the proteins in the flour, yielding a better texture in the final product. - 1/2 cup water
Water hydrates the flour, allowing the glutens to develop and the dough to form. It is important to use the right temperature – lukewarm for best results, activating the yeast if you choose to add it. - 1 tablespoon olive oil
Olive oil makes the dough rich and adds flavor, while also contributing to a tender texture by coating some of the flour's proteins. - 1 1/2 cups shredded mozzarella cheese
Mozzarella cheese is the classic choice for pizza due to its excellent melting properties and mild flavor. It stretches beautifully, creating that iconic cheese pull. - 1/2 cup pizza sauce or marinara
This sauce adds moisture and flavor to the filling, providing the hallmark taste of pizza. Choose your favorite brand or make it homemade for a personalized touch. - 1/2 cup preferred toppings (pepperoni, veggies, etc.)
Adding your favorite toppings gives these pizza pockets personality and makes them customizable for everyone. Be creative and experiment with flavors.
Directions & Preparation
Step 1: Preheat your oven to 400°F (200°C).
Preheating the oven is vital as it ensures that your pizza pockets will bake evenly and adequately. An appropriately heated oven makes for a crispy exterior while keeping the filling hot and delicious.
Step 2: In a large bowl, combine the flour, baking powder, and salt.
Mixing the dry ingredients before adding wet ones helps to distribute the baking powder and salt evenly throughout the flour, ensuring a consistent rise and flavor for the entire dough.
Step 3: Add water and olive oil to the dry mixture and stir until a dough forms.
Incorporating water slowly allows you to gauge the dough's consistency. Adding olive oil at this stage enriches the dough and aids in creating the desired texture.
Step 4: Knead the dough on a floured surface for about 5 minutes until smooth.
Kneading develops the gluten, which is essential for a chewy texture. A good trick is to knead until the dough is no longer sticky and springy to the touch.
Step 5: Roll out the dough into a large rectangle about 1/4 inch thick.
A thin roll ensures that the pizza pockets cook evenly and prevents them from becoming too doughy. The rectangle shape allows for adequate filling in each pocket.
Step 6: Cut the dough into smaller squares, approximately 4×4 inches.
Uniform squares allow for even cooking and consistent shape. Each square serves as a pocket that will hold your tasty filling, so make sure they’re equal in size.
Step 7: Place a tablespoon of sauce, followed by a handful of cheese and toppings on one half of each square.
Layering the ingredients properly is key; too much filling can make sealing difficult, while too little won't give you that delightful bite. Placing them only on one half allows for easy folding.
Step 8: Fold the dough over to form a pocket and crimp the edges to seal.
Sealing the pockets securely is crucial to preventing any leakage of cheese or sauce during baking. You can use a fork to crimp edges for a decorative touch and better seal.
Step 9: Arrange the pockets on a baking sheet lined with parchment paper.
Lining the baking sheet prevents sticking and makes cleanup a breeze. Spacing the pockets apart promotes even cooking, ensuring each one gets a nice golden color.
Step 10: Bake for 15-20 minutes or until golden brown and crispy.
Baking time can vary depending on your oven, so watch closely. The desired outcome is a golden brown top that indicates a fully cooked pocket with gooey cheese inside.
Step 11: Let cool slightly before serving – this will make the filling safer to eat.
Cooling for a few minutes allows steam to escape, preventing burns from hot cheese. It also helps the pockets hold their shape for better presentation.

Customizing Your Pizza Pocket Fillings
One of the best features of cheesy pizza pockets is their adaptability to personal taste. You can fill them with a variety of ingredients, from classic pepperoni and mozzarella to gourmet options like goat cheese and sun-dried tomatoes. Consider using leftovers or whatever you have in the fridge. Experimenting with different flavors will create exciting new combinations that make every batch unique.
Serving Suggestions for Pizza Pockets
These delicious pizza pockets can be enjoyed on their own or paired with various dips. A side of marinara sauce or garlic butter can elevate the experience, offering additional moisture and flavor. You could also create a small platter with various dips, allowing guests to customize their bites. Pair them with a refreshing salad for a complete meal.
Healthier Alternatives for Dough and Fillings
If you're looking to make a healthier version of pizza pockets, consider alternatives like whole wheat flour or cauliflower crust for the dough. For the fillings, you can opt for low-fat cheeses, fresh vegetables, or lean proteins. These tweaks keep the essence of cheesy pizza pockets while accommodating dietary preferences and health goals.
FAQs
Why are my pizza pockets bursting open?
If your pizza pockets are bursting, it's likely due to overfilling or not sealing them properly. Ensure you use just the right amount of filling and press the edges firmly to avoid leaks.
What if my dough is too sticky?
If your dough is sticky, you can add a little more flour while kneading until it reaches a smooth consistency. Just be cautious not to add too much, or the dough can become tough.
Can I use premade dough for this recipe?
Yes, you can absolutely use premade pizza dough or even biscuit dough as a time saver. Just roll it out and follow the same filling and baking instructions.
What's the best way to reheat leftover pizza pockets?
For the best results, reheat pizza pockets in the oven at 350°F (175°C) for about 10 minutes. This keeps the crust crispy while warming the filling thoroughly.
Can I use a different type of cheese?
Certainly! While mozzarella is the traditional choice, you can experiment with cheeses like provolone, gouda, or even cheddar for different flavor profiles.
What can I do if my filling is too bland?
If your filling lacks flavor, try incorporating herbs like oregano or basil or even add a pinch of red pepper flakes for zing. Don't forget to season your fillings before adding them to enhance overall taste.
Conclusion
Cheesy pizza pockets bring the joy of pizza to a convenient, bite-sized format that's perfect for any occasion. With a little creativity, they can be tailored to fit a variety of tastes and dietary preferences.
Whether it’s a cozy family dinner, game night, or a fun cooking project with kids, these pizza pockets are bound to be a hit. After one bite of these cheesy, flavorful delights, you’ll find it hard to resist making them again.
Recipe Card

Deliciously Cheesy Pizza Pockets for Any Occasion
Ingredients
Method
- Preheat your oven to 400°F (200°C).
- In a large bowl, combine the flour, baking powder, and salt.
- Add water and olive oil to the dry mixture and stir until a dough forms.
- Knead the dough on a floured surface for about 5 minutes until smooth.
- Roll out the dough into a large rectangle about 1/4 inch thick.
- Cut the dough into smaller squares, approximately 4x4 inches.
- Place a tablespoon of sauce, followed by a handful of cheese and toppings on one half of each square.
- Fold the dough over to form a pocket and crimp the edges to seal.
- Arrange the pockets on a baking sheet lined with parchment paper.
- Bake for 15-20 minutes or until golden brown and crispy.
- Let cool slightly before serving – this will make the filling safer to eat.
Notes
Additional serving suggestions: pair with a crisp salad, garlic bread, or roasted seasonal vegetables for balance.
For make-ahead, prep components separately and assemble just before heating to preserve texture.
Taste and adjust with acid (lemon/vinegar) and salt right at the end to wake up flavors.