Introduction
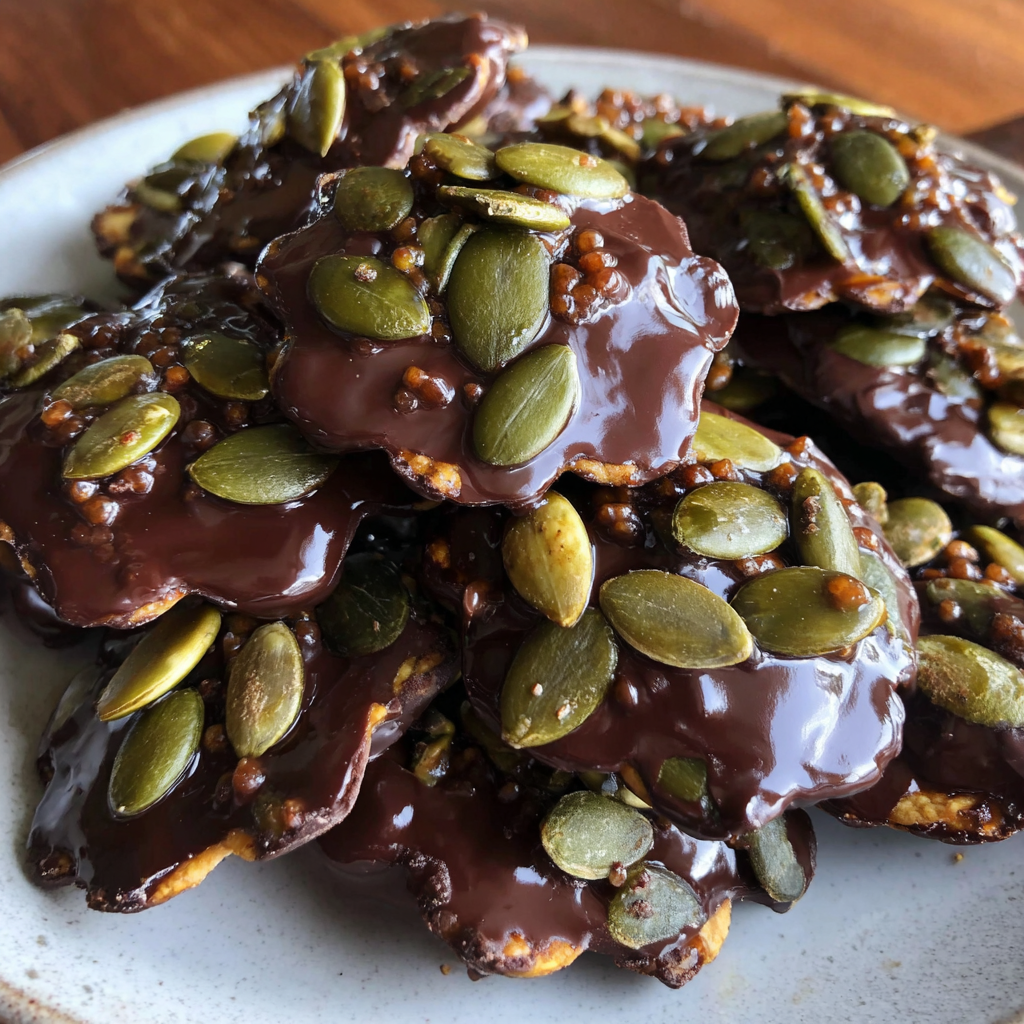
If you're looking for a unique and tasty snack, chocolate covered pumpkin seeds are a delightful choice. This treat combines the crunch of roasted pumpkin seeds with the rich sweetness of chocolate, creating a perfect balance of flavors and textures.
These little bites not only offer an enjoyable snacking experience, but they also pack a nutritional punch. With a mix of protein, healthy fats, and fiber from the pumpkin seeds, these snacks cater to both your sweet tooth and your health goals.
Ingredients
- 1 cup pumpkin seeds
Pumpkin seeds, or pepitas, serve as the base of this recipe, providing a crunchy texture and a wealth of nutrients like magnesium, zinc, and healthy fats. - 1 cup dark chocolate chips
Dark chocolate offers a rich flavor that beautifully complements the natural earthiness of the pumpkin seeds. It also provides antioxidants, making the snack a guilt-free indulgence. - 1 tablespoon coconut oil
Coconut oil helps create a smooth melting chocolate, ensuring an even coating on the pumpkin seeds. It also adds a subtle tropical flavor and richness. - 1/2 teaspoon sea salt
Sprinkling sea salt enhances the overall flavor profile, balancing the sweetness of the chocolate and amplifying the nutty taste of the seeds.
Directions & Preparation
Step 1: Preheat your oven to 350°F (175°C) and prepare a baking sheet.
Preheating the oven ensures that the pumpkin seeds will roast evenly, promoting their natural crunchiness. Lining the baking sheet with parchment paper will prevent the seeds from sticking and aid in easy cleanup.
Step 2: Spread the pumpkin seeds on the baking sheet in a single layer.
Arranging the seeds in a single layer allows them to roast uniformly. This step is crucial for achieving that perfectly toasted flavor without any undercooked or burnt pieces.
Step 3: Roast the seeds for about 10-15 minutes, stirring occasionally.
Stirring the seeds during roasting helps them cook evenly and prevents them from burning on one side. Keep an eye on them, as you want them golden brown without overdoing it.
Step 4: Remove the seeds from the oven and let them cool slightly.
Allowing the seeds to cool creates a better texture when coated in chocolate. If the seeds are too hot, they can cause the chocolate to seize and not coat properly.
Step 5: Melt the dark chocolate chips with coconut oil in a microwave or double boiler.
The melting process is crucial for achieving a smooth coating. Using a microwave requires intervals of heating to avoid burning; a double boiler provides more control and consistent heat.
Step 6: Once melted, stir the chocolate until smooth, and then combine with the slightly cooled pumpkin seeds.
Mixing the seeds quickly and thoroughly in the melted chocolate ensures that each seed is evenly coated. This step is important for texture and ensuring the chocolate adheres well.
Step 7: Spread the chocolate-covered seeds back onto the parchment-lined baking sheet and sprinkle with sea salt.
Spreading the seeds out prevents clumping and allows the chocolate to set properly. The sea salt provides a delightful contrast to the sweetness of the chocolate, enhancing the overall flavors.
Step 8: Refrigerate the baking sheet for 30 minutes or until the chocolate hardens.
Chilling the seeds speeds up the hardening process for the chocolate. This step is essential for achieving a satisfying crunch when you bite into the finished snack.
Step 9: Once set, break apart any clumps and store in an airtight container.
Breaking apart clumps ensures that every bite has the ideal combination of chocolate and seed. Storing them in an airtight container preserves freshness and keeps them crisp.

The Health Benefits You’ll Love
Chocolate covered pumpkin seeds aren’t just a tasty treat; they also offer multiple health benefits. The pumpkin seeds are a source of essential nutrients like magnesium, zinc, and omega-3 fatty acids. Chocolate, especially dark chocolate, is rich in antioxidants, which help combat free radicals in the body. Together, they create a nutritious snack that nurtures your body while indulging your cravings.
Perfect for Any Occasion
These delicious chocolate covered pumpkin seeds make excellent snacks for various occasions. Whether you're preparing for a movie night, packing a lunch, or need a party appetizer, they fit seamlessly into any gathering. They can even be used as a topping for yogurt or desserts, catering to both adults and children alike, ensuring everyone enjoys this sweet treat.
Customize Your Chocolate Coating
One of the wonderful aspects of chocolate covered pumpkin seeds is how customizable they are. You can experiment with different types of chocolate, like white, milk, or ruby chocolate, to fit your preference. Add ingredients such as crushed nuts, spices like cinnamon, or even coconut flakes for texture and added flavor, creating a browsing experience tailored just for you.
FAQs
Why did my chocolate seize while melting?
Seizing usually occurs if moisture gets into the chocolate during melting. Avoid adding any liquid and ensure all utensils are completely dry.
Can I use other nuts or seeds instead of pumpkin seeds?
Absolutely! You can substitute almonds, sunflower seeds, or even pecans. Adjust the roasting time accordingly based on the type of nut or seed you choose.
How do I know when the pumpkin seeds are perfectly roasted?
Look for a golden brown color and a nutty aroma. They should taste crunchy; if still chewy, they need more roasting time.
What can I do if the chocolate is too thick?
If your melted chocolate is too thick for coating, try adding a little more coconut oil or a small amount of vegetable oil and stir until smooth.
Is it necessary to use dark chocolate?
While dark chocolate is recommended for its flavor and health benefits, you can also use milk or white chocolate based on your taste preferences.
How do I prevent clumping of the seeds when they set?
Spreading the chocolate-covered seeds in a single layer before chilling helps prevent clumping. Ensure they have ample space to cool properly.
Can I add spices to the chocolate?
Yes! Adding spices like cinnamon or cayenne pepper can give your chocolate an extra kick and a unique flavor profile.
What should I do if I want a sweeter coating?
If you prefer a sweeter taste, consider adding powdered sugar or choosing chocolate with a higher sugar content. Adjust to your liking.
Conclusion
Chocolate covered pumpkin seeds are a deliciously simple snack that you can enjoy any time of the day. The combination of flavors offers both satisfaction and some surprising health benefits.
Once you master this recipe, you’ll find endless ways to customize it to suit your palate. So gather your ingredients and treat yourself to this delightful crunchy indulgence!
Recipe Card
Deliciously Sweet Chocolate Covered Pumpkin Seeds
Ingredients
Method
- Preheat your oven to 350°F (175°C) and prepare a baking sheet.
- Spread the pumpkin seeds on the baking sheet in a single layer.
- Roast the seeds for about 10-15 minutes, stirring occasionally.
- Remove the seeds from the oven and let them cool slightly.
- Melt the dark chocolate chips with coconut oil in a microwave or double boiler.
- Once melted, stir the chocolate until smooth, and then combine with the slightly cooled pumpkin seeds.
- Spread the chocolate-covered seeds back onto the parchment-lined baking sheet and sprinkle with sea salt.
- Refrigerate the baking sheet for 30 minutes or until the chocolate hardens.
- Once set, break apart any clumps and store in an airtight container.
Notes
Additional serving suggestions: pair with a crisp salad, garlic bread, or roasted seasonal vegetables for balance.
For make-ahead, prep components separately and assemble just before heating to preserve texture.
Taste and adjust with acid (lemon/vinegar) and salt right at the end to wake up flavors.