Introduction
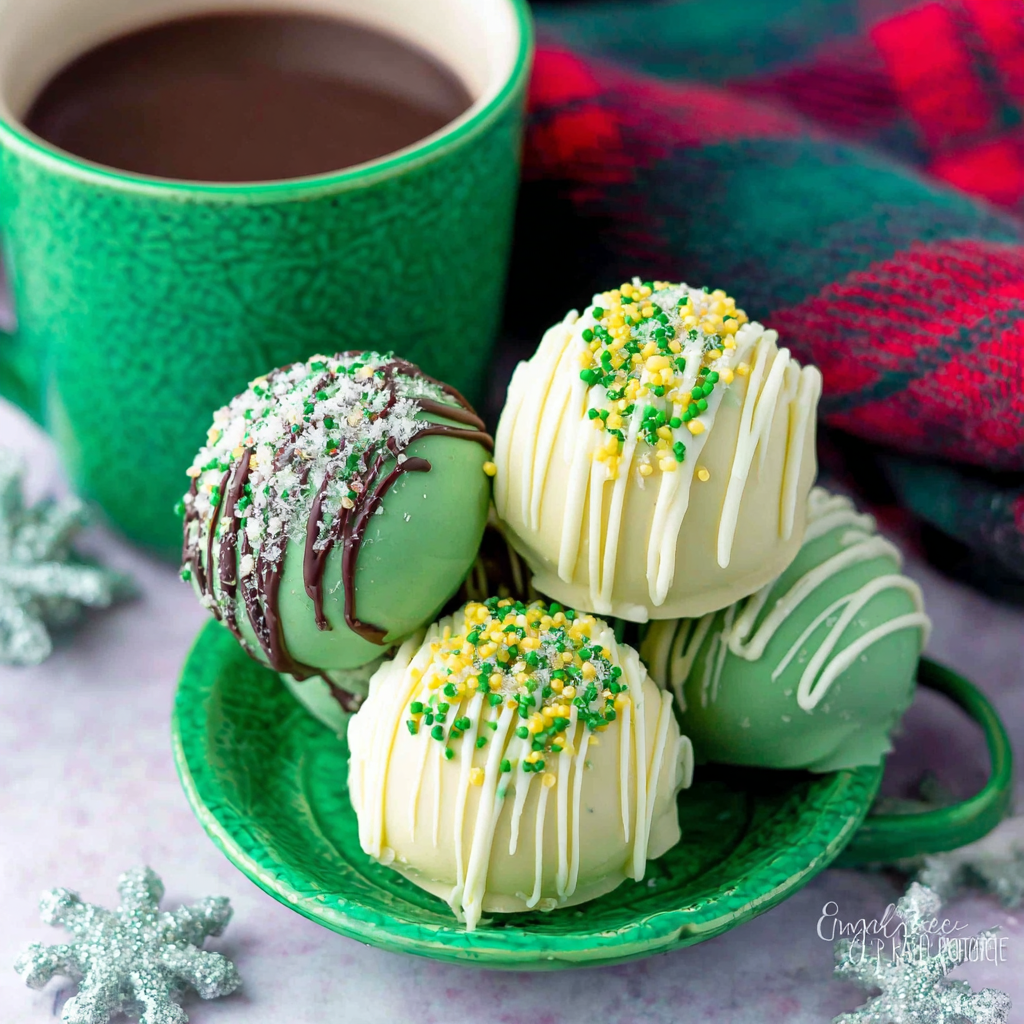
Hot cocoa bombs have taken the home cooking world by storm, bringing a touch of fun and whimsy to the beloved winter beverage. These charming chocolaty spheres unleash a delightful explosion of cocoa and marshmallows when submerged in hot milk, transforming ordinary cocoa into an event worth savoring.
Whether you’re making them for a festive occasion, a cozy night in, or as a heartfelt gift, hot cocoa bombs combine creativity with deliciousness. They are not only a treat for the taste buds but also a joy to make, allowing home cooks to experiment with flavors and designs alike.
Ingredients
- 8 oz semi-sweet chocolate
This chocolate forms the shell of the cocoa bomb, providing a rich, indulgent flavor. It melts beautifully and hardens to create a sturdy exterior that holds the other ingredients inside. - 1/2 cup cocoa powder
Cocoa powder is the key ingredient for creating that classic hot chocolate flavor. Using high-quality cocoa will ensure a deep and satisfying taste when the bomb is activated. - 1/2 cup powdered sugar
This sweetener balances the richness of the chocolate and cocoa, creating a smooth, creamy texture when dissolved in milk. It also adds sweetness to the bombs themselves. - 1/2 cup mini marshmallows
These delightful treats add a fluffy texture and a burst of sweetness to the cocoa experience. They melt into the hot milk, creating the ideal comforting drink. - Optional: flavor extracts or spices
Adding vanilla extract, peppermint extract, or even a pinch of cinnamon can elevate the taste of your cocoa bombs. Personalizing flavors can make them more exciting and enjoyable.
Directions & Preparation
Step 1: Melt the chocolate in a microwave safe bowl.
Start by breaking the semi-sweet chocolate into smaller pieces to ensure even melting. Heat in the microwave at 30-second intervals, stirring in between, until the chocolate is smoothly melted. This step is critical because improperly melted chocolate can seize up, making it unusable. Aim for a glossy consistency without any lumps.
Step 2: Coat the silicone mold with chocolate.
Using a spoon or a brush, coat the inside of each mold cavity with a layer of melted chocolate. Make sure to cover the sides thoroughly to prevent any gaps. This first coat should be thick enough to support the shape of your cocoa bomb but not so thick that it becomes overly hard to break open. Allow this layer to set before applying a second coat for extra strength.
Step 3: Apply a second layer of chocolate after the first sets.
Once the first layer has hardened, apply a second layer of melted chocolate to reinforce the mold. This is especially important if you’re aiming for integrity in your cocoa bombs; a stronger shell means a better explosion when it meets the hot milk. Let the second layer cool completely to firm up.
Step 4: Let the chocolate shells cool and harden completely.
After molding, it’s essential to wait for the chocolate to firm up fully. This could take about 10-15 minutes at room temperature or faster in the fridge. Patience pays off here; if the shells aren’t fully set, they can collapse or break when you try to unmold them.
Step 5: Fill half of the shells with cocoa mix and marshmallows.
Once unmolded, take half of the chocolate shells and spoon in cocoa powder and mini marshmallows. This is where you can get creative with the proportions and add any additional flavoring, transforming a simple cocoa into something truly unique. Be careful not to overfill, as you still need to seal the halves together.
Step 6: Seal the hot cocoa bombs by melting the edges.
To seal your cocoa bombs, take a non-filled half shell and heat the edge briefly over a warm surface or microwave to slightly melt the perimeter. Quickly press it onto a filled shell, ensuring a solid seal. This step is crucial to keep the contents secure until it’s time to enjoy your cocoa bomb.
Step 7: Decorate as desired before storing.
Before storing, consider drizzling melted chocolate on top or sprinkling with decorative sprinkles or edible glitter. This not only enhances their visual appeal but also makes them more festive and delightful as gifts. Allow any decoration to set before placing them in an airtight container.

Experimenting with Cocoa Variations
Hot cocoa bombs are versatile, allowing for endless variations based on personal tastes or seasonal preferences. You might incorporate different kinds of chocolate, such as milk or white chocolate, each bringing its distinct flavor. For a seasonal twist, consider adding holiday spices like nutmeg or ginger, or even infusions of espresso for coffee lovers, allowing you to create a unique cocoa experience tailored to your palate.
Creating the Perfect Chocolate Shell
The success of a hot cocoa bomb largely hinges on the integrity of the chocolate shell. Ensure your chocolate isn't overheated, as this can affect the texture and taste. Using good-quality chocolate chips or couverture chocolate will yield a smoother finish. Tapping the mold lightly after coating helps to eliminate air bubbles, which could lead to weak spots in your bombs, making the perfect shell essential for visual or functional success.
Serving and Enjoying Your Cocoa Bombs
Serving hot cocoa bombs is part of the fun. Simply place one in a mug and pour hot milk over it, watching the spectacle unfold as it melts and releases cocoa and marshmallows. You can elevate the experience further by offering toppings like whipped cream, more marshmallows, or flavored syrups for guests to personalize their drinks, turning a simple evening into an interactive delicious event.
FAQs
What if my chocolate is too thick to pour?
If your chocolate has thickened too much, try placing it back in the microwave for a few seconds at a low power setting, stirring frequently until it reaches a pourable consistency.
How can I adjust the sweetness of my cocoa bombs?
To adjust sweetness, you can add more powdered sugar to the cocoa filling or use less if you prefer a less sweet outcome. Tasting as you go along can help achieve the perfect balance.
What can I do if my shells break during unmolding?
If the chocolate shells break when unmolding, simply remelt the broken pieces, pour them back into the mold, and start over with a thicker layer. Make sure to let them cool properly before attempting to unmold again.
How can I make these chocolate bombs larger or smaller?
Adjusting the size of cocoa bombs is easy—simply use larger or smaller molds according to your desired size and adjust the ingredient quantities to match.
Can I use dark chocolate instead of semi-sweet?
Absolutely! Dark chocolate can be utilized, though it will create a more intense flavor. Adjust the sugar levels in the filling to complement the bitterness.
What if my cocoa bombs don’t dissolve properly in milk?
If your bombs are not dissolving fully, check the integrity of the seal. An improperly sealed bomb can cause the ingredients to stay intact. Ensure they are sealed tightly before mixing.
Conclusion
Creating hot cocoa bombs is an enjoyable culinary adventure that brings warmth and joy to chilly days. Their customizable nature allows both novice and experienced cooks to join in the fun.
With just a few simple ingredients and techniques, anyone can make these delightful treats. Once you master the basic recipe, the sky's the limit for flavors and designs. Enjoy experimenting and sharing your creations with others!
Recipe Card
Delightful Hot Cocoa Bombs for Cozy Evenings
Ingredients
Method
- Melt the chocolate in a microwave safe bowl.
- Coat the silicone mold with chocolate.
- Apply a second layer of chocolate after the first sets.
- Let the chocolate shells cool and harden completely.
- Fill half of the shells with cocoa mix and marshmallows.
- Seal the hot cocoa bombs by melting the edges.
- Decorate as desired before storing.
Notes
Additional serving suggestions: pair with a crisp salad, garlic bread, or roasted seasonal vegetables for balance.
For make-ahead, prep components separately and assemble just before heating to preserve texture.
Taste and adjust with acid (lemon/vinegar) and salt right at the end to wake up flavors.