Introduction
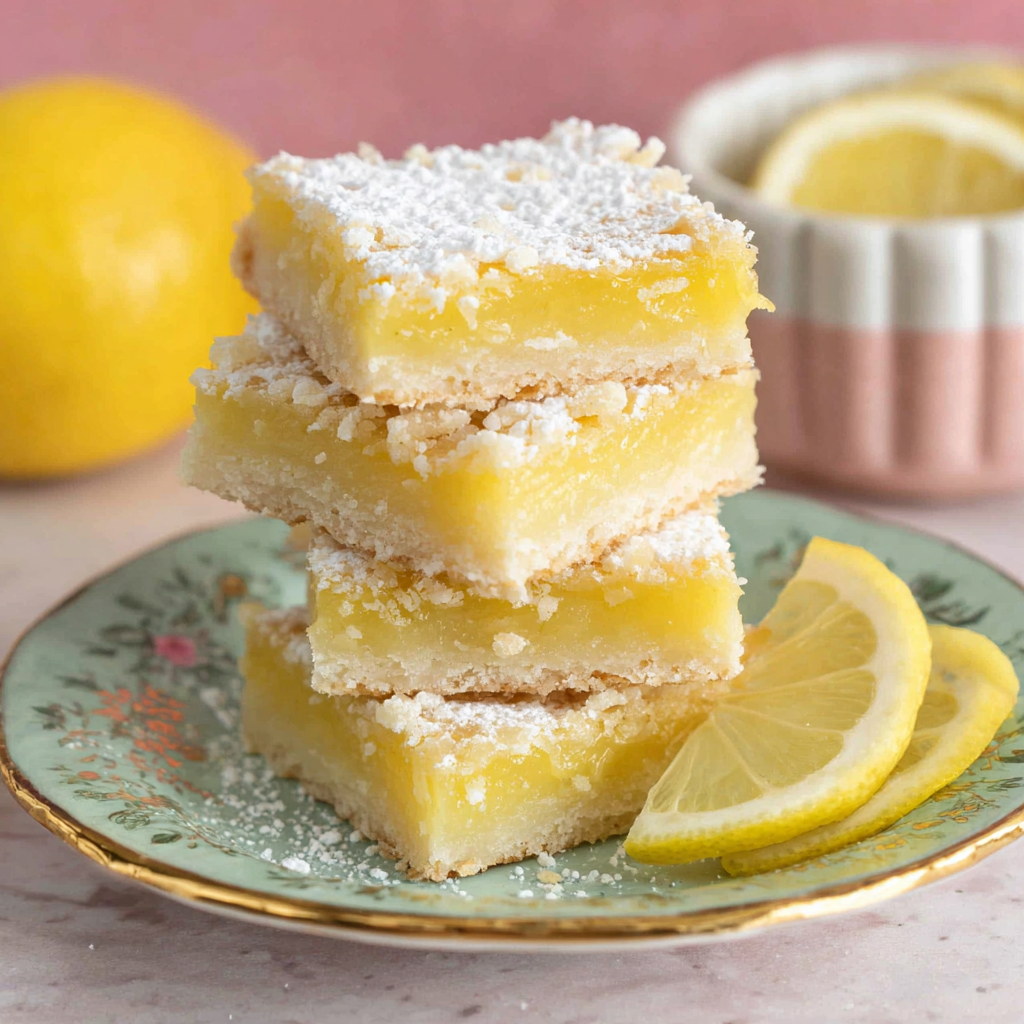
Lemon bars are a classic dessert that perfectly balance tart and sweet, making them delightful for any setting. The bright and zesty flavor captures the essence of sunshine, offering a refreshing treat that can lighten up any gathering. Whether served at a picnic, a party, or simply enjoyed at home, their simple elegance will never go unnoticed.
The way the buttery crust crumbles beneath a smooth, tangy lemon filling creates a lovely contrast that keeps people coming back for seconds. Not only are they delicious, but lemon bars are also relatively easy to prepare, making them ideal for both novice and experienced bakers. Let's dive into creating this iconic dessert that brings joy with each bite.
Ingredients
- 1 ¾ cups all-purpose flour
This forms the base of the crust, providing structure and texture. The balance of gluten development is essential for a tender yet firm bar. - ¾ cup unsalted butter
Butter adds richness to the crust and contributes to its flaky texture. Using unsalted butter allows you to control the saltiness of your recipe. - ½ cup granulated sugar
Sugar sweetens the crust, balancing the tart lemon filling. It also plays a role in the texture, making the crust slightly crisp once baked. - ½ teaspoon salt
Salt enhances the flavors in both the crust and the filling. It helps to bring out the sweetness and improve the overall taste. - 4 large eggs
Eggs provide structure and stability to the lemon filling. They also aid in binding the ingredients together while adding a rich texture. - 1 cup granulated sugar for filling
This sugar sweetens the lemon filling, counterbalancing the acidity of the lemons. It’s crucial for creating a well-rounded flavor. - 2/3 cup fresh lemon juice
Fresh lemon juice brings the iconic zesty flavor to the filling. It also includes citric acid, which gives the lemon bars their distinctive tang. - 1 tablespoon lemon zest
Zest adds an extra layer of lemon flavor, enhancing the aroma and taste of the filling without increasing the acidity. - Powdered sugar for dusting (optional)
This is typically sprinkled on top for a touch of sweetness and presentation. It adds an elegant finish to the bars.
Directions & Preparation
Step 1: Preheat the oven to 350°F (175°C).
Preheating the oven ensures that the lemon bars cook evenly from the start. This step is critical as it impacts the overall texture of the crust, helping it become golden and crisp.
Step 2: Grease a 9×13-inch baking pan.
Greasing the pan prevents the bars from sticking, allowing for easy removal after baking. You can use butter, cooking spray, or parchment paper for easy lifting.
Step 3: Prepare the crust by mixing flour, sugar, and salt.
Combining the dry ingredients first ensures an even distribution, which is key to achieving a harmonious taste. Mixing these together before adding butter creates a uniform dough.
Step 4: Cut in the butter until crumbly.
Cutting in the butter incorporates it into the flour mixture, creating a crumbly texture that leads to a flaky crust. This step is crucial for achieving the desired consistency.
Step 5: Press the mixture into the prepared pan and bake for 15-20 minutes.
Pressing the dough evenly ensures consistent baking. The goal is to achieve a lightly golden crust, as this adds flavor and prevents a soggy bottom for your bars.
Step 6: While the crust bakes, prepare the filling by whisking eggs and sugar.
Whisking the eggs with sugar creates a well-blended mixture, essential for the filling's smooth consistency. It’s important to fully dissolve the sugar to avoid graininess.
Step 7: Add lemon juice and zest, mixing until combined.
Incorporating the lemon juice and zest right after whisking the eggs ensures that the flavors meld together. This step is integral for an intense lemony flavor in your filling.
Step 8: Pour the filling over the baked crust.
Pouring the filling onto a pre-baked crust helps it set correctly without creating layers that are too dense. Make sure the crust is hot for a better texture contrast.
Step 9: Bake for an additional 20-25 minutes until set.
You’ll know the filling is set when it doesn’t jiggle excessively in the center. Avoid overbaking, as this can cause a rubbery filling or a browned top.
Step 10: Cool completely in the pan on a wire rack.
Cooling helps the filling to set properly, making it easier to slice. This step also enhances the flavors as they meld together while the bars cool.
Step 11: Dust with powdered sugar and slice into bars.
Dusting with powdered sugar not only adds sweetness but also gives your lemon bars an appealing finish. Cutting them into even squares makes for a beautiful presentation.

Enhancing the Flavor Profile
To elevate the flavors of your lemon bars, consider infusing the lemon juice with herbs like basil or thyme. Just a small hint can transform the taste, creating a unique twist on a classic recipe. Similarly, you can experiment with citrus blends, such as combining lemon with lime or orange, to customize the zesty notes.
Perfect Pairings for Lemon Bars
Lemon bars pair beautifully with a variety of accompaniments. Fresh berries, whipped cream, or even a scoop of vanilla ice cream can complement the tartness perfectly. For a drink pairing, consider a lightly brewed iced tea or a refreshing lavender lemonade to enhance the sunny flavors of your dessert.
Serving Suggestions and Variations
While traditional lemon bars are adored, there's room for creativity. Try adding a meringue topping for a fluffy finish or reversing the sweetness by incorporating a layer of ganache. For those who enjoy texture, a sprinkle of sea salt on top can accentuate the lemony flavor while giving a gourmet touch.
FAQs
What if my bars turned out too thick?
If the filling is too thick, it may have been overbaked. Always check for a slight jiggle in the center when removing from the oven, as it will continue to set while cooling.
How can I make my lemon bars less tart?
To mellow the tartness, you could reduce the amount of lemon juice slightly or increase the sugar in the filling. Adjust based on your taste preference.
What if the crust didn't hold together?
If the crust is crumbly and doesn't hold together, it might have too much flour or not enough butter. Ensure accurate measurements and consider adding a bit more melted butter.
Is it possible to substitute lime juice for lemon juice in this recipe?
Yes, lime juice can be used instead of lemon juice. It will provide a different flavor profile but will still yield a delicious result.
Can I make mini lemon bars instead of a large batch?
Absolutely! Simply use a mini muffin tin or a smaller baking dish. Adjust the baking time accordingly, as smaller bars will cook faster.
Why did my filling come out runny?
Runny filling usually indicates it wasn't baked long enough. Ensure that the filling is set and firm before removing it from the oven.
Conclusion
Lemon bars are not just a dessert; they are a celebration of flavors that provide a refreshing finish to any meal. Their versatility allows for endless experimentation, making them a delightful choice for various occasions. Whether enjoyed plain or dressed up with toppings, these bars are sure to impress your family and friends.
By mastering this simple recipe, you'll be equipped to create a beloved classic that transcends seasons. So roll up your sleeves, embrace the zesty challenge, and bring a bit of sunshine into your kitchen with these delectable lemon bars.
Recipe Card

Delightful Lemon Bars for Every Occasion
Ingredients
Method
- Preheat the oven to 350°F (175°C).
- Grease a 9x13-inch baking pan.
- Prepare the crust by mixing flour, sugar, and salt.
- Cut in the butter until crumbly.
- Press the mixture into the prepared pan and bake for 15-20 minutes.
- While the crust bakes, prepare the filling by whisking eggs and sugar.
- Add lemon juice and zest, mixing until combined.
- Pour the filling over the baked crust.
- Bake for an additional 20-25 minutes until set.
- Cool completely in the pan on a wire rack.
- Dust with powdered sugar and slice into bars.
Notes
Additional serving suggestions: pair with a crisp salad, garlic bread, or roasted seasonal vegetables for balance.
For make-ahead, prep components separately and assemble just before heating to preserve texture.
Taste and adjust with acid (lemon/vinegar) and salt right at the end to wake up flavors.