Introduction
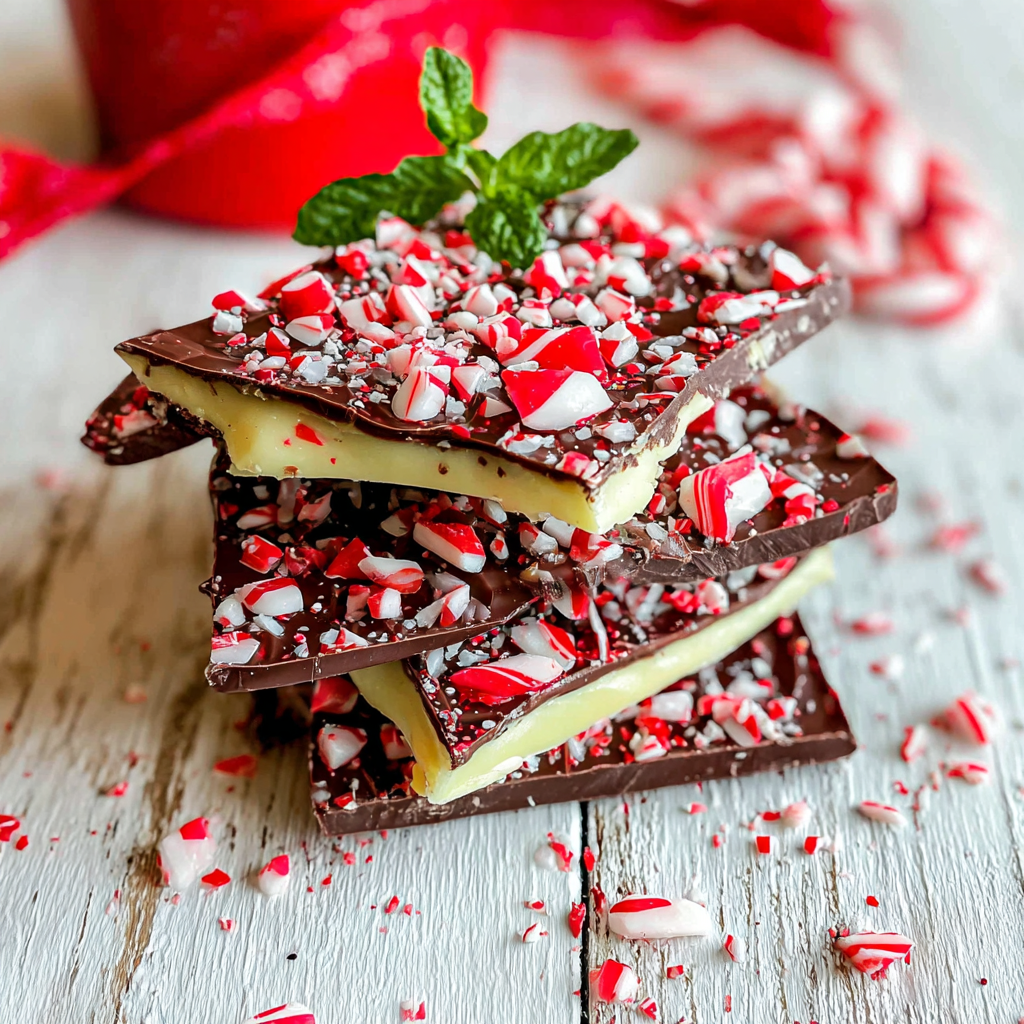
As the holiday season approaches, few treats evoke the spirit of festivities quite like chocolate peppermint bark. This delightful confection, with its rich chocolate and refreshing mint notes, is a perfect centerpiece for dessert tables or cozy gatherings.
Crafting your own chocolate peppermint bark at home not only guarantees freshness but also allows you to personalize it to your taste. With just a few simple ingredients, you can create an elegant and delicious gift or indulgent treat for yourself.
Let’s explore this easy-to-make recipe that combines the comforting flavor of chocolate with a brisk hint of peppermint, creating a delightful experience for anyone who takes a bite.
Ingredients
- 12 ounces semi-sweet chocolate
This forms the rich base of your bark, providing a creamy and indulgent flavor that balances beautifully with the peppermint. - 8 ounces white chocolate
The white chocolate layer adds sweetness and a contrasting color, enhancing both presentation and taste, allowing the peppermint oil to shine through. - 1 teaspoon peppermint extract
This contributes a refreshing and aromatic quality, making the bark reminiscent of holiday flavors and uplifting the overall taste. - 1/2 cup crushed candy canes
Adding a festive crunch and visual appeal, crushed candy canes not only enhance the texture but also impart a sweet, minty flavor that complements the chocolate. - Pinch of salt
A small amount of salt intensifies the sweetness of the chocolate, balancing flavors and elevating the overall experience of the bark.
Directions & Preparation
Step 1: Prepare the baking sheet.
Start by lining a baking sheet with parchment paper. This step is crucial as it prevents the bark from sticking, allowing for easy removal once set. Ensure that the parchment paper hangs over the edges slightly; this will make it convenient to lift the bark out later for cutting.
Step 2: Melt the semi-sweet chocolate.
In a microwave-safe bowl, melt the semi-sweet chocolate in 30-second intervals, stirring between each interval until it's smooth. This controlled approach helps prevent overheating. Proper temperature management is key; chocolate that’s too hot can seize up, ruining its texture.
Step 3: Spread the chocolate on the prepared sheet.
Once fully melted, pour the chocolate onto the lined baking sheet. Use a spatula to evenly spread it into a rectangle, about 1/4 inch thick. This step is important for ensuring even thickness throughout the bark, which aids both in aesthetics and bite size.
Step 4: Cool the semi-sweet layer.
Allow the layer to cool in the refrigerator for about 10-15 minutes, until it firms up. This cooling phase is essential before adding the next layer; it ensures the layers don’t mix together, keeping distinct flavors visible in the finished bark.
Step 5: Melt the white chocolate.
Repeat the melting process for the white chocolate, again using short intervals. Be vigilant as white chocolate can scorch more easily than semi-sweet. Aim for a smooth, creamy consistency, as this will create a beautiful layer atop the dark chocolate.
Step 6: Add peppermint extract.
Once melted and smooth, remove the white chocolate from the microwave and stir in the peppermint extract. This infusion of mint flavor is what gives the bark its festive essence. Adjust the amount of peppermint to your taste; a little goes a long way.
Step 7: Spread the white chocolate.
Pour the melted white chocolate over the chilled dark chocolate layer and spread it evenly. This dual-layer approach not only enhances flavor but also creates a visually stunning contrast. Work quickly, as the chocolate should be poured while it remains warm enough to flow.
Step 8: Sprinkle with crushed candy canes.
Before the white chocolate sets, evenly sprinkle the crushed candy canes on top. This adds texture and a festive touch to your bark. Firmly pressing the candy canes into the chocolate ensures they adhere well, resulting in a nice crunch with every bite.
Step 9: Allow to cool and set.
Let your creation cool at room temperature until completely set, or refrigerate for quicker results. This crucial step ensures the chocolate layers bond well and harden properly, making the bark easy to break into clean pieces later.
Step 10: Break into pieces.
Once set, use your hands to break the bark into irregular pieces. The homemade nature allows for each piece to be unique and adds charm to your presentation. Store in an airtight container or place in decorative bags for gifting.

Elevating Your Bark with Flavor Variations
While the classic chocolate peppermint combination is a holiday favorite, feel free to experiment with your bark. Consider adding ingredients like chopped nuts, dried fruit, or different flavored extracts. A hint of orange zest or almond extract can provide unique alternatives that elevate this treat beyond the traditional recipe.
Packaging and Presentation Ideas
Homemade chocolate peppermint bark not only tastes divine but also makes for an excellent gift. To enhance presentation, consider layering the bark in decorative boxes or wrapping pieces in clear bags tied with festive ribbons. Adding a handwritten tag with serving suggestions can make the gift feel extra special and personalized.
Incorporating Leftover Ingredients
If you find yourself with leftover candy canes or chocolate, this recipe is an ideal way to use them up creatively. Combining different types of chocolate or using other kinds of crushed candies can inspire new flavors. This is also a fantastic way to minimize waste and create an even more delightful treat.
FAQs
What can I do if my chocolate is too thick after melting?
If your chocolate becomes too thick, try adding a small amount of vegetable oil or coconut oil while melting to help thin it out. Stir vigorously until combined, adjusting the amount gradually until you reach the desired consistency.
Can I use dark chocolate instead of semi-sweet?
Absolutely! Dark chocolate will provide a richer flavor profile. Keep in mind that it will intensify the overall taste, so adjust the sweetness of the white chocolate layer if necessary.
What if I don’t have candy canes?
In place of candy canes, consider using other crushed candies like peppermint patties, or even sprinkles. They will offer a different visual appeal and flavor while still maintaining the festive spirit.
What if my bark breaks unevenly?
If your bark breaks in unexpected pieces, it could be due to uneven spreading or cooling. To ensure uniform pieces next time, make sure to level the chocolate evenly and allow for full cooling before breaking.
Is there a specific type of chocolate to avoid?
It’s best to steer clear of chocolate chips specified as baking, as they often contain stabilizers that prevent proper melting. Look for chocolate labeled specifically for melting or coating instead.
Can I cut the recipe in half without affecting the texture?
Yes, you can easily halve the recipe, but ensure the layers are still of similar thickness for the best results. Adjust baking sheet size accordingly to maintain the desired bark consistency.
Conclusion
Chocolate peppermint bark is one of those timeless treats that seems to capture the essence of the holiday spirit with every bite. Its blend of rich chocolate and refreshing peppermint not only delights the palate but also brightens any occasion.
By making this treat at home, you not only embrace creativity but also share love and joy through the gift of an irresistible confection. So gather your ingredients and make this seasonal favorite that will surely become a cherished tradition.
Recipe Card

Indulge in Homemade Chocolate Peppermint Bark
Ingredients
Method
- Prepare the baking sheet.
- Melt the semi-sweet chocolate.
- Spread the chocolate on the prepared sheet.
- Cool the semi-sweet layer.
- Melt the white chocolate.
- Add peppermint extract.
- Spread the white chocolate.
- Sprinkle with crushed candy canes.
- Allow to cool and set.
- Break into pieces.
Notes
Additional serving suggestions: pair with a crisp salad, garlic bread, or roasted seasonal vegetables for balance.
For make-ahead, prep components separately and assemble just before heating to preserve texture.
Taste and adjust with acid (lemon/vinegar) and salt right at the end to wake up flavors.