Introduction
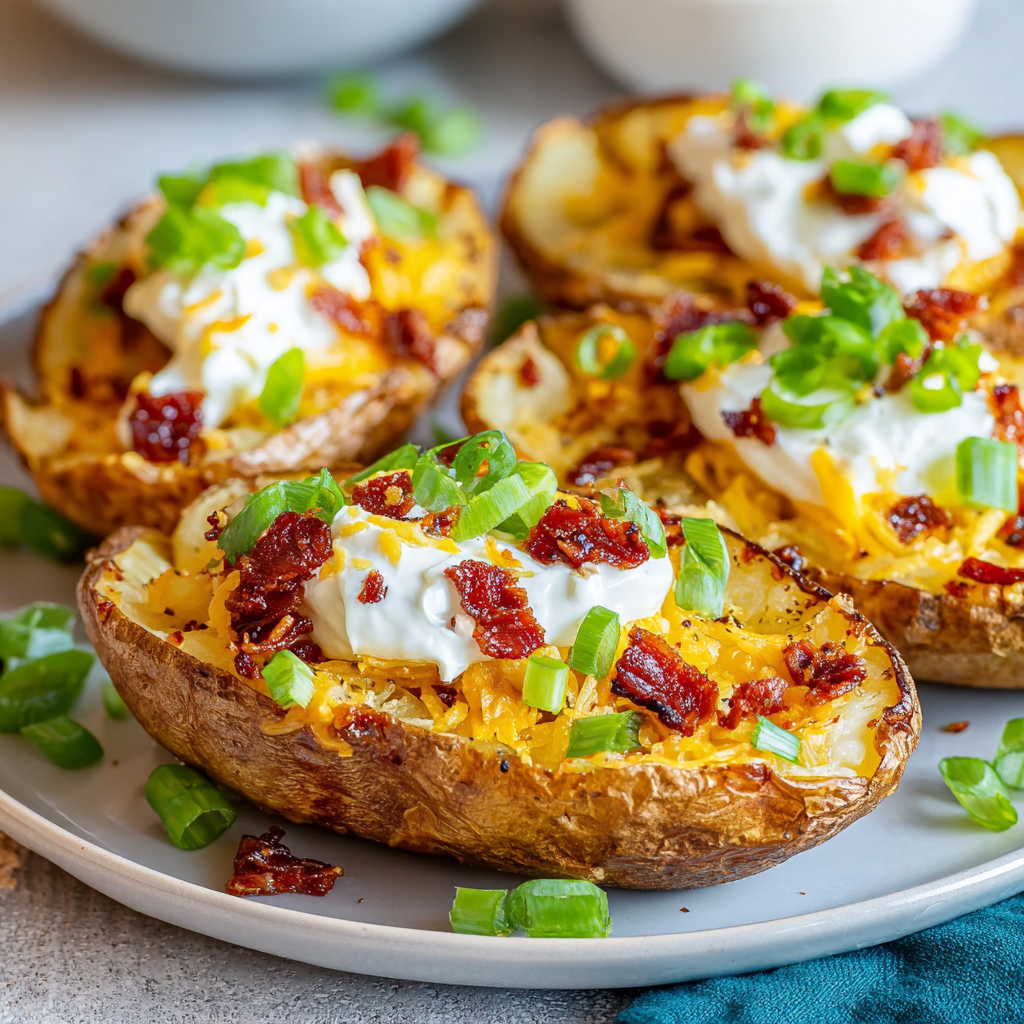
Loaded potato skins are the ultimate comfort food, combining the crispy texture of baked potatoes with a wealth of toppings that satisfy diverse taste buds. Whether for game day gatherings, cozy family evenings, or a unique twist at dinner parties, these savory treats are sure to impress. Perfectly crispy on the outside and beautifully fluffy on the inside, the satisfying crunch of every bite guarantees contentment.
The simplicity of the ingredients allows the flavors to shine through without overwhelming the palate. Moreover, the customization possibilities are endless; you can mix and match toppings based on personal preferences or pantry availability. This recipe encourages creativity while delivering a deliciously hearty bite that everyone will reach for.
Ingredients
- 4 large russet potatoes
Russet potatoes are ideal for loaded skins due to their high starch content. This results in a fluffy interior when baked, while their resilient skin becomes wonderfully crisp, making them the perfect vessel for toppings. - 1 cup shredded cheddar cheese
Cheddar cheese adds a rich, tangy flavor that melts beautifully, creating a gooey texture over the warm potato. It’s the quintessential cheese for loaded potato skins, elevating both taste and visual appeal. - 1/2 cup cooked and crumbled bacon
Bacon introduces a savory, smoky element that complements the creaminess of the cheese and potato. Its crispy bits provide a delightful crunch and a pleasing contrast in textures within each bite. - 1/2 cup sour cream
Sour cream contributes a creamy, tangy flavor that balances the richness of the cheese and bacon. It also lends a cooling effect to the dish, making it a classic topping. - 1/4 cup chopped green onions
Green onions add a fresh crispness and a mild onion flavor that cuts through the heaviness of the other ingredients. Their vibrant color enhances presentation, making each skin look tempting. - Olive oil as needed
Olive oil is used to brush the potato skins, ensuring they land on the baking sheet with a golden-brown crunch. It also aids in the even roasting of the skins. - Salt and pepper to taste
Seasoning with salt and pepper enhances the natural flavors of the potatoes and toppings. It’s essential for achieving a well-balanced taste in the final dish.
Directions & Preparation
Step 1: Preheat your oven to 400°F (200°C).
Preheating the oven is critical for achieving that perfect crispy texture on the potato skins. An adequately heated oven ensures that the skins bake evenly and develop a satisfying crunch.
Step 2: Wash and scrub the russet potatoes thoroughly. Pat dry.
Cleaning the potatoes removes any dirt or impurities that might affect flavor or texture. Patting them dry helps oil adhere better later, leading to a crispier skin when baked.
Step 3: Prick each potato several times with a fork.
Pricking the potatoes allows steam to escape as they bake. This step is crucial; otherwise, trapped steam could cause the potatoes to burst, compromising the integrity of the skins.
Step 4: Rub each potato with olive oil and sprinkle with salt.
Applying olive oil on the potato skins not only promotes browning but also enhances flavor. The salt penetrates the skin, seasoning it right from the outside and contributing to a delicious savory note.
Step 5: Bake the potatoes directly on the oven rack for about 45-60 minutes, or until fork-tender.
Baking the potatoes on the rack allows air to circulate all around, resulting in even cooking. Thoroughly cooked potatoes are essential as they provide the fluffy texture needed for loaded skins.
Step 6: Let the potatoes cool slightly before slicing them in half lengthwise.
Cooling the potatoes makes them easier to handle while slicing. Cutting them lengthwise allows for ample room to load on toppings later, maximizing flavor in every bite.
Step 7: Scoop out the flesh from the inside of each half, leaving a thin layer of potato.
Scooping out some of the flesh not only creates a shell for the toppings but also helps prevent them from becoming too heavy or soggy. Leaving a thin layer keeps the skins soft yet sturdy.
Step 8: Brush the inside and outside of the potato skins with olive oil and season with salt and pepper.
Brushing with olive oil enhances crispiness while seasoning the skins adds flavor. This step ensures that every bite is flavorful and contrasts nicely with the soft potato inside.
Step 9: Place the potato skins on a baking sheet and return them to the oven for about 10-15 minutes until crisp.
Baking the skins again after preparing them heightens their texture, making them golden and crisp. This step also gives them a delicious roasted flavor that complements the toppings.
Step 10: Remove from the oven, and fill each potato skin with shredded cheese, crumbled bacon, and green onions.
Loading the skins with toppings while they're hot helps the cheese melt perfectly. This step turns your potato skins into a decadent treat that's loaded with flavors and textures.
Step 11: Return the loaded skins to the oven for an additional 5-10 minutes until the cheese is melted and bubbly.
Re-baking the loaded skins ensures the toppings meld together beautifully. This final baking gives the dish a cohesive texture while ensuring everything is heated through, culminating in a warm, gooey masterpiece.
Step 12: Serve hot topped with a dollop of sour cream and extra green onions if desired.
Serving the skins hot ensures each bite is indulgent, while the sour cream adds a cooling touch. Topping with additional green onions elevates the dish’s presentation and flavor, making it irresistible.

Creative Toppings Beyond the Classics
While cheddar, bacon, and sour cream are the traditional toppings for loaded potato skins, this is an opportunity for culinary creativity. Consider adding pulled pork, jalapeños, avocado, or different types of cheese. Each ingredient adds a unique flavor profile, transforming the basic recipe into something truly exceptional and delightful to the palate.
Pairing Recommendations for Loaded Potato Skins
The rich flavors of loaded potato skins pair beautifully with a variety of beverages and sides. A crisp salad with a citrus vinaigrette can lighten the meal, while a cold beer or sparkling water complements the flavors. You might also explore serving them alongside your favorite dipping sauces for added variety and taste, such as ranch dressing or a spicy aioli.
Making Loaded Potato Skins a Meal
Loaded potato skins can easily be transformed from an appetizer into a satisfying meal. By adding more protein, like grilled chicken or seasoned ground beef, and garnishing with colorful vegetables, they become a hearty dish. Serve with a side of sautéed greens or a light soup for a complete, well-rounded dining experience.
FAQs
What can I do if my potato skins are too soggy?
If your skins are soggy, ensure they are baked long enough to achieve a crispy texture. You might also try reducing the amount of oil used for brushing or prolonging the second baking time.
How can I make a smaller batch of loaded potato skins?
To make a smaller batch, simply reduce the number of potatoes and adjust the toppings proportionately. Each potato yields two skins, so plan based on how many you want to serve.
What if I don't have sour cream?
If sour cream isn't available, Greek yogurt serves as a perfect substitute. It has similar creaminess and tanginess, maintaining the intended flavor profile.
Why did my cheese not melt properly?
If the cheese fails to melt, it may be due to low-quality cheese or not enough heat. Make sure to use a cheese suitable for melting and allow sufficient time in the oven.
Can I use other types of cheese?
Absolutely! Experiment with cheeses like Monterey Jack, Gouda, or pepper jack for a unique twist in flavor. Just ensure they melt well.
What's the best way to reheat leftover potato skins?
Reheating in the oven works best to retain the skins' crispiness. Preheat the oven to 375°F (190°C) and bake for about 10 minutes or until heated through.
Conclusion
Loaded potato skins are not just a dish; they’re an experience that brings people together. Their warm, inviting flavors and textures make them a favorite at any gathering, whether casual or special. Don't hesitate to get creative, experiment with toppings, and make them your own.
As you serve these delectable treats, watch the smiles and satisfaction they bring to faces around the table. With each bite, it’s clear that loaded potato skins embody comfort, indulgence, and the joy of sharing great food.
Recipe Card
Indulgent Loaded Potato Skins for a Crowd-Pleasing Snack
Ingredients
Method
- Preheat your oven to 400°F (200°C).
- Wash and scrub the russet potatoes thoroughly. Pat dry.
- Prick each potato several times with a fork.
- Rub each potato with olive oil and sprinkle with salt.
- Bake the potatoes directly on the oven rack for about 45-60 minutes, or until fork-tender.
- Let the potatoes cool slightly before slicing them in half lengthwise.
- Scoop out the flesh from the inside of each half, leaving a thin layer of potato.
- Brush the inside and outside of the potato skins with olive oil and season with salt and pepper.
- Place the potato skins on a baking sheet and return them to the oven for about 10-15 minutes until crisp.
- Remove from the oven, and fill each potato skin with shredded cheese, crumbled bacon, and green onions.
- Return the loaded skins to the oven for an additional 5-10 minutes until the cheese is melted and bubbly.
- Serve hot topped with a dollop of sour cream and extra green onions if desired.
Notes
Additional serving suggestions: pair with a crisp salad, garlic bread, or roasted seasonal vegetables for balance.
For make-ahead, prep components separately and assemble just before heating to preserve texture.
Taste and adjust with acid (lemon/vinegar) and salt right at the end to wake up flavors.