Introduction
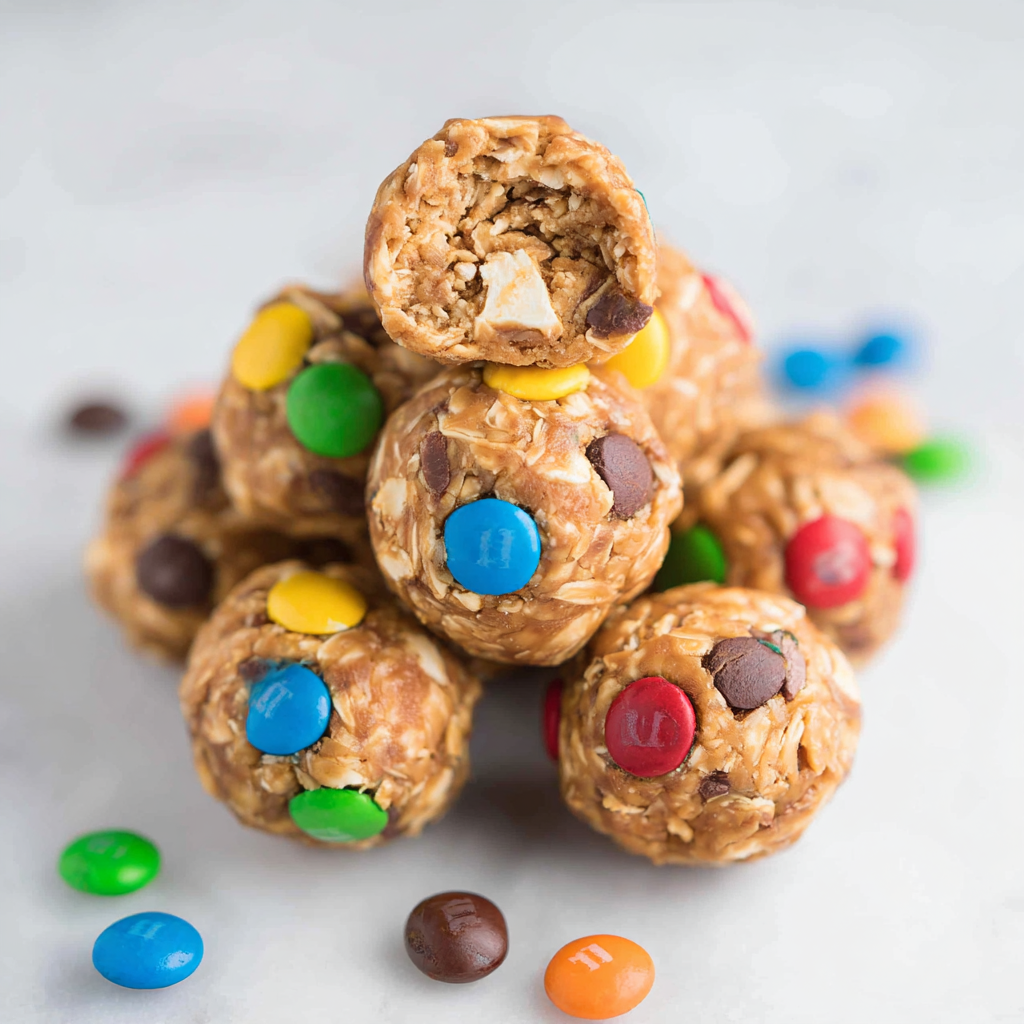
Fitting wholesome snacks into our busy lives can often be a challenge. Enter Monster Cookie Protein Balls, a delectable treat that's not only easy to make but also packed with nutrition. These delightful bites combine the best of flavor and health, making them perfect for busy afternoons or post-workout recovery.
Combining the beloved elements of classic monster cookies, like oats, nut butter, and chocolate chips, these protein balls offer a satisfying chew while boosting your energy levels. They're a crowd-pleaser, balancing sweetness and nutrition, so everyone can enjoy a monster-sized snack without the guilt.
Ingredients
- 1 cup rolled oats
Rolled oats form the base of these protein balls, providing hearty texture and dietary fiber. They help in stabilizing blood sugar levels and add a wholesome, chewiness that complements other ingredients beautifully. - 1/2 cup creamy peanut butter
Peanut butter serves as the binding agent, along with being a delicious source of protein and healthy fats. It adds a creamy texture and rich flavor, making these protein balls satisfying and nutrient-dense. - 1/2 cup protein powder
Protein powder enhances the nutritional profile of these balls, supporting muscle repair and growth after workouts. It also adds a variety of flavors depending on the type of powder used, from chocolate to vanilla. - 1/3 cup honey or maple syrup
Natural sweeteners like honey or maple syrup provide necessary moisture while sweetening the protein balls. They also enhance the overall flavor and encourage a delightful chewiness. - 1/2 cup mini chocolate chips
Mini chocolate chips infuse a burst of sweetness and richness in every bite. They're a fun addition that elevates the indulgent taste of monster cookies while still keeping it wholesome. - 1/4 cup ground flaxseed
Ground flaxseed is a nutritious add-in that boosts the fiber content, aiding in digestion. It also provides omega-3 fatty acids, which are beneficial for heart health and may contribute to improved metabolism. - 1/2 teaspoon vanilla extract
Vanilla extract enriches the flavor profile of the protein balls, making them more aromatic and delicious. Its unique warmth enhances the sweetness of the other ingredients. - 1/4 teaspoon salt
A pinch of salt balances the sweetness and enhances the overall flavors in these protein balls. It ensures every bite is perfectly seasoned without being overpowering.
Directions & Preparation
Step 1: In a large mixing bowl, combine rolled oats, protein powder, and ground flaxseed.
Mixing dry ingredients together first ensures even distribution of flavors and nutrients. By combining rolled oats with protein powder and flaxseed, you'll create a robust nutritional foundation for your protein balls.
Step 2: Add in the creamy peanut butter and sweetener.
Incorporating peanut butter and honey or maple syrup at this stage helps bind the dry ingredients while providing moisture. The warmth and creaminess of the peanut butter help in forming a cohesive mixture that's easy to work with.
Step 3: Stir the mixture until fully combined.
Thoroughly mixing ensures all ingredients are well incorporated, resulting in a consistent flavor and texture throughout the protein balls. This step is crucial for preventing dry or uneven pockets when you form the balls.
Step 4: Fold in the mini chocolate chips and vanilla extract.
Adding chocolate chips at this stage allows you to control their distribution in the mixture. Vanilla enhances the overall flavor, making the mixture tastier and more appealing, so don’t skip this flavorful addition.
Step 5: Refrigerate the mixture for 10-15 minutes.
Chilling the mixture helps firm it up, making the dough easier to handle when forming into balls. This step prevents the mixture from being too sticky or hard to shape, giving you more control over the final product.
Step 6: Form the mixture into small balls, about 1 inch in diameter.
Shaping the balls evenly ensures consistent size and bites. Use your hands to roll the mixture into balls, pressing slightly to create a compact shape. This method allows your protein balls to hold together well.
Step 7: Place the formed balls on a parchment-lined baking sheet.
Using parchment paper prevents the protein balls from sticking to the surface. It also makes cleanup easier, so you can focus on enjoying your delicious creations rather than scrubbing your dishes.
Step 8: Refrigerate for an additional hour before enjoying.
Allowing the balls to chill again solidifies their shape and texture, giving them a satisfying bite. This final cooling phase enhances the flavors as they meld together, making them even more enjoyable once ready to eat.

Flavor Variations for Your Monster Cookie Protein Balls
While the classic recipe is delicious, experimenting with different flavors can elevate your protein balls to new heights. Consider adding a scoop of cocoa powder for a chocolatey twist, or incorporating shredded coconut for a tropical flair. Dried fruits like cranberries or raisins can also bring added sweetness, giving your protein balls a unique touch.
Nut Butter Options to Explore
Peanut butter is a fantastic choice, but don’t hesitate to explore other nut butters that might suit your palate. Almond butter or cashew butter can replace peanut butter, each providing distinct flavors and nutritional benefits. Nut-free alternatives like sunflower seed butter are also excellent choices for those avoiding nuts, creating a safe yet tasty snack.
Customizing for Dietary Needs
If you're catering to specific dietary requirements, it's easy to customize this recipe. For a vegan version, opt for maple syrup over honey and ensure your protein powder is plant-based. Adjusting ingredient quantities or types can help achieve the desired texture and flavor while staying true to dietary preferences, making these protein balls versatile for everyone.
FAQs
What if my mixture is too thick to form balls?
If the mixture is too thick, try adding a teaspoon of water or extra nut butter to loosen it. Stir until the texture becomes manageable, allowing for easier shaping into balls.
Can I scale up the recipe for a larger batch?
Absolutely! You can double or triple the recipe as needed. Just be mindful of your mixing bowl size to ensure even incorporation of all ingredients.
How can I enhance the chocolate flavor?
To deepen the chocolate flavor, consider using chocolate protein powder or adding cocoa powder to the dry ingredients. You could also increase the amount of chocolate chips for an extra indulgent bite.
What adjustments can I make if I'm out of flaxseed?
If flaxseed is unavailable, you can replace it with chia seeds or omit it entirely. The mixture might be slightly less binding, but it still should hold together nicely.
How do I keep the protein balls from sticking to my hands?
To prevent the mixture from sticking to your hands, you can lightly coat your hands with a bit of coconut oil or water. This allows for easy rolling without a mess.
Can I add nuts or seeds for extra crunch?
Yes, adding chopped nuts or seeds can provide a wonderful crunch and additional nutrients. You can mix in nuts like almonds, walnuts, or pumpkin seeds according to your preference.
Conclusion
Monster Cookie Protein Balls are an incredibly versatile and nutritious snack choice, offering a perfect balance between indulgence and health. Once you've mastered the basic recipe, the possibilities for customization are endless.
Enjoy them as a post-workout snack, a quick breakfast option, or a simple treat any time of day. These protein balls will not only satisfy your hunger but also fuel your body with wholesome ingredients, making them a perfect addition to any well-rounded diet.
Recipe Card

Savory Million Dollar Chicken Bake Recipe
Ingredients
Method
- Preheat your oven to 350°F (175°C).
- Prepare a baking dish by lightly greasing it with cooking spray.
- In a mixing bowl, combine the cream of chicken soup and sour cream.
- Stir in garlic powder, onion powder, paprika, salt, and pepper.
- Arrange the chicken breasts in the greased baking dish and cover with the cream mixture.
- Sprinkle the shredded cheddar and grated Parmesan cheese evenly over the top.
- Top with crushed potato chips for crunch.
- Cover the baking dish with foil and bake for 30 minutes.
- Remove the foil and bake for an additional 15-20 minutes.
- Let the dish rest for 5-10 minutes before serving.
Notes
Additional serving suggestions: pair with a crisp salad, garlic bread, or roasted seasonal vegetables for balance.
For make-ahead, prep components separately and assemble just before heating to preserve texture.
Taste and adjust with acid (lemon/vinegar) and salt right at the end to wake up flavors.