Introduction
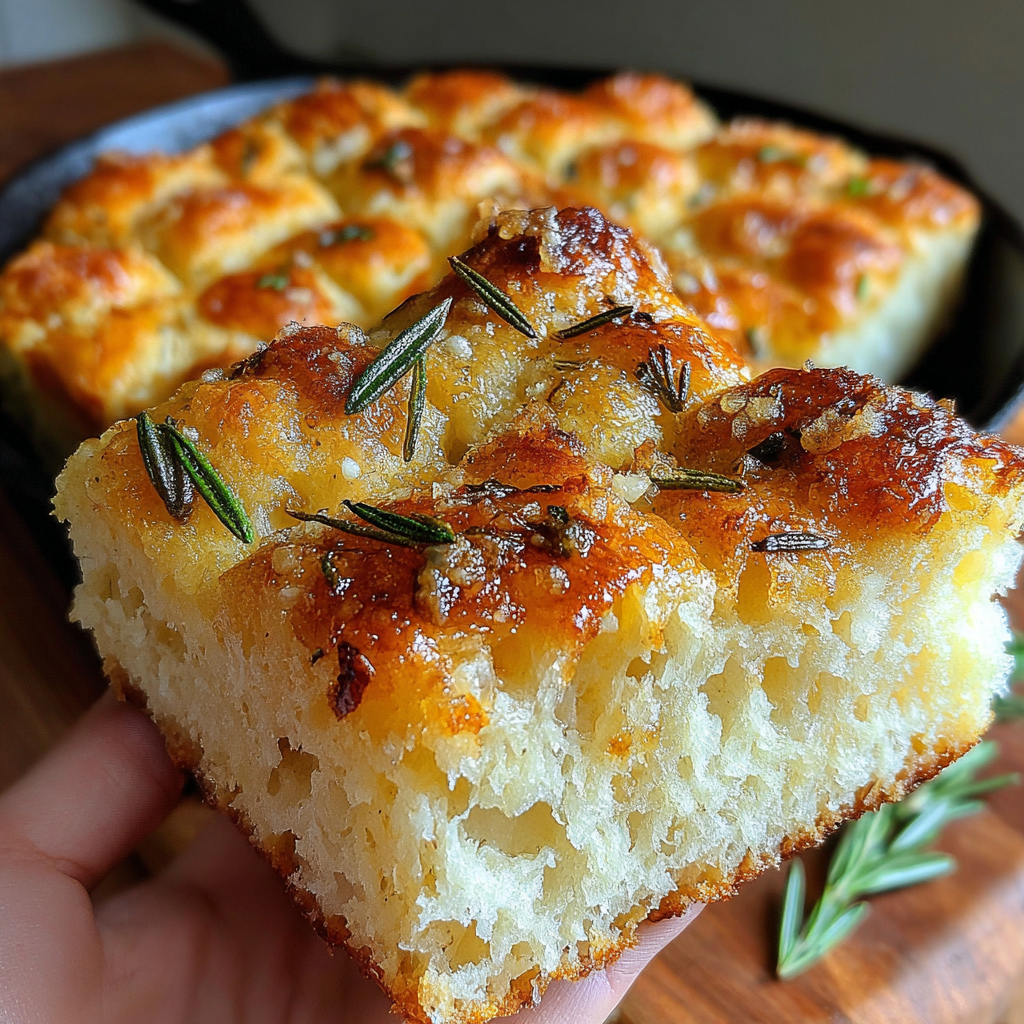
Baking bread at home can seem daunting, but it doesn't have to be. Rustic Garlic Rosemary Skillet Bread is an easy and rewarding project that brings the warmth of homemade bread into your kitchen without the need for fancy equipment or techniques.
With a delightfully crispy crust and a soft, aromatic interior, this bread pairs beautifully with any meal or can be enjoyed on its own. The addition of garlic and rosemary adds an earthy dimension, making each bite more than just a vehicle for butter.
Ingredients
- 3 cups all-purpose flour
The foundation of the bread, all-purpose flour provides the necessary structure and texture. Higher protein levels in the flour contribute to gluten development, which helps the bread rise. - 1 ½ teaspoons salt
Salt not only enhances flavor but also controls yeast activity, ensuring steady fermentation. It strengthens the dough structure and contributes to the overall taste. - 1 packet (2 ¼ teaspoons) active dry yeast
Yeast is the leavening agent that causes the dough to rise, creating a light and airy texture. Active dry yeast requires activation in warm water, ensuring it's alive and ready to work. - 1 ¼ cups warm water
Warm water is essential for activating the yeast. It should be comfortably warm to the touch, as water that's too hot can kill the yeast, while water that's too cold can inhibit its growth. - 3 tablespoons olive oil
Olive oil adds flavor and moisture to the bread. It also promotes tenderness in the crumb and contributes to a crispier crust when baked. - 4 cloves garlic, minced
Garlic infuses the bread with its rich, savory flavor. It caramelizes slightly during baking, enhancing the overall taste profile. - 2 tablespoons fresh rosemary, chopped
Rosemary brings a fragrant, earthy aroma and flavor to the bread. Its robust scent complements the garlic and provides a touch of rustic charm.
Directions & Preparation
Step 1: Activate the yeast
Start by combining warm water with the active dry yeast in a medium bowl. Allow it to sit for about 5-10 minutes until it becomes frothy. This step is crucial as it confirms that your yeast is alive and ready to ferment. If it doesn't froth, you may need to start over with new yeast.
Step 2: Mix the dry ingredients
In a large mixing bowl, combine the all-purpose flour and salt. Stir the dry ingredients together to ensure even distribution. This step is important for consistent flavor throughout the bread, as salt can inhibit yeast growth if it directly contacts it.
Step 3: Combine wet and dry ingredients
Make a well in the center of the dry ingredients, then pour in the activated yeast mixture, olive oil, minced garlic, and chopped rosemary. Stir until the dough begins to come together. The garlic and rosemary will begin to infuse the flour, and the moisture from the water and oil will help bind the ingredients.
Step 4: Knead the dough
Transfer the dough to a floured surface and knead for about 8-10 minutes until it’s smooth and elastic. This step develops gluten, which gives bread its structure. You’ll know it’s ready when it springs back when pressed and feels slightly tacky.
Step 5: First rise
Place the kneaded dough in a greased bowl, cover it with a damp towel or plastic wrap, and let it rise in a warm place for 1-1.5 hours or until doubled in size. This fermentation process is essential as it allows flavor development and proper texture.
Step 6: Shape the dough
Once risen, punch down the dough to release the gases, then turn it out onto a lightly floured surface. Shape it into a ball or a disc, depending on your skillet size. This reshaping helps to produce a denser, more flavorful bread.
Step 7: Prepare the skillet
Heat a cast-iron or oven-safe skillet over medium heat on the stovetop. Drizzle a bit of olive oil and allow it to coat the base. Heating the skillet helps to develop a crust during the initial stages of baking.
Step 8: Cook on the stovetop
Place the shaped dough into the hot skillet. Cover it with a lid or foil and cook on low for about 5-10 minutes. This will help create a crust before it moves into the oven, allowing for better texture.
Step 9: Bake the bread
Transfer the skillet to a preheated oven at 425°F (220°C). Bake for 20-25 minutes until the bread is golden brown and sounds hollow when tapped. This final baking step develops the crust and allows the aromas of garlic and rosemary to fill your kitchen.
Step 10: Cool before slicing
Remove the skillet from the oven and let the bread cool for a few minutes before transferring it to a cooling rack. Allowing it to cool prevents the inside from becoming gummy and helps maintain its structure.

Elevating Flavors with Garlic and Rosemary
The combination of garlic and rosemary not only adds a fragrant aroma but also heightens the bread's flavor complexity. As the bread bakes, the garlic caramelizes, creating a depth that balances beautifully with the herbal notes of rosemary. Experimenting with different quantities can yield variations in intensity, making this a versatile recipe for flavor adjustments.
The Importance of Kneading
Kneading is a critical step in bread-making, as it develops the gluten network that gives bread its structure. This process allows the dough to stretch and support the gases produced by yeast fermentation. Effective kneading results in a bread that has a chewy bite and a satisfying texture, crucial for those rustic loaves.
Skillet Baking Advantages
Using a skillet to bake bread presents unique advantages. It enables a beautiful crust to form quickly, as the direct contact with a heated surface develops flavor and texture. Moreover, skillet baking reduces baking time compared to conventional methods, making it a practical choice for home cooks eager to enjoy warm bread without a long wait.
FAQs
What if my dough doesn’t rise?
Check if your yeast was activated correctly; it should froth in warm water. Also, ensure the dough was placed in a warm, draft-free area for rising.
Can I use dried rosemary instead of fresh?
Yes, dried rosemary can be used, but use less since it’s more concentrated. Typically, 1 tablespoon of dried rosemary is equivalent to 2 tablespoons of fresh.
What if the dough feels too sticky?
If the dough is excessively sticky, add a small amount of flour at a time until it reaches a manageable consistency. It should be slightly tacky but workable.
Why does my bread taste bland?
Make sure to measure salt accurately, as it enhances flavor. Additionally, ensure that your garlic and rosemary are fresh to provide a fuller richer taste.
How do I know when the bread is done baking?
The bread is ready when it is golden brown and sounds hollow when tapped on the bottom. An internal temperature of about 190°F (88°C) indicates that it is fully cooked.
Can I bake this bread in a different type of pan?
You can use any oven-safe pan, but baking times may vary. A pan with good heat retention, like a cast iron skillet, is recommended for optimal crust.
Conclusion
Rustic Garlic Rosemary Skillet Bread brings the joy of baking into your home with minimal hassle and maximum flavor. Each bite is not just a treat, but a testament to the beauty of simple ingredients working in harmony.
Whether enjoyed alongside a meal or as a snack with some butter, this bread is sure to become a beloved staple in your kitchen. Don't hesitate to experiment with the recipe, adding your spin on flavors for even more delicious possibilities.
Recipe Card
Rustic Garlic Rosemary Skillet Bread Recipe
Ingredients
Method
- Activate the yeast
- Mix the dry ingredients
- Combine wet and dry ingredients
- Knead the dough
- First rise
- Shape the dough
- Prepare the skillet
- Cook on the stovetop
- Bake the bread
- Cool before slicing
Notes
Additional serving suggestions: pair with a crisp salad, garlic bread, or roasted seasonal vegetables for balance.
For make-ahead, prep components separately and assemble just before heating to preserve texture.
Taste and adjust with acid (lemon/vinegar) and salt right at the end to wake up flavors.