Introduction
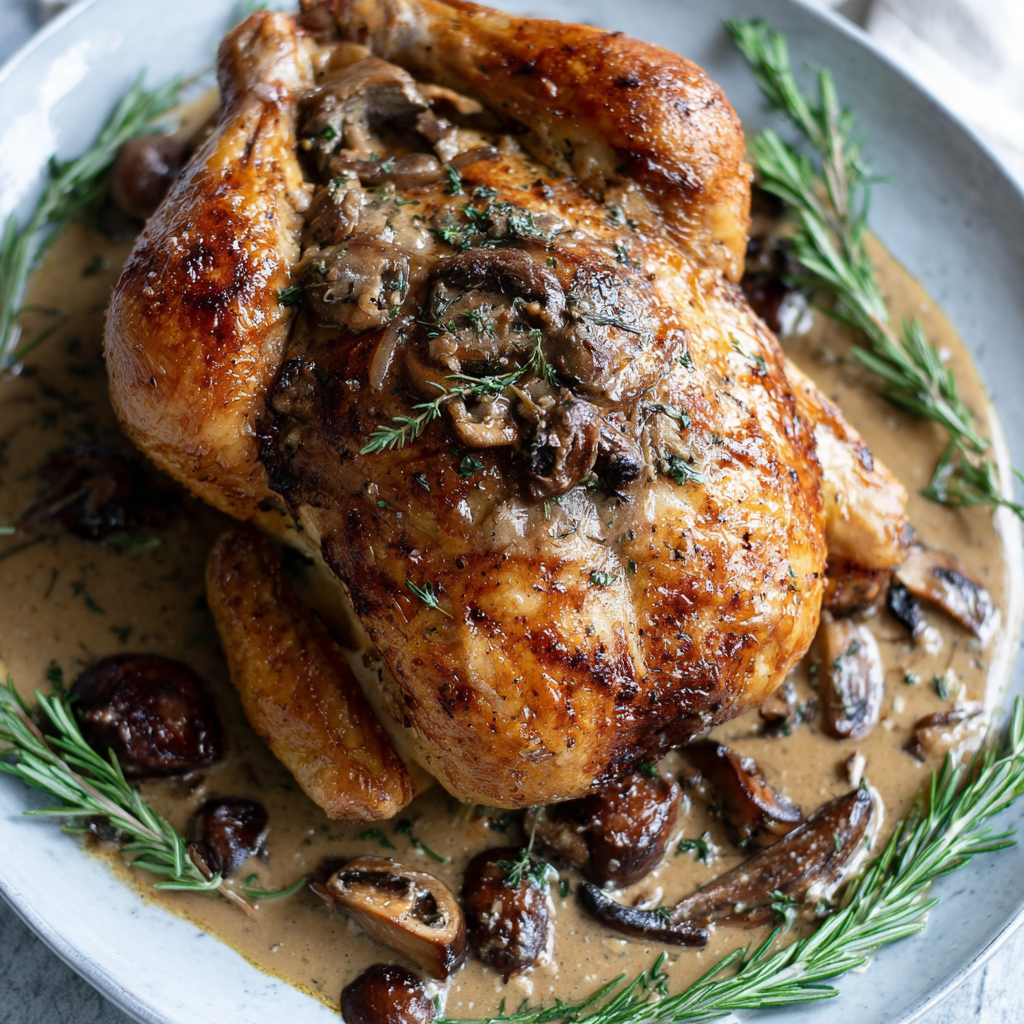
There's something inherently comforting about a perfectly slow roasted chicken. The aroma that fills your kitchen as it cooks is almost as enchanting as the first bite. The method of slow roasting transforms a simple bird into a feast worthy of celebration, ensuring tenderness and rich flavors.
This cooking approach allows for prolonged exposure to low heat, resulting in a juicier chicken with crispy skin. With a handful of simple ingredients and minimal active cooking time, you can bring a delicious and hearty meal to your table, perfect for family gatherings or a cozy dinner at home.
Join me as we explore the art of slow roasting chicken, where patience meets big rewards. Prepare to impress your loved ones with a dish that’s as satisfying to make as it is to enjoy.
Ingredients
- 1 whole chicken (about 4-5 lbs)
Choosing a good quality chicken is key. Fresh, free-range birds tend to have superior flavor and texture, ensuring a succulent final dish as the chicken absorbs the rich flavors while roasting. - 3 tablespoons olive oil
Olive oil helps achieve that golden brown skin and adds depth of flavor. It also helps to keep the chicken moist while roasting, creating a perfect balance with crispy edges. - 2 tablespoons salt
Salt is essential for flavor enhancement. It helps draw moisture out of the chicken, which melds with seasonings to create a savory brine that infuses the meat. - 1 tablespoon black pepper
Freshly ground pepper adds a subtle spiciness, which complements the natural flavors of the chicken. It also balances the richness of the dish. - 1 lemon, halved
Lemon introduces a bright acidity that cuts through the richness, balancing the flavors. It can also help tenderize the chicken when cooked inside the cavity. - Fresh herbs (rosemary, thyme, or parsley)
Herbs provide aromatic notes that enhance the overall flavor. Their oils infuse the chicken, leading to a more nuanced and complex taste. - 4 garlic cloves, smashed
Garlic contributes its fragrant essence, mellowing out during the cooking process to provide a savory aromatic quality that enriches the dish. - 1 onion, quartered
Onions add natural sweetness and depth, caramelizing slightly as the chicken roasts. They can also provide a flavorful base that the chicken rests upon.
Directions & Preparation
Step 1: Preheat your oven to 300°F (150°C).
Starting with a properly preheated oven ensures even cooking. This low temperature allows the chicken to roast slowly, encouraging even doneness, resulting in juicy meat and crispy skin.
Step 2: Prepare the chicken by removing any giblets from the cavity and rinsing it under cold water.
Rinsing the chicken helps clean it, removing any residual blood or bits. Make sure to pat it dry with paper towels; excess moisture can inhibit browning.
Step 3: Rub olive oil all over the chicken, covering it generously.
The olive oil helps the skin to crisp up beautifully while also providing moisture. It creates a barrier that locks in flavors and keeps the meat tender during cooking.
Step 4: Season the chicken with salt and pepper both inside and out.
Proper seasoning is crucial for flavor distribution. Salting the cavity not only seasons the meat but also influences how moisture is retained, leading to a more flavorful outcome.
Step 5: Stuff the cavity with lemon halves, garlic, onion, and your choice of herbs.
Stuffing the cavity with aromatics flavors the chicken from the inside, releasing essential oils as it cooks. This helps to infuse the meat with a delightful freshness, making every bite irresistible.
Step 6: Place the chicken on a roasting rack in a roasting pan.
Using a rack elevates the chicken, allowing heat to circulate around it evenly. This technique ensures that air can reach all sides, contributing to a crispy exterior.
Step 7: Roast in the preheated oven for 3 to 4 hours, basting occasionally with the rendered juices.
Slow roasting allows the fat to render out while keeping the meat moist. Basting with the juices promotes a beautiful brown color and rich flavor while also preventing the bird from drying out.
Step 8: Check the internal temperature; it should read 165°F (75°C) when done.
Using an instant-read thermometer guarantees perfect doneness. Ensuring the chicken reaches this temperature helps kill any harmful bacteria, making your meal safe to enjoy.
Step 9: Let the chicken rest for at least 15-20 minutes before carving.
Resting allows the juices to redistribute throughout the meat, ensuring that each slice remains juicy and moist. This step enhances flavor and improves texture.

The Importance of Seasoning
Seasoning is a critical step in the roasting process, as it impacts the final taste significantly. A well-seasoned chicken enhances every bite, allowing the natural flavors to shine. Focus on balancing salt, acidity, and aromatics for a truly unforgettable dish.
Choosing the Right Cooking Vessel
The choice of vessel for roasting chicken matters more than you might think. A roasting pan with a rack allows for maximum airflow around the chicken, leading to better cooking. Equally, a Dutch oven can retain moisture, creating a different texture and flavor.
Serving Suggestions and Pairings
Slow roasted chicken pairs beautifully with seasonal vegetables and grains, creating a complete meal. Consider side dishes like roasted potatoes, sautéed greens, or a refreshing salad to complement the rich flavors, providing contrast and balance.
FAQs
Why is my chicken skin not crispy?
If the skin isn't crispy, it may have been too wet before roasting or not seasoned adequately. Ensure you dry the skin well and keep the oven temperature consistent.
What if my chicken turns out bland?
Lack of flavor can stem from insufficient seasoning. Always taste and adjust seasoning before roasting, and consider adding more aromatic ingredients.
How can I tell if my chicken is overcooked?
Overcooked chicken is often dry and has a tough texture. Use a meat thermometer to check internal temperature and ensure it remains moist.
Can I adjust the recipe for a smaller chicken?
Yes, you can easily scale down the recipe. Just reduce the cooking time and keep an eye on the internal temperature for doneness.
What to do if my chicken is too thick?
If your sauce or juices are too thick, whisk in a bit of chicken broth or water gradually until you reach your desired consistency.
Is it necessary to use fresh herbs?
While fresh herbs enhance the flavor, dried herbs can be substituted. Use about one-third of the amount as dried herbs are more concentrated.
Conclusion
Slow roasted chicken is not just a meal; it's a celebration of flavor and texture. The process honors the bird, allowing it to shine in its simplicity, while the accompanying aromas fill your home, creating a warm, inviting atmosphere.
With patience and care, anyone can master this culinary technique. Enjoy the satisfaction of serving a beautifully roasted chicken that brings comfort and joy to your dining table.
Recipe Card

Savor the Flavor of Slow Roasted Chicken
Ingredients
Method
- Preheat your oven to 300°F (150°C).
- Prepare the chicken by removing any giblets from the cavity and rinsing it under cold water.
- Rub olive oil all over the chicken, covering it generously.
- Season the chicken with salt and pepper both inside and out.
- Stuff the cavity with lemon halves, garlic, onion, and your choice of herbs.
- Place the chicken on a roasting rack in a roasting pan.
- Roast in the preheated oven for 3 to 4 hours, basting occasionally with the rendered juices.
- Check the internal temperature; it should read 165°F (75°C) when done.
- Let the chicken rest for at least 15-20 minutes before carving.
Notes
Additional serving suggestions: pair with a crisp salad, garlic bread, or roasted seasonal vegetables for balance.
For make-ahead, prep components separately and assemble just before heating to preserve texture.
Taste and adjust with acid (lemon/vinegar) and salt right at the end to wake up flavors.