Introduction
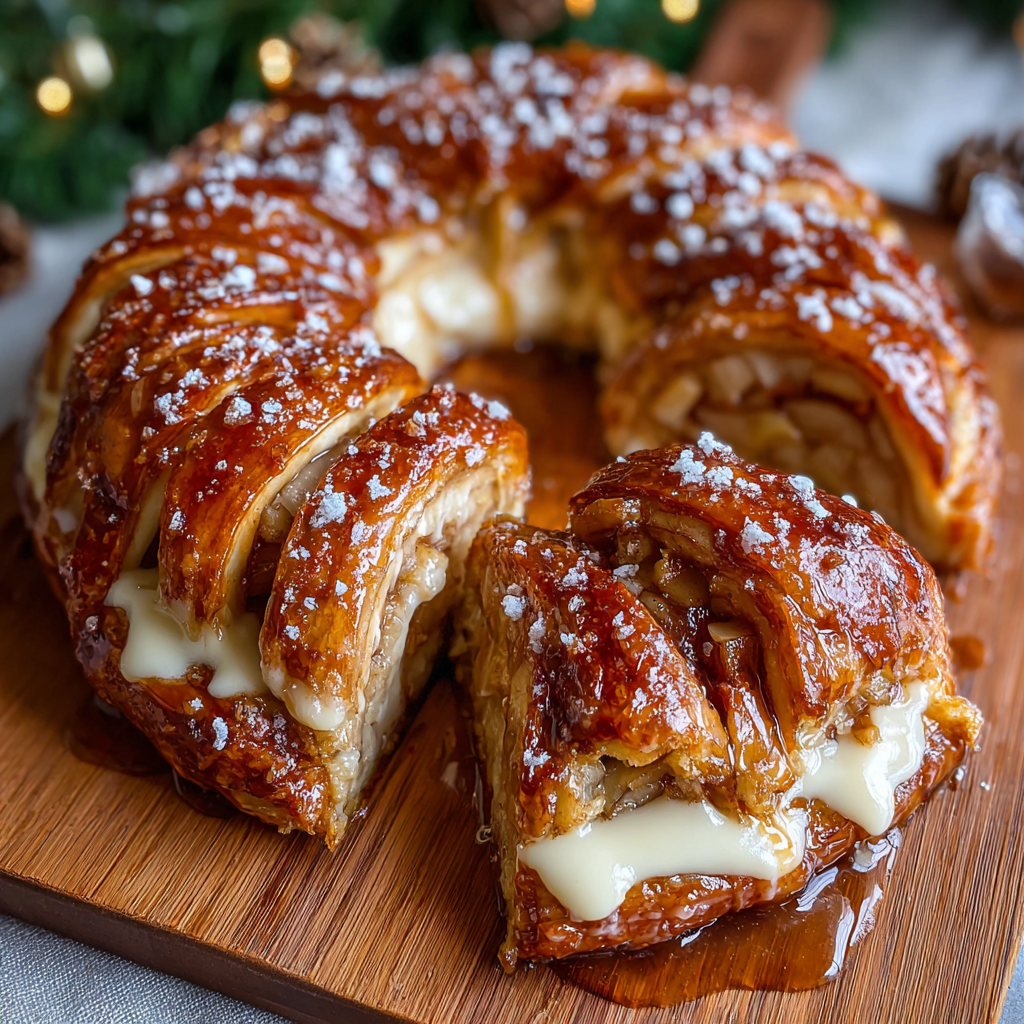
Wisconsin apple kringle is a delightful pastry that embodies the fall harvest with its rich apple filling and flaky crust. Hailing from the Scandinavian community in Racine, this treat has become a beloved staple across the Midwest. Its unique character lies in the buttery dough and the sweet-spiced apples, making it a perfect indulgence for any occasion.
The kringle's origins are tied to the traditions of Danish bakers, who infused their artistry into every bite. This recipe allows home cooks to recreate that magic, bringing a slice of Wisconsin to their kitchens. With a few simple ingredients and a little patience, you can enjoy a homemade kringle that is sure to impress family and friends.
Ingredients
- 4 cups all-purpose flour
All-purpose flour serves as the foundation of the kringle's dough. Its balance of protein content provides the necessary structure while keeping the pastry tender and flaky. - 1 tablespoon sugar
Sugar not only adds sweetness to the dough but also contributes to the browning process during baking, resulting in a beautifully golden pastry exterior. - 1 teaspoon salt
Salt enhances the flavors of the other ingredients, ensuring a well-rounded taste. It also strengthens the dough, improving its overall texture. - 1 cup unsalted butter, cold and cubed
Butter is essential for creating the flaky layers in kringle. Cold butter provides the right texture by steam during baking, helping to separate the dough layers. - 1/2 cup sour cream
Sour cream adds moisture to the dough, contributing to its richness and tenderness. It also introduces a slight tang that balances the sweetness. - 1 large egg yolk
Egg yolk enriches the dough, helping to bind the ingredients together and resulting in a richer flavor. It also contributes to the kringle's attractive color. - 1 tablespoon lemon juice
Lemon juice brightens the flavor of both the dough and the apple filling. The acidity complements the sweetness of the apples, enhancing the overall taste. - 3 cups peeled and sliced apples (such as Granny Smith)
The apples provide the primary flavor for the filling. Granny Smith apples are preferred for their tartness, which balances the sweet elements of the dish. - 1/2 cup brown sugar
Brown sugar not only adds sweetness but also introduces a hint of caramel flavor. It helps to create a thick filling that enhances the kringle's indulgence. - 1 teaspoon ground cinnamon
Cinnamon brings warmth and spice to the apple filling, making each bite comforting. It’s a classic pairing with apples that enhances their natural flavors. - 1/4 teaspoon nutmeg
Nutmeg adds a subtle earthiness and complexity to the flavor profile of the filling, complementing the cinnamon and apple wonderfully. - 1/4 teaspoon vanilla extract
Vanilla extract enriches the overall flavor of the dish, adding a sweet aromatic note that harmonizes with the other ingredients. - 1 egg, for egg wash
An egg wash applied before baking gives the kringle a beautiful golden color and a shiny finish, enhancing its visual appeal. - Powdered sugar, for garnish
Powdered sugar provides a sweet finishing touch, adding a light and festive demeanor to the kringle, perfect for presentation.
Directions & Preparation
Step 1: Prepare the dough by mixing the dry ingredients.
In a large mixing bowl, combine the flour, sugar, and salt. This step sets the foundation for your pastry, ensuring the dry ingredients are evenly distributed, which leads to consistent texture. Be sure to mix well, as this will affect the overall structure of your kringle.
Step 2: Cut in the cold butter.
Using a pastry cutter or your fingertips, work the cold, cubed butter into the flour mixture until it resembles coarse crumbs. This is crucial for achieving the desired flaky texture; the cold butter creates steam as it bakes, helping the dough to rise and separate into layers.
Step 3: Add the sour cream, egg yolk, and lemon juice.
Incorporate the sour cream, egg yolk, and lemon juice into the mixture until a soft dough forms. These ingredients enrich the dough and help bind it, creating a tender and moist texture. Be careful not to overmix, as this can make the dough tough.
Step 4: Chill the dough.
Wrap the dough in plastic wrap and refrigerate for at least an hour. Chilling allows the gluten to relax, resulting in a more tender pastry and making it easier to roll out. This step is crucial for achieving the perfect texture.
Step 5: Prepare the apple filling.
While the dough chills, peel and slice the apples. Combine them with brown sugar, cinnamon, nutmeg, vanilla extract, and mix until the apples are well coated. This step is essential for flavorful filling; the spices enhance the apple's natural sweetness, leading to a well-balanced taste.
Step 6: Roll out the dough.
After chilling, divide the dough in half and roll one half on a floured surface into a large rectangle. This rolling creates a uniform layer, ensuring even baking and proper filling distribution. Aim for a thickness of about 1/8 inch to achieve the right balance between crisp and flaky.
Step 7: Add the apple filling.
Spread half of the apple filling evenly on the rolled dough, leaving a border around the edges. Ensuring the filling is evenly distributed prevents sogginess and allows for even baking. Place the filling closer to the center to make rolling easier in the next step.
Step 8: Shape the kringle.
Carefully fold the dough over the filling and pinch the edges to seal. This technique not only prevents the filling from leaking during baking but also creates a layered effect that adds to the pastry's visual appeal. Repeat this process with the second half of the dough and filling.
Step 9: Preheat the oven.
Preheat the oven to 375°F (190°C) while shaping the kringles. A preheated oven ensures even baking and a consistent rise, resulting in a perfectly golden exterior and fully cooked interior by the time you are finished.
Step 10: Apply the egg wash.
Brush the top of each kringle with the egg wash before baking. This step enhances the color and provides a shiny finish, creating an alluring appearance that invites everyone to take a bite. Don't skimp on this for a golden crust!
Step 11: Bake the kringles.
Place the kringles in the preheated oven and bake for 30–35 minutes, or until golden brown. Keep an eye on them, as ovens can vary; a golden color is your best indicator that they are ready. Allowing them to bake fully ensures a crisp texture and thoroughly cooked filling.
Step 12: Cool and serve.
Once baked, allow the kringles to cool on a wire rack. This cooling period helps set the filling and makes slicing easier. Dust with powdered sugar before serving to add a touch of sweetness and elegance to your homemade treat.

Choosing the Right Apples
The choice of apples can significantly impact the flavor and texture of your kringle. Tart varieties like Granny Smith are ideal for their firmness and ability to hold their shape during baking. Additionally, mixing different types of apples can add depth to the flavor profile, creating a more complex and enjoyable filling. Experimenting with local varieties can yield delightful results.
Mastering the Dough
Achieving the perfect kringle dough is crucial for a successful pastry. The key is to handle the dough as little as possible to prevent gluten development, which can lead to a tough texture. Using chilled ingredients and working quickly helps maintain the buttery flakiness that kringles are known for. Pay attention to the consistency; it should be soft yet manageable for rolling.
Serving Suggestions
Wisconsin apple kringle is a versatile pastry that pairs beautifully with various accompaniments. For a breakfast treat, consider serving it with fresh coffee or tea. At dessert time, a scoop of vanilla ice cream or a drizzle of caramel sauce elevates the experience further. Additionally, it can be enjoyed plain or lightly dusted with powdered sugar for an elegant presentation.
FAQs
What if my dough turns out too crumbly?
If your dough is too crumbly, it may be due to over-measuring the flour or under-mixing the ingredients. Try adding a teaspoon of cold water at a time until the dough comes together more easily.
Can I use other fruits in place of apples?
Absolutely! Pears or a mixture of berries can also be used for the filling. Just ensure the fruit is not overly juicy to avoid a soggy pastry.
Why is my kringle filling too runny?
A runny filling may occur if the fruit has too much moisture or if not enough thickener is used. You can add a tablespoon of cornstarch to help absorb excess liquid.
What if I want to make a smaller batch?
To make a smaller batch, divide all ingredients in half. This recipe scales easily, allowing for adjustments without compromising taste or texture.
How can I make my kringle more flavorful?
For a more robust flavor, consider adding additional spices like ginger or allspice to the apple filling. A splash of brandy or bourbon can deepen the flavor profile as well.
What’s the best way to reheat leftover kringle?
To reheat, place slices in a toaster oven or regular oven at 350°F for about 10 minutes. This helps retain its flaky texture and keeps the filling warm.
Conclusion
Wisconsin apple kringle is more than just a dessert; it’s a celebration of flavors and traditions. The combination of flaky pastry paired with sweet, spiced apples draws everyone in. As you experiment and create this dish in your kitchen, you join a long line of bakers who have cherished this iconic treat.
Try it at your next gathering or as a special treat for yourself. With practice, you can master the art of making this enchanting kringle, delighting anyone fortunate enough to taste it.
Recipe Card
Savor the Sweetness of Wisconsin Apple Kringle
Ingredients
Method
- Prepare the dough by mixing the dry ingredients.
- Cut in the cold butter.
- Add the sour cream, egg yolk, and lemon juice.
- Chill the dough.
- Prepare the apple filling.
- Roll out the dough.
- Add the apple filling.
- Shape the kringle.
- Preheat the oven.
- Apply the egg wash.
- Bake the kringles.
- Cool and serve.
Notes
Additional serving suggestions: pair with a crisp salad, garlic bread, or roasted seasonal vegetables for balance.
For make-ahead, prep components separately and assemble just before heating to preserve texture.
Taste and adjust with acid (lemon/vinegar) and salt right at the end to wake up flavors.