Introduction
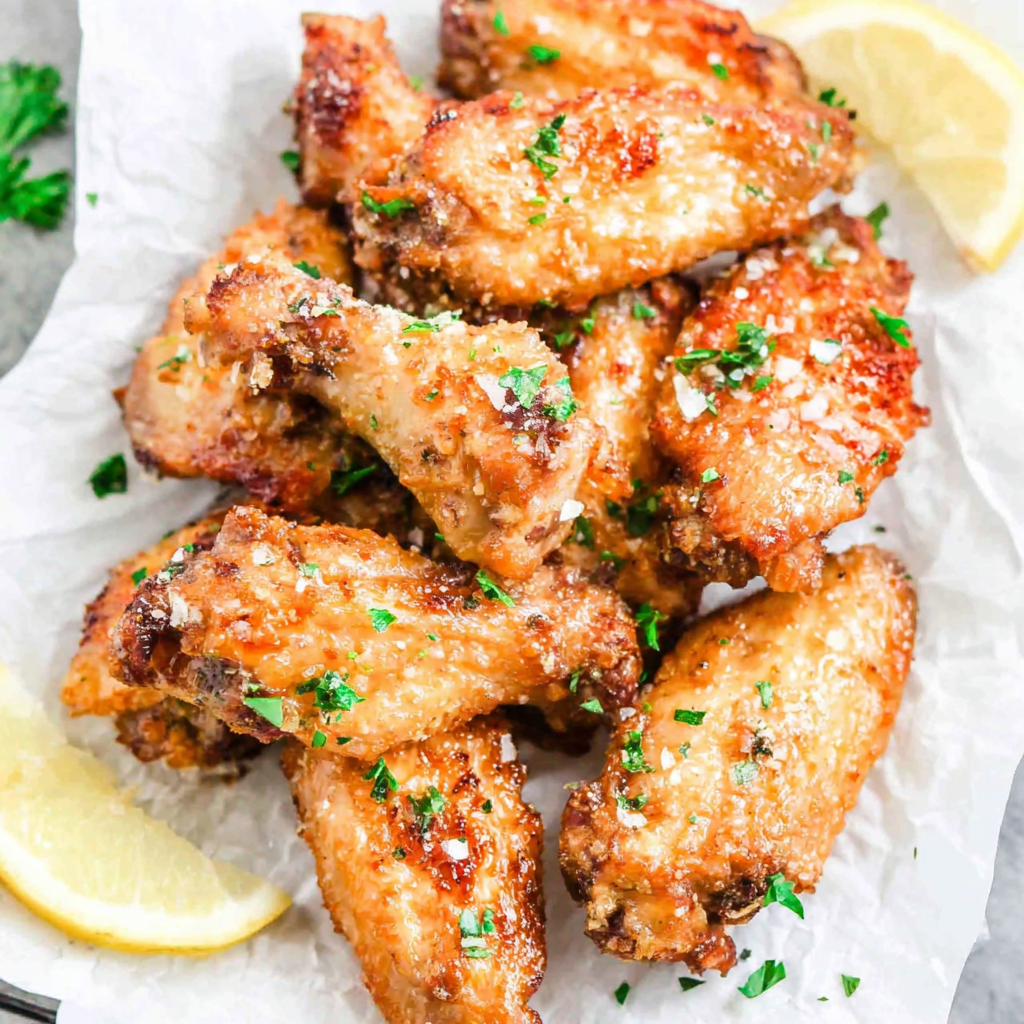
Salt and pepper wings are a classic dish that perfectly balances simplicity and flavor, making them an excellent choice for any gathering or weeknight dinner. This recipe elevates the traditional wing experience, showcasing the role of basic seasonings in enhancing chicken’s natural taste.
Whether you enjoy them baked, fried, or grilled, these wings can be customized to fit your cooking style and preferences. With just a handful of ingredients and straightforward preparation, you’ll find that crafting succulent, zesty wings at home is both enjoyable and rewarding.
Ingredients
- 2 pounds chicken wings
Fresh chicken wings serve as the perfect canvas for flavor. Their skin crisps up beautifully during cooking, while the meat stays juicy. Choose whole wings or sections; both can yield delicious results. - 2 tablespoons salt
Salt plays a critical role in enhancing the overall flavor of the wings. It not only seasons the meat but also aids in drawing out moisture, resulting in a crispy exterior. - 1 tablespoon black pepper
Freshly ground black pepper adds a delightful heat and depth to the wings. It enhances the savory flavor profile, balancing the salt and enriching the dish's overall experience. - 1 tablespoon garlic powder
Garlic powder gives a savory kick that complements the other seasonings. It provides an aromatic depth that's hard to resist, adding complexity without overwhelming the palate. - 1 tablespoon onion powder
Onion powder contributes a subtle sweetness that pairs well with the salt and pepper. It enhances the wings' flavor without any raw onion garnish, creating a well-rounded seasoning blend. - 2 tablespoons vegetable oil
Vegetable oil is vital for achieving crispy skin, especially if you're baking the wings. It helps distribute heat evenly and adds a subtle richness to the flavor. - Optional: Fresh herbs or scallions for garnish
Adding fresh herbs or scallions as a garnish brightens the presentation and adds a fresh note to each bite. They can bring a lovely color contrast and a burst of flavor without overwhelming the dish.
Directions & Preparation
Step 1: Preheat your oven to 425°F (220°C).
Preheating the oven is crucial for even cooking and achieving that coveted crispy skin on the wings. A hot oven will kickstart the cooking process, ensuring the outside gets golden brown while the interior remains succulent and tender.
Step 2: Pat the chicken wings dry using paper towels.
Drying the chicken wings thoroughly removes excess moisture which is key for achieving a crispy skin during cooking. Moisture prevents the skin from frying up nicely, so don't skip this important step.
Step 3: In a large bowl, combine the salt, pepper, garlic powder, and onion powder.
Mixing the dry ingredients beforehand ensures that every wing gets an equal coating of flavor. This step is essential for a consistent taste throughout the dish, creating that irresistible crunch and savory experience.
Step 4: Add the wings to the bowl and toss with vegetable oil, making sure they are well-coated.
Coating the wings with oil before seasoning helps the dry rub stick better and promotes crispiness while cooking. It also enhances flavor, allowing the spices to integrate deeply into the skin.
Step 5: Sprinkle the seasoning mixture over the wings and toss again until evenly coated.
Creating an even coverage of spices guarantees that every mouthful of wing has that signature salt and pepper flavor. Proper tossing helps prevent clumping of spices and ensures all wings absorb the delicious flavors.
Step 6: Arrange the wings in a single layer on a baking sheet lined with parchment paper or a wire rack.
Spacing the wings on the baking sheet allows hot air to circulate evenly around them, leading to uniform cooking. Using a wire rack elevates the wings off the pan, allowing fat to drip away and enhancing crispness.
Step 7: Bake in the preheated oven for 40-45 minutes, flipping halfway through.
Baking at high heat ensures the wings develop a crispy skin while rendering down the fat for a delicate balance of texture and flavor. Flipping halfway ensures even browning and avoids sogginess on one side.
Step 8: Remove from the oven and let cool for a few minutes before serving.
Allowing the wings to cool slightly lets the coating set, intensifying the flavors and ensuring easier handling. Serving them immediately after resting will enhance the overall dining experience.

Flavor Variations for Salt & Pepper Wings
While the classic salt and pepper seasoning is delightful on its own, experimenting with different spices can elevate your wings to new heights. Consider adding a dash of paprika for smokiness, or some cayenne pepper for an extra kick. You could also incorporate citrus zest for brightness or even a drizzle of hot sauce for those who crave heat. The possibilities are endless, so don’t hesitate to tailor this dish to suit your taste.
Pairing Suggestions for Your Wings
Salt and pepper wings can be enjoyed in many ways. For a casual gathering, serve them alongside a variety of dipping sauces like ranch or blue cheese for a cooling contrast. If you want to create a more substantial meal, pair them with a fresh salad, roasted vegetables, or even some creamy coleslaw for a perfect balance of flavors and textures. The fun lies in personalizing your serving suggestions!
The Science Behind Crispy Wings
Achieving the perfect crispy wing involves understanding a bit of culinary science. The high baking temperature causes the moisture on the skin to evaporate quickly, leading to that desirable crunch. Additionally, the salt in the seasoning draws out moisture, allowing the heat to create a caramelization effect. By managing temperature and moisture, you're orchestrating a delightful crunch that enhances the wings' overall flavor.
FAQs
What can I do if my wings turn out too salty?
If your wings are too salty, serving them with a side of unsalted dipping sauce can help balance the flavors. Alternatively, accompany them with fresh vegetables to mitigate the saltiness.
My wings are soggy; what went wrong?
Soggy wings usually result from excess moisture. Make sure to dry the wings thoroughly before seasoning, and consider using a wire rack for better airflow during baking to prevent moisture buildup.
What if I want to make a smaller batch of wings?
To make a smaller batch, simply halve the ingredient quantities while maintaining the same cooking times. Adjusting amounts ensures you get the same delicious flavor and texture without waste.
Can I use fresh garlic instead of garlic powder?
Fresh garlic can be used, but it will change the dynamics of the seasoning. Use about 1-2 cloves of minced garlic for a more intense flavor, keeping in mind it may require less baking time as it can burn more easily.
How can I make my wings spicier?
To add heat to your wings, increase the amount of black pepper or add crushed red pepper flakes to the seasoning. For a bolder flavor, consider tossing the wings in a spicy sauce after baking for an extra kick.
Why are my wings unevenly cooked?
Uneven cooking can happen if the wings are overcrowded on the baking sheet or if they are of varying sizes. Ensure they're in a single layer and try to select similar-sized wings for consistent cooking.
Conclusion
Salt and pepper wings are not just a comfort food staple; they also allow for creativity in the kitchen. With simple yet potent flavors, they can easily become a favorite among family and friends.
Experimenting with seasonings and cooking methods lets you personalize this dish, making it your own. Enjoy the process, and share the joy of these crispy delights with others!
Recipe Card
Savory Salt & Pepper Wings for Home Cooks
Ingredients
Method
- Preheat your oven to 425°F (220°C).
- Pat the chicken wings dry using paper towels.
- In a large bowl, combine the salt, pepper, garlic powder, and onion powder.
- Add the wings to the bowl and toss with vegetable oil, making sure they are well-coated.
- Sprinkle the seasoning mixture over the wings and toss again until evenly coated.
- Arrange the wings in a single layer on a baking sheet lined with parchment paper or a wire rack.
- Bake in the preheated oven for 40-45 minutes, flipping halfway through.
- Remove from the oven and let cool for a few minutes before serving.
Notes
Additional serving suggestions: pair with a crisp salad, garlic bread, or roasted seasonal vegetables for balance.
For make-ahead, prep components separately and assemble just before heating to preserve texture.
Taste and adjust with acid (lemon/vinegar) and salt right at the end to wake up flavors.