Introduction
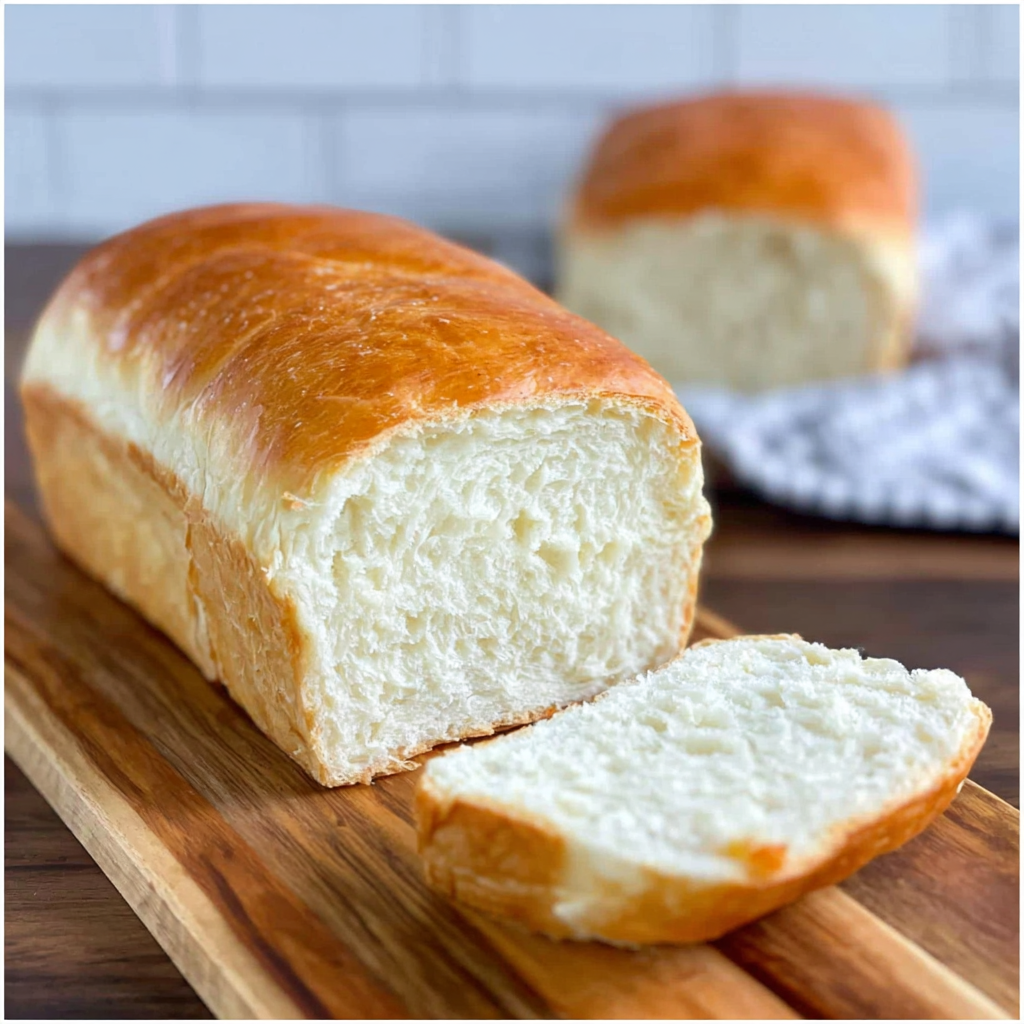
Baking homemade bread is a rewarding endeavor that fills your home with an irresistible aroma. It transforms simple ingredients into a warm, comforting staple that elevates any meal. Whether you're a novice or have some experience under your belt, the process of making bread can be both satisfying and therapeutic.
Creating bread at home allows you to experiment with flavors and techniques, ensuring you have fresh loaves tailored to your preferences. The beauty of homemade bread lies in its simplicity; just flour, water, yeast, and salt can turn into something extraordinary with a little patience and love.
Ingredients
- 4 cups all-purpose flour
Flour is the backbone of your bread, providing structure and holding the dough together. It contains gluten proteins that develop elasticity, allowing the bread to rise and maintain its shape. - 1 ½ cups warm water
Water activates the yeast, making it essential for fermentation and dough development. The warmth helps to dissolve the sugar and salt while promoting yeast growth for optimal rising. - 2 teaspoons active dry yeast
Yeast is the leavening agent that causes the dough to rise. It ferments the sugars in the flour, producing carbon dioxide which creates air pockets, giving the bread its light texture. - 2 teaspoons salt
Salt enhances flavor and controls yeast activity during fermentation. It also strengthens gluten structure, contributing to a better texture in the final loaf. - 1 tablespoon sugar
Sugar feeds the yeast, accelerating fermentation. It enhances fermentation, resulting in a lighter loaf, and also adds a subtle sweetness to the bread.
Directions & Preparation
Step 1: Prepare the yeast mixture.
In a bowl, combine warm water, sugar, and yeast. Stir gently and let it sit for about 5-10 minutes until it becomes foamy. This step activates the yeast, ensuring it is alive and capable of fermenting the dough. If the mixture does not foam, the yeast may be expired, requiring a new batch.
Step 2: Mix dry ingredients.
In a separate bowl, whisk together the flour and salt. This ensures that the salt is evenly distributed, which is crucial for flavor and yeast control. Mixing the dry ingredients separately helps prevent direct contact between the salt and yeast, which could inhibit the yeast's effectiveness.
Step 3: Combine wet and dry ingredients.
Make a well in the center of the dry ingredients and slowly pour in the yeast mixture. Using a wooden spoon or your hands, mix until it forms a shaggy dough. This is where gluten formation begins, supporting the structure in the final bread. Don't be alarmed if the dough appears sticky; it will come together with kneading.
Step 4: Knead the dough.
Transfer the dough to a floured surface and knead for about 8-10 minutes until smooth and elastic. Kneading develops gluten, which will trap air during fermentation, allowing the dough to rise properly. A well-kneaded dough should be tacky but not overly sticky, forming a nice ball when shaped.
Step 5: First rise.
Place the kneaded dough in a lightly oiled bowl, cover it with a damp cloth, and let it rise in a warm area for 1-2 hours or until doubled in size. This step is crucial for flavor development and texture. A draft-free environment helps the dough rise efficiently; you can also place it in an oven that's turned off but warm.
Step 6: Shape the dough.
After the first rise, gently deflate the dough (punch it down) and transfer it to a floured surface. Shape it into a loaf or rolls as desired. This step allows you to redistribute the yeast, sugars, and air bubbles that developed during the first rise, which is essential for a uniform texture in the final bread.
Step 7: Second rise.
Place the shaped dough into a greased loaf pan or on a baking sheet. Cover it again with a cloth and let it rise for another 30-45 minutes. This second rise enhances the bread's texture and volume, with the dough continuing to ferment and develop flavor.
Step 8: Preheat the oven.
While the dough is rising, preheat your oven to 375°F (190°C). A properly preheated oven ensures that the bread starts to bake at the right temperature, creating a good crust while sealing in moisture for a soft interior.
Step 9: Bake the bread.
Bake the dough for 25-30 minutes or until the loaf is golden brown and sounds hollow when tapped on the bottom. Baking is essential for developing the bread's crust and fully cooking the insides. If the top browns too quickly, cover it with aluminum foil to prevent burning while the crust sets.
Step 10: Cool before slicing.
Remove the bread from the oven and let it cool in the pan for 10 minutes, then transfer it to a wire rack to cool completely before slicing. Allowing the bread to cool helps the structure set, ensuring clean slices rather than squished bread. Slicing too soon can result in a gummy texture.

Exploring Add-Ins for Flavor
Homemade bread is a canvas for your culinary creativity. Consider adding ingredients like herbs, cheeses, nuts, or dried fruits to elevate the flavor. Incorporating olives or sun-dried tomatoes can create a savory loaf, while cinnamon and raisins add a touch of sweetness. It’s a great way to customize your bread to match your meals.
Texture Matters: Crust vs. Crumb
The texture of your homemade bread can greatly affect your culinary experience. The crust contributes to the bread’s overall flavor and appearance, creating that satisfying crunch when you take a bite. Meanwhile, the crumb—the inside of the bread—should be soft yet chewy. Adjusting baking time and temperature can yield varying crust and crumb textures to suit your preferences.
The Science of Rising
Understanding dough rising can take your bread-making skills to the next level. The rising process involves not just fermentation, where yeast produces carbon dioxide, but also gluten development that traps those gas bubbles. Factors such as temperature, humidity, and ingredient proportions all influence the effectiveness of this process, making it a delicate balance worth mastering.
FAQs
Why is my bread dense?
Dense bread can result from under-kneading, insufficient rising time, or too much flour. Ensure you knead until smooth and allow the dough to rise fully in a warm spot.
How do I know when my dough is ready to rise?
Dough is ready when it has roughly doubled in size and has a slightly domed appearance. Pressing a finger gently into the dough should leave an indentation that slowly springs back.
Can I use whole wheat flour instead of all-purpose flour?
You can substitute whole wheat flour, but consider starting with a smaller ratio (about 25%) mixed with all-purpose flour. Whole wheat absorbs more moisture, so additional water may be needed.
How do I fix bland bread?
If your bread tastes bland, consider adding more salt, herbs, or dairy. Salt is key to enhancing the flavors of bread, while herbs and cheeses can add depth and character.
What if my dough is too sticky?
A sticky dough can be managed by adding small amounts of flour gradually during kneading. Be careful not to add too much, as it can make the bread dry.
Why does my crust burn before the bread is done?
If your crust is browning too quickly, try reducing the oven temperature by 25°F and covering it with foil if necessary. This way, the inside can cook thoroughly without over-browning the crust.
Conclusion
Baking homemade bread opens a world of flavor and satisfaction right in your kitchen. With practice, you'll refine your technique and discover the joy of sharing your creations with family and friends. Remember, each loaf tells a story of creativity and patience, making each baking session a unique experience.
So roll up your sleeves, unleash your inner baker, and dive into the delightful world of homemade bread. Your taste buds will thank you!
Recipe Card
The Art of Baking Homemade Bread at Home
Ingredients
Method
- Prepare the yeast mixture.
- Mix dry ingredients.
- Combine wet and dry ingredients.
- Knead the dough.
- First rise.
- Shape the dough.
- Second rise.
- Preheat the oven.
- Bake the bread.
- Cool before slicing.
Notes
Additional serving suggestions: pair with a crisp salad, garlic bread, or roasted seasonal vegetables for balance.
For make-ahead, prep components separately and assemble just before heating to preserve texture.
Taste and adjust with acid (lemon/vinegar) and salt right at the end to wake up flavors.